Printing in Excel – Tricks You Need to Know
Printing in Excel – Tricks You Need to Know. In today’s article, I will guide you through all the tips and tricks for printing in Excel to help you master this important feature and work more efficiently.
Printing in Excel – Create a Print Preview and Print button
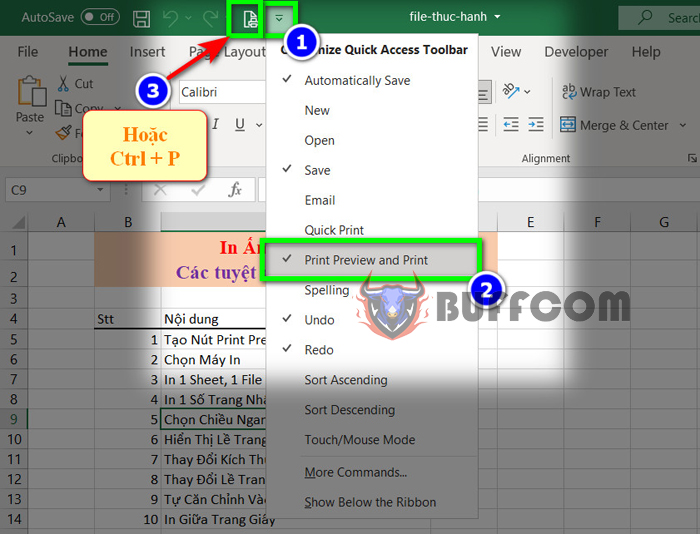
To do this, first click on the Access Toolbar button, then click on Print Preview and Print. This will make it more convenient for you to print multiple copies because it will take you directly to the preview.
Printing in Excel – Tricks You Need to Know
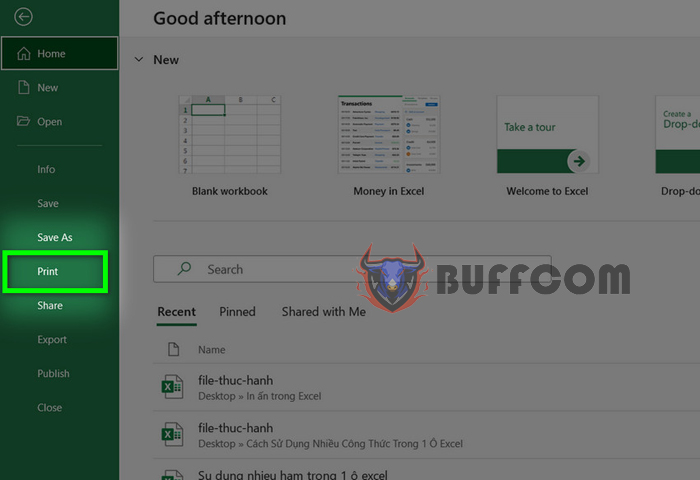
Alternatively, you can press the Ctrl + P key combination to create a preview.
Additionally, you can also go to File -> select print to create a preview.
Printing in Excel – Tricks You Need to Know
You should create a button to perform the job most efficiently.
Select a printer
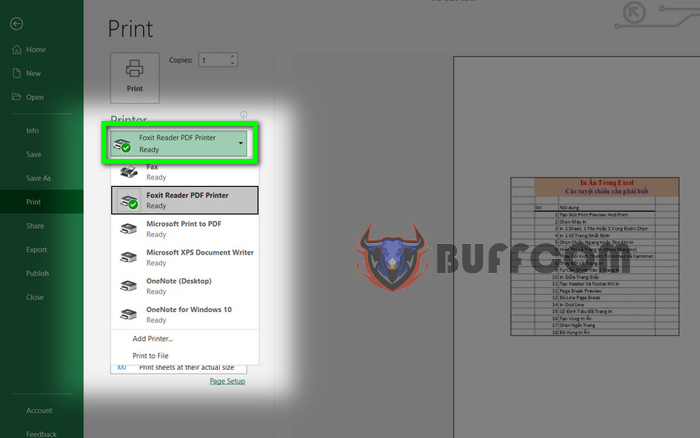
In the Printer section of the preview, you will check and select the appropriate printer. Remember to choose to print to PDF or to paper.
Printing in Excel – Tricks You Need to Know
Print one sheet, one file, or one area
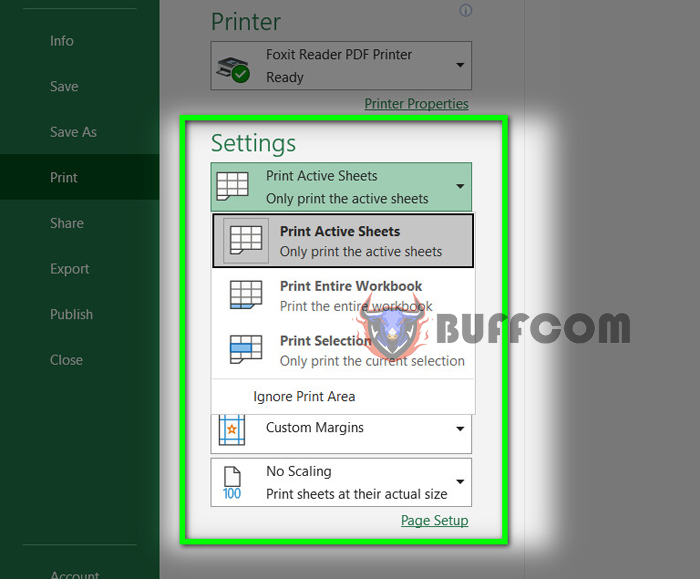
Still in the Print window, go to the Settings section where you will see three options.
Printing in Excel – Tricks You Need to Know
Print Active Sheet means printing the currently active sheet.
Print Entire Workbook means printing the entire file, including all sheets.
Print Selection is when you select the data area you want to print before going to the Settings section to print only that area.
Print a specific number of pages
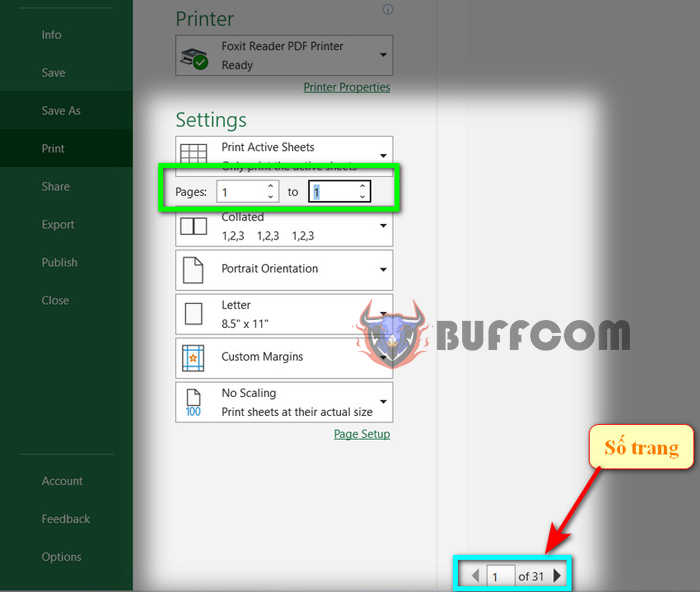
For example, if you have many pages on one sheet and you only want to print one or a few pages, go to the Pages section in Settings and specify the starting and ending pages. If you only want to print page 4, set Pages to 4 and To to 4. If you want to print pages 1 to 3, set Pages to 1 and To to 3.
Printing in Excel – Tricks You Need to Know
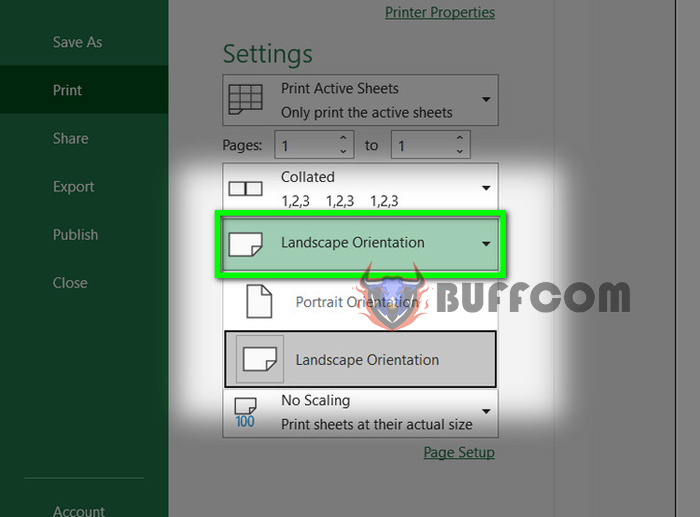
Select Landscape or Portrait orientation when printing
Still in the Settings section, select Portrait Orientation to print on paper vertically or Landscape to print on paper horizontally.
Printing in Excel – Tricks You Need to Know
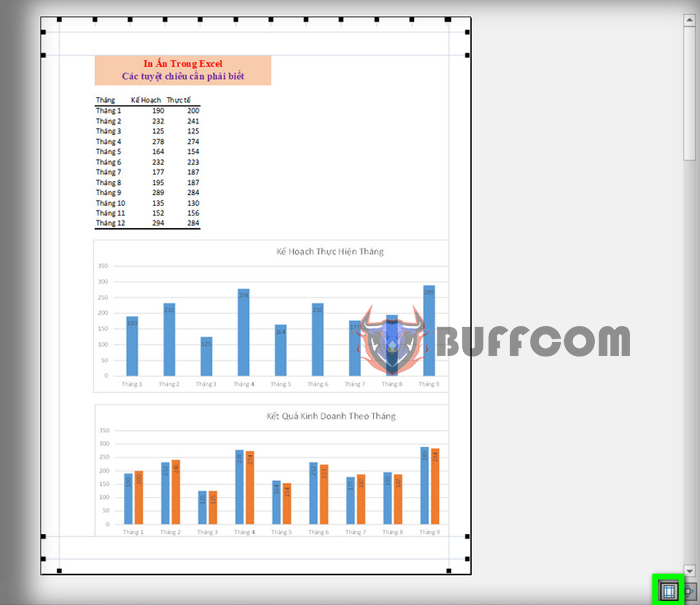
Show Margins
In the Print window, pay attention to the Show Margins icon at the bottom right. Clicking on it will allow you to adjust the margins of the paper.
Printing in Excel – Tricks You Need to Know
Here you can adjust the margins of the paper to your liking by dragging the margin lines.
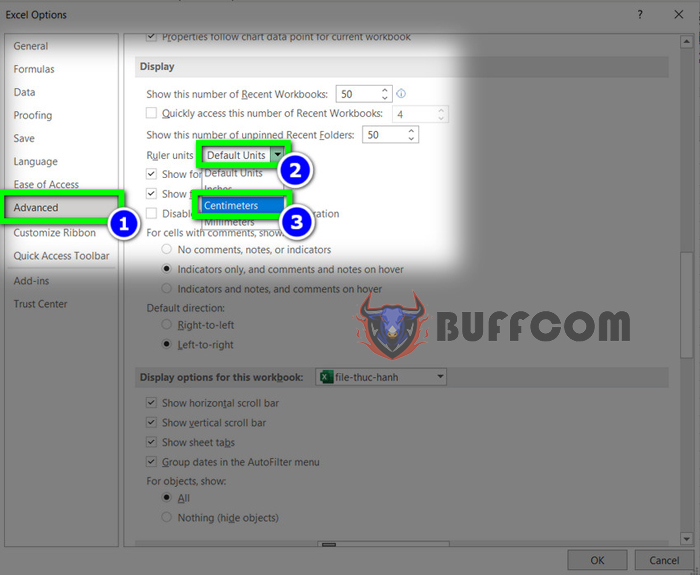
Changing the Size from Inches to Centimeters
Excel’s default unit is Inches, so if you want to change it to Centimeters for easier use, go to the File tab, select Options -> Advanced, then scroll down to the Display section under Ruler Unit and select Centimeters.
Printing in Excel – Tricks You Need to Know
Now all units are changed to Centimeters.
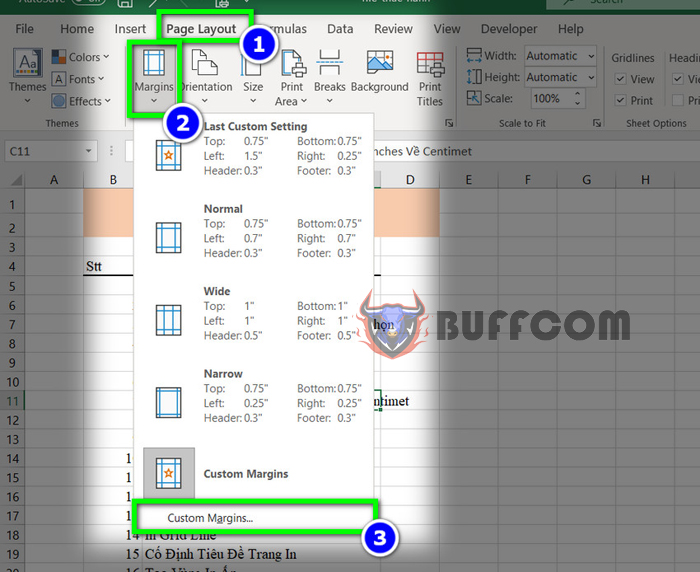
Changing Page Margins
To change page margins, go to the Page Layout tab, select Margins, and then Custom Margins to adjust the margins according to your preferences.
Fitting onto One Page
When your data is too long or wide to fit on one page, Excel will split it into two pages. To fit it onto one page, go to the Print tab, select Settings, then choose No Scaling and Fit Sheet on One Page. This will reduce the size of the sheet to fit onto one page.
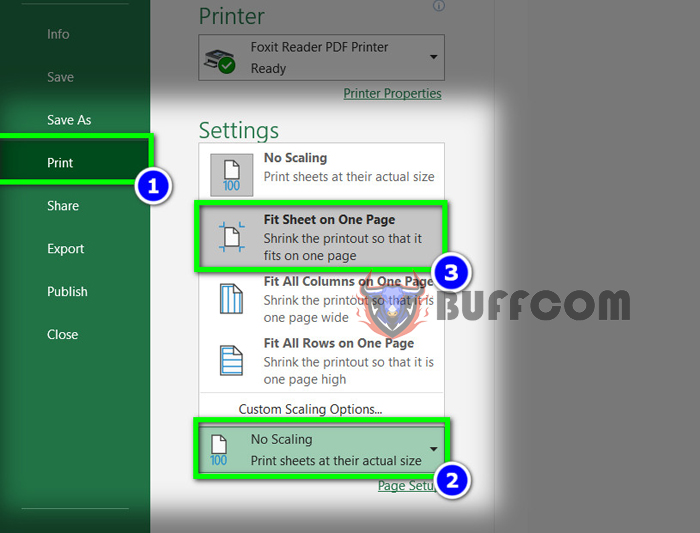
Now your data will fit onto one page.
Centering on the Page
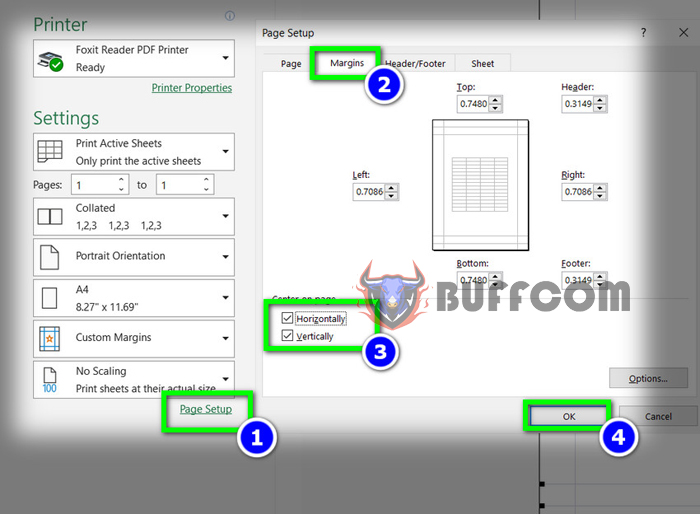
To center your data on the page, go to the Print tab, select Page Setup, and then Margins. Under Center on Page, select both options to center your data on the page.
Creating Headers and Footers
To create headers and footers, go to the Page Layout tab, select Print Titles, and then Header and Footer.
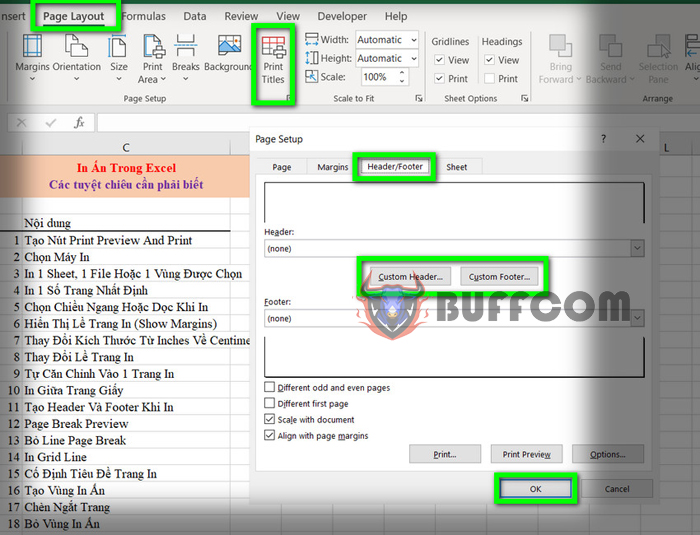 Under Custom Header and Custom Footer, you can add headers and footers to your preferences. The header is the top of the page, and the footer is the bottom of the page. You can use them to print names in the header, display page numbers in the footer, or insert any content you want.
Page Break Preview
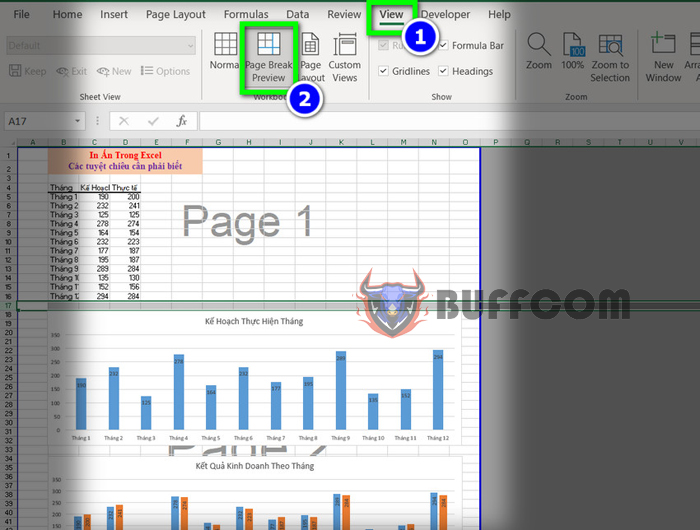
If you have one page of data that you want to split into two pages, you can do so by selecting the row that separates the two pages, then go to the Page Layout tab, select Breaks, and then Insert Page Break.
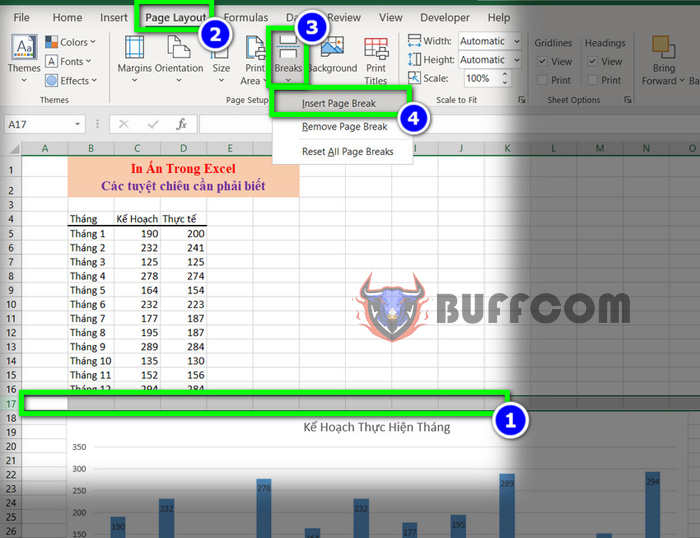 After that, you can go to the View tab and select Page Break Preview to view the number and alignment of the pages.
 Here’s the English translation:
So you can adjust the page numbers according to your preference using this method.
Remove Line Page Break
After you apply a Page Break, a dotted Line Page Break appears. If you want to hide it and make it look normal, go to the File tab, select Advanced, scroll down to Display options for this worksheet, and uncheck Show page break.
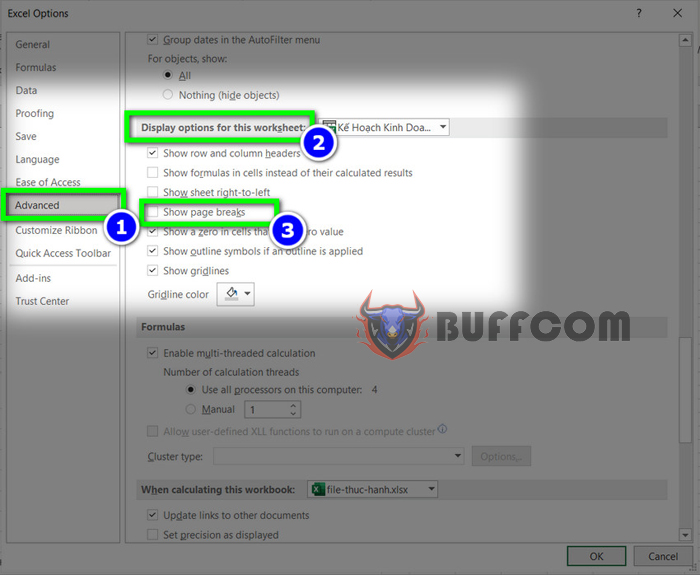 Now the dotted line has been completely hidden.
Print Gridlines
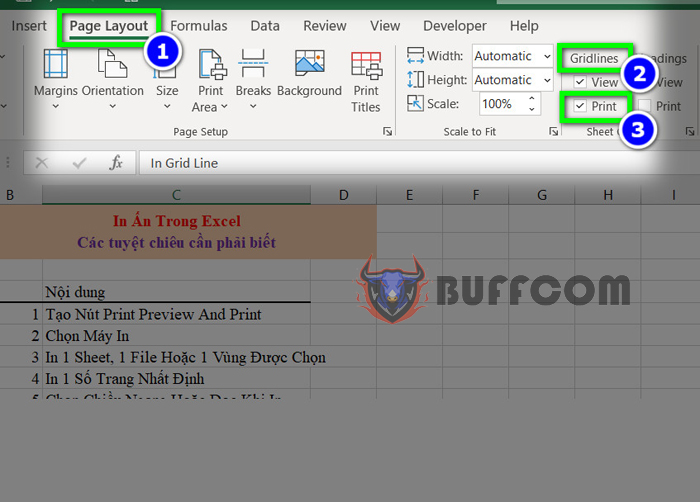
If you want to print the gridlines of Excel cells, do the following: go to the Page Layout tab and check Print in the Gridlines section.
Now you can print the gridlines just like in Excel.
Fix Print Titles
If you want to print a data title on multiple pages without losing it on the next page, do the following: go to the Page Layout tab, select Print Titles, select the Sheet tab, click on the icon of the row you want to repeat, and it will automatically switch to the current sheet for you to select the row to repeat. After selecting, click the icon again and then click OK.
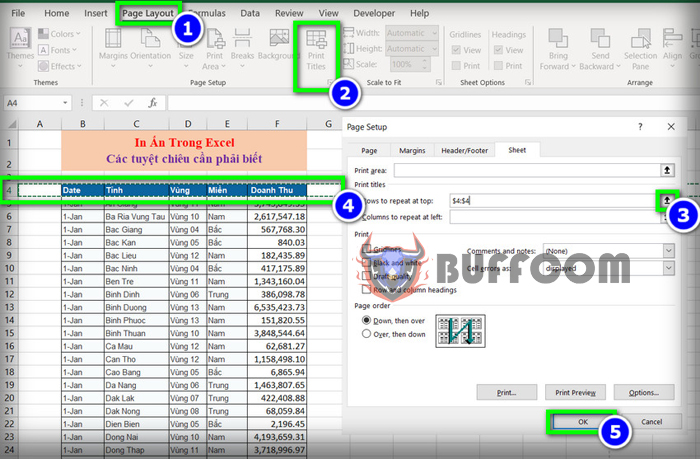 Now the title will be printed by default on the next pages.
Create Print Area
If you want to print a specific data area, select that area and go to the Page Layout tab, select Print Area, and then click Set print area to print. To clear the print area, select Clear print area.
That’s all the content Buffcom shared today. Good luck!

