How to disable one or more keys on a Windows 10 keyboard?

You may have a key on your Windows keyboard that you never use, but sometimes accidentally press. Or perhaps a key is stuck and no longer working. A simple way to address such key issues is to completely disable that specific key. However, don’t worry, as it won’t be permanently disabled. You can always reactivate it whenever you need it.
How to disable one or more keys on a Windows 10 keyboard?
Here are the simplest methods to disable any specific key:
1. Use the KeyTweak application
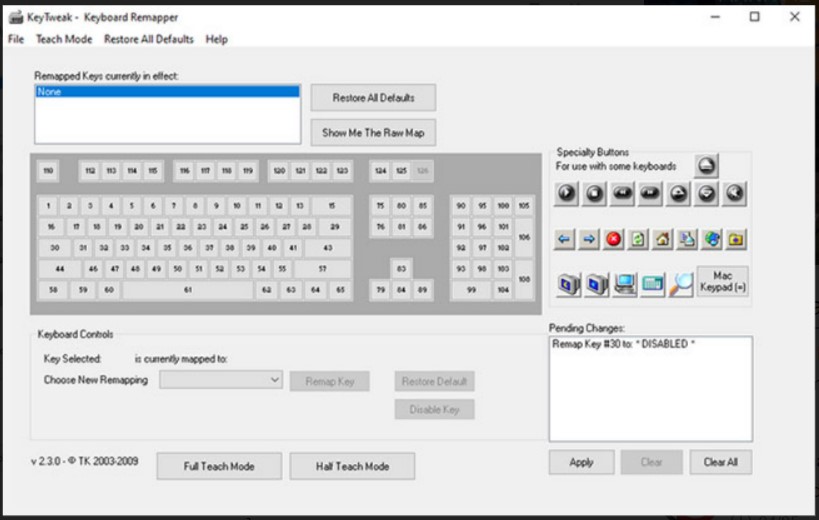
KeyTweak is a free tool that allows you to disable any specific key on your Windows keyboard. All you have to do is select a specific key and then proceed to disable it. Follow the steps below to get started:
Step 1: Download and run KeyTweak.
Step 2: Select the key that you want to disable.
Step 3: In the Keyboard Controls section, select Disable Key.
Step 4: Click on Apply. 
You will then be prompted to restart your PC for the changes to take effect. Afterward, the key you selected will be disabled upon reboot.
Reactivating disabled keys However, if later on, you decide to reactivate all the disabled keys, all you have to do is reopen the application and click on Restore All Defaults. Then restart quickly and your keyboard keys will be back to working again.
2. Use AutoHotkey
AutoHotkey is a free scripting language used to automate repetitive tasks on Windows 10. You can also use it to disable a specific key in Windows. First, let’s look at the list of supported keys from the official AutoHotkey website: https://www.autohotkey.com/docs/KeyList.htm
If the key you want to disable is supported, download AutoHotkey and follow the steps below:
Step 1: Open any text editor and type the key’s reference name, followed by ::return. You can find the reference name from the link provided. Here, for simplicity, we will disable the Caps Lock key.
Step 2: Save this script (using the .ahk extension) in a safe location that you can easily find.
Step 3: Double-click on the newly created script. 
This operation will start the AutoHotKey script and the specific key will be disabled. If you need to use this key again in the future, you just need to stop the AutoHotkey script and the setting will return to normal. To do this, right-click on the H icon in your taskbar and select Suspend Hotkeys.
In conclusion, disabling a specific key on your keyboard can be a simple process with the help of AutoHotkey. By following the steps outlined above, you can easily create a script that will disable the desired key and save it for future use. Remember that if you need to use the disabled key again in the future, you can simply stop the AutoHotkey script and your settings will return to normal. At Buffcom.net, we hope this guide has been helpful to you, and we wish you success in your endeavors. Thank you for choosing Buffcom.net as your trusted source for all your tech needs. Good luck!


