3 Easy Ways to Break and Remove Page Breaks in Word
Breaking a page in Word may seem like a simple task, but it can be difficult for many people. Especially if you are a student or office worker, you will often have to compose and edit Word documents. Sometimes you may want to insert additional data or images, but using the Enter key can cause the previously composed Word pages to become misaligned.
If you are in this situation, let Buffcom.net help you with 3 ways to break pages in Word!
Understanding the Page Break Feature in Word
Page Break, also known as Page Break in English, is a very useful feature. It allows you to quickly break the current page and move to the next page. From there, your text will be more logical and coherent.
Usually, this feature is most commonly used for those who are working on theses, dissertations, reports, essays, etc. that often have a title page, table of contents,…
3 Quick and Easy Ways to Break Pages in Word
Step 1: Select the desired position to break the page in Word.
 Step 2: Break the page.
- Method 1: Select Insert -> Page break
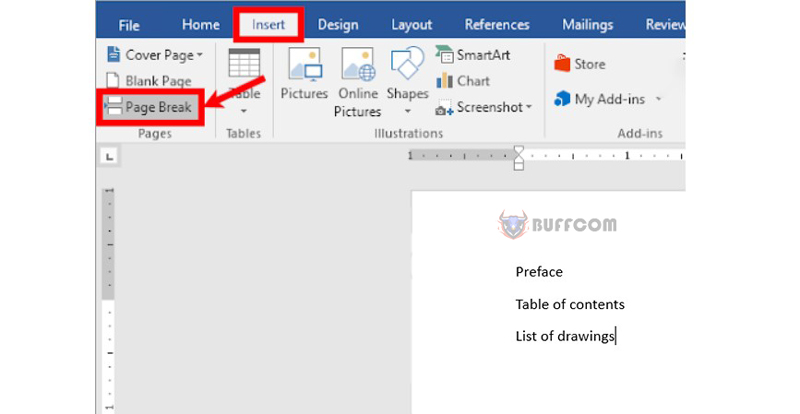
- Method 2: Press the Ctrl + Enter shortcut key
- Method 3: Select Layout -> Breaks -> Page
Immediately after performing one of the above 3 methods, the text after the mouse cursor will be immediately broken onto a new page below.
How to Remove Page Breaks in Word
In case you want to remove page breaks in Word, you can also perform the following 3 methods:
Method 1: Manually remove page breaks
Step 1: Select Home and then select the Show/Hide icon in the Paragraph section.
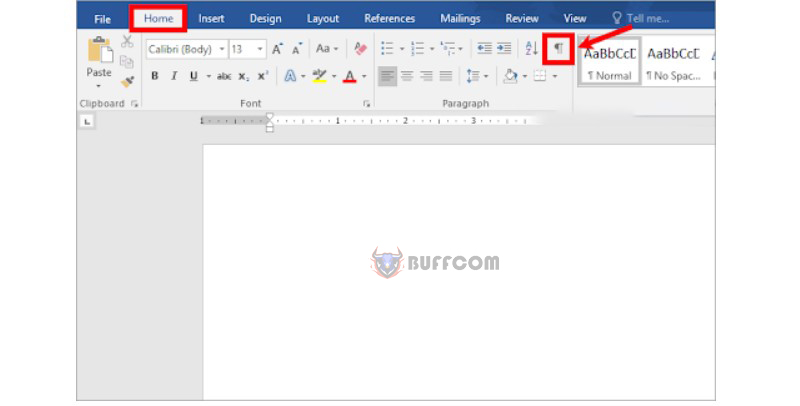 Step 2: When page breaks (if any) appear in the Word document, simply select the page break you want to remove and press Delete.
Method 2: Remove All Page Breaks in Word
If you want to remove all page breaks in Word without spending too much time, you can use the following method:
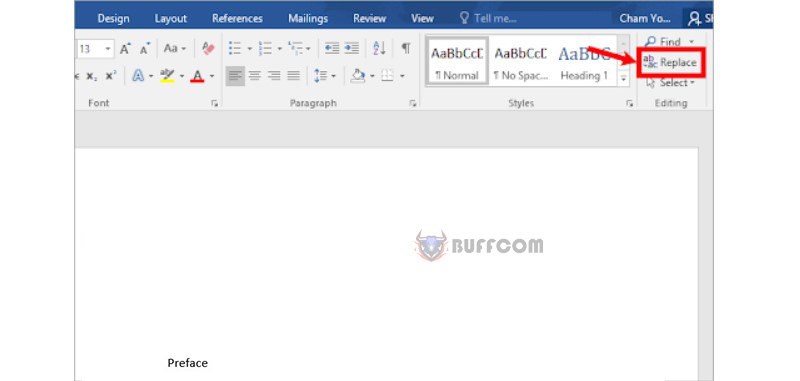
Step 1: Select Home -> Replace or press the shortcut key Ctrl + H to open the Find & Replace dialog box.
 Step 2: In the Find and Replace dialog box, place the cursor in the “Find what” box, then select “More.”
Step 3: Next, select “Special” -> “Manual Page Break.”
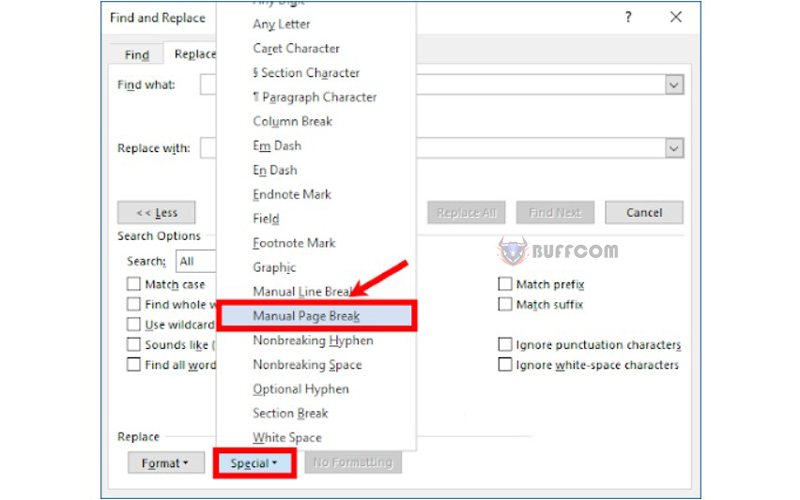 When “^m” appears in the “Find what” box, select “Replace All” to replace all of them.
Close the Find and Replace dialog box, and you will remove all page breaks in Word.
Method 3: Adjust Automatic Page Breaks in Word
To prevent automatic page breaks from appearing where you don’t want them to, you can follow these steps:
Step 1: Select the text you want to break.
Step 2: Select the Layout tab, then in the Paragraph section, select the Paragraph Settings icon to open the Paragraph dialog box.
Step 3: In the Paragraph dialog box, select the Line and Page Breaks tab, then select the checkbox next to the option you want to customize.
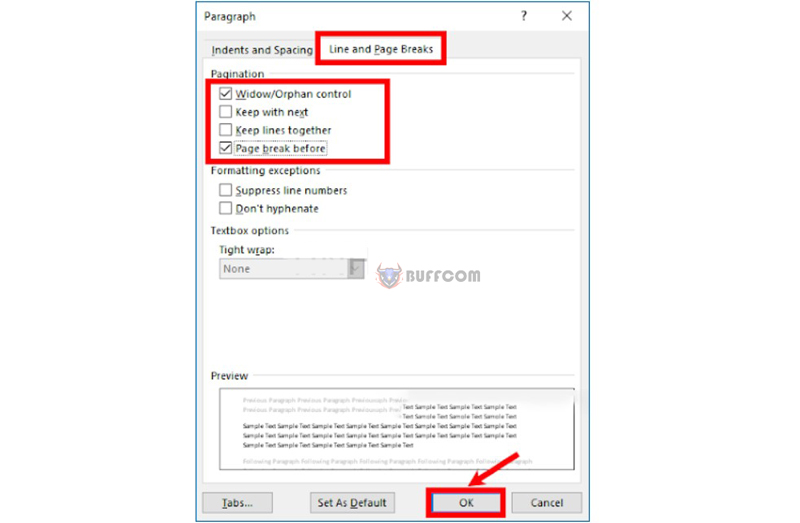
- Widow/Orphan control: Keep at least two lines of a paragraph at the beginning or end of a page.
- Keep with next: Prevent a page break between paragraphs that you want to keep together.
- Keep lines together: Prevent a page break within a paragraph of text.
- Page break before: Insert a page break before a specific paragraph.
- Click OK to confirm the settings.
Above is the article that shares with you how to insert and remove page breaks in Word. Hopefully, through this article, you will have a better understanding of the page break feature and how to use it in Word documents when necessary.
Additionally, you can refer to many other helpful tips when using Word on the Buffcom.net website. If you need it, you can also purchase a genuine Office software license at Buffcom.net!


