3 Methods to Select Visible Cells in Microsoft Excel

If you need to exclusively select the visible cells within a range in Excel, there are specific techniques you can employ. Although Excel offers features like hiding, filtering, and grouping rows of data, selecting a range may include hidden cells by default, which may not be the desired outcome.
For instance, a common scenario is when you want to copy and paste only the visible values from a range. In such cases, you can utilize different methods to achieve this goal. This article will delve into several approaches for selecting only the visible cells in Excel.
Select Visible Cells with a Keyboard Shortcut
 When dealing with a dataset in Excel that includes hidden rows or filtered data, it’s important to select only the visible cells when performing actions like copying and pasting. By default, selecting a range may include hidden cells, which can lead to undesired outcomes. However, Excel provides built-in methods to address this issue.
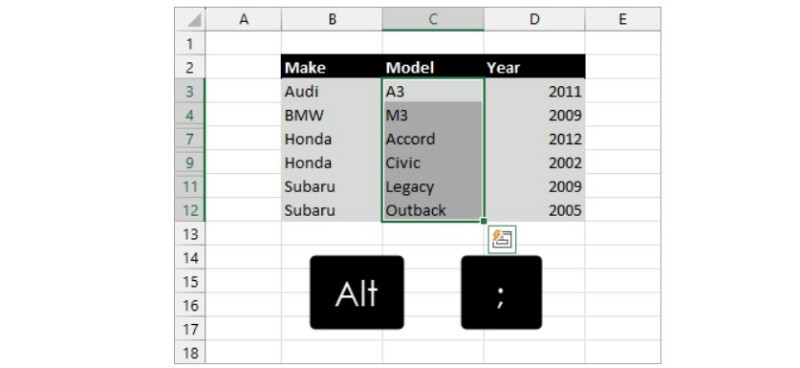
One of the easiest ways to select only the visible cells is by using a keyboard shortcut. Here’s how:
- Begin by selecting the full range of cells as you would normally do.
- Press the Alt + ; (semicolon) keyboard shortcut.

- You will notice that the active range’s green border disappears, and only the visible cells are now selected. These cells will appear as a disjointed set of light grey cells, indicating that only the visible cells are included in the selection.

- To copy the visible cells, press Ctrl + C. As you do so, the green dashed border will appear around each set of visible cells, clearly indicating which cells will be copied.
By utilizing this keyboard shortcut, you can easily and accurately select only the visible cells in your Excel worksheet, ensuring that your copying and pasting actions exclude any hidden or filtered data.
Select Visible Cells with the Go To Special Menu
To exclusively select visible cells in your Excel sheet, you can utilize the Go To menu, which offers various criteria for selecting cells based on their content or properties. This includes the option to select only visible cells.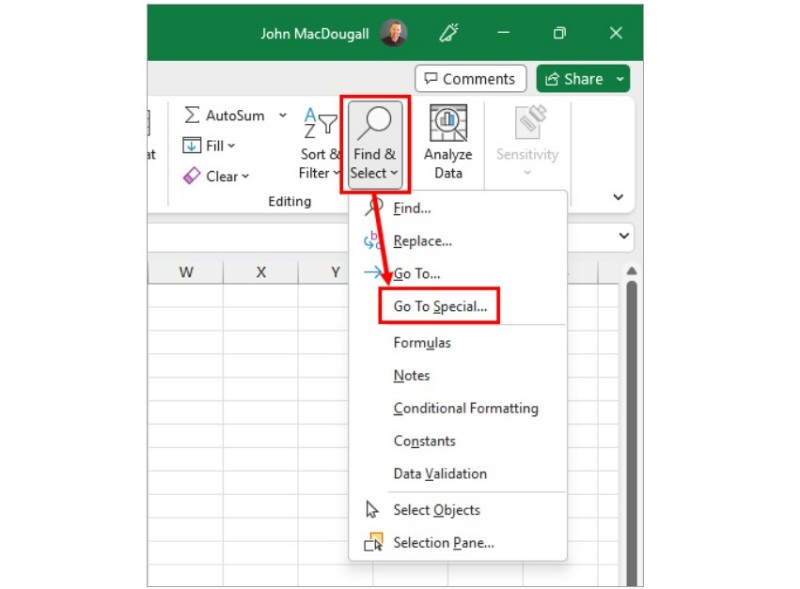
Follow these steps to select visible cells using the Go To Special menu:
- Begin by selecting the full range of cells that contains the visible cells you wish to select.
- Navigate to the Home tab.
- In the Editing section, click on the Find & Select command.
- From the dropdown menu, select the Go To Special option.
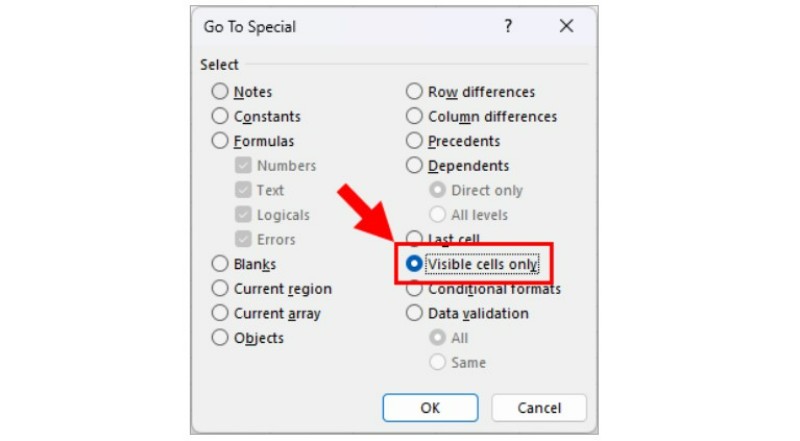
- In the Go To Special menu, choose the “Visible cells only” option.
- Click the OK button.
By following these steps, Excel will select only the visible cells within your original selection. It’s worth noting that you can also access the Go To menu using a keyboard shortcut. Simply press Ctrl + G to open the Go To menu, and then click on the “Special” button to open the Go To Special menu.
Using the Go To Special menu provides a convenient way to specifically select visible cells in Excel, enabling you to work with and manipulate only the visible data without including any hidden or filtered content.
Select Visible Cells with the Quick Access Toolbar
If you frequently find yourself needing to select only the visible cells for copying and pasting, you can add this command to the Quick Access Toolbar for easy access with a single click. Although it’s not a default option in the ribbon, you can customize the toolbar to include this command.
Here’s how you can add the Select Visible Cells command to the Quick Access Toolbar:
- Right-click anywhere on the Quick Access Toolbar.
- From the menu that appears, select “Customize Quick Access Toolbar.” This will open the Excel Options menu with the Customize Toolbar section, where you can add new commands.
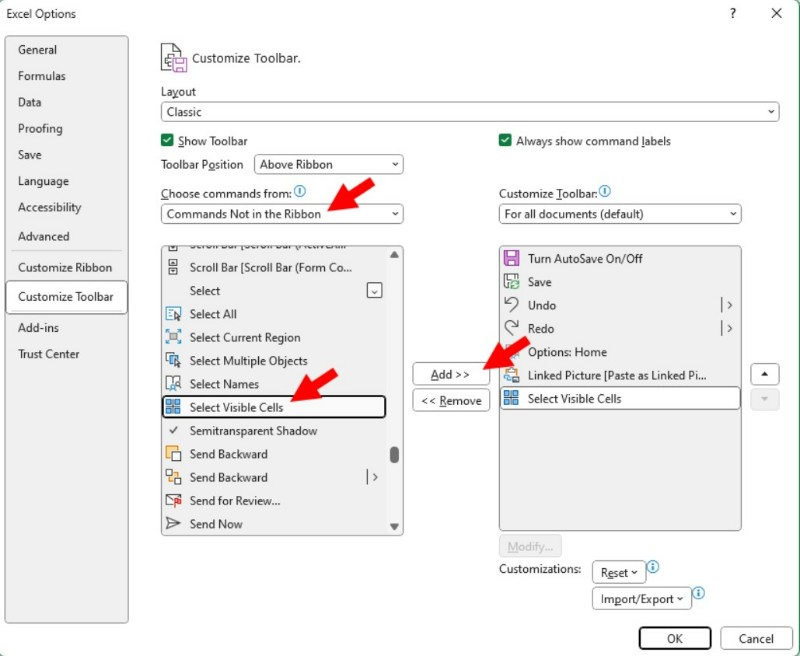
- In the Excel Options menu, select “Commands Not in the Ribbon.”
- Scroll down the list of commands and click on “Select Visible Cells.”
- Click on the “Add” button to add the command to your toolbar.
- Press the “OK” button to save the changes.
Now you should see the “Select Visible Cells” command in your Quick Access Toolbar. You can use this command to easily select only the visible cells within a range.
To select visible cells using the Quick Access Toolbar:
- Select the range of cells that you want to work with.
- Click on the “Select Visible Cells” command in the toolbar.
Now, only the visible cells within the selected range will be selected, allowing you to perform actions such as copying and pasting without including any hidden or filtered content.
In conclusion, selecting only the visible cells from a range is an essential step when dealing with hidden rows or columns. You can quickly reduce your selected range to only the visible cells using shortcuts, the Go To menu, or by adding the Select Visible Cells command to the Quick Access Toolbar. Let us know in the comments below if you were aware of this handy feature!

