How to Group and Ungroup Worksheets in Microsoft Excel

If you find yourself needing to group or ungroup sheets within your Excel workbook, there are several techniques available to simplify your tasks. Grouping sheets in Excel allows you to efficiently perform actions across multiple similar sheets simultaneously. By grouping sheets, any actions performed on the active sheet will be applied to all the grouped sheets, eliminating the need for individual modifications. However, it’s important to ungroup the sheets afterwards to prevent unintended changes. This article will explore four methods for effectively grouping and ungrouping worksheets in Excel, enabling you to optimize your Excel workflow.
How to Group Worksheets
When you need to work on multiple sheets simultaneously, grouping them together in Excel is a straightforward process, offering several options to suit your needs. Here are some methods to accomplish this:
Group Sheets with the Ctrl Key:

- Select the first sheet you want to group.
- Hold down the Ctrl key.
- Click on the sheet tab of each additional sheet you want to include in the group.
- To remove a sheet from the group, hold the Ctrl key and click on the tab of the grouped sheet.
Group Sheets with the Shift Key:
- Select the first sheet you want to group.
- Hold down the Shift key.

- Click on the tab of the last sheet you want to include in the group.
- All the sheets between the first and last sheet will be grouped.
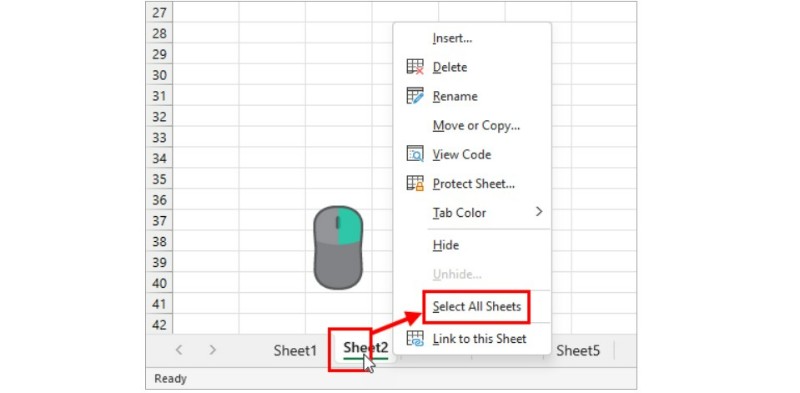
Group Sheets with the Right-Click Menu:
- Right-click on any sheet tab in the workbook.
- From the menu, select “Select All Sheets.”
- This will group all the sheets in your workbook.

How to Determine if Sheets are Grouped:
 There are two indicators to help you determine if any sheets in your workbook are grouped:
- The “Group” tag appears at the top of the workbook, next to the file name, indicating that you are working with grouped sheets.
- The grouped sheets will have a white color tab, distinguishing them from ungrouped sheets.

If these indicators do not appear in your workbook, it means that your sheets are not currently grouped.
Grouping sheets in Excel provides a convenient way to perform consistent actions across multiple sheets simultaneously. Be sure to ungroup the sheets when you have completed your tasks to avoid unintended modifications.
How to Ungroup Worksheets
After you’ve finished working with grouped sheets, it’s crucial to ungroup them to prevent any unintended modifications across the sheets. Fortunately, ungrouping sheets is a simple task. Here are two methods to accomplish this:
Ungroup Sheets by Selecting a Single Sheet:
- If all sheets in the workbook are grouped, select any sheet other than the active sheet, and the sheets will be automatically ungrouped.
- If only some sheets are grouped, select any ungrouped sheet, and the grouping will be removed.

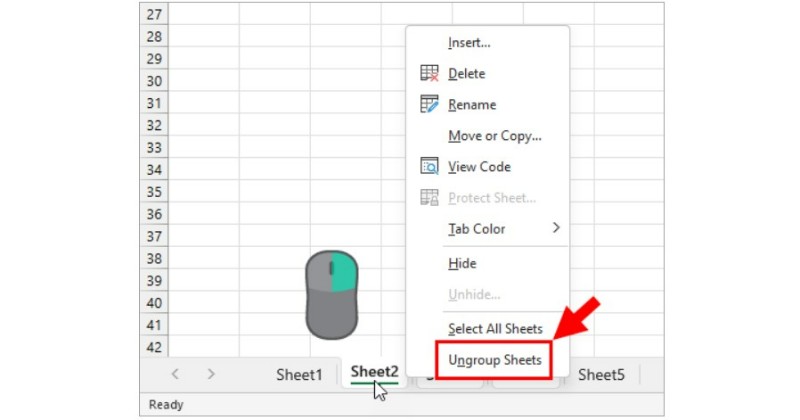
Ungroup Sheets with the Right-Click Menu:
- Regardless of the grouping status, you can always ungroup sheets using the right-click menu.
- Right-click on any of the grouped sheets.
- From the menu, select “Ungroup Sheets.”

- All sheets will be ungrouped.
Conclusion: Grouping sheets in Excel enables you to efficiently perform tasks across multiple sheets simultaneously, saving you time and effort. Whether using the Ctrl or Shift keys, the right-click menu, or VBA, grouping sheets is a straightforward process. However, remember to ungroup the sheets once you’ve completed your work to avoid unintended changes. Have you utilized grouped sheets? Share your experience and purposes in the comments section!


