• Microsoft Office
  • Microsoft Windows
  • Other Software
  • Anti Virus
  • Blog
    • Word
    • Excel
    • Powerpoint
    • Software tricks/tips
  • POLICIES
    • PAYMENT GUIDE
    • SHIPPING POLICY
    • REFUND POLICY
    • TERMS & CONDITIONS
    • Contact Us

No products in the cart.

  • Microsoft Office
  • Microsoft Windows
  • Other Software
  • Anti Virus
  • Blog
    • Word
    • Excel
    • Powerpoint
    • Software tricks/tips
  • POLICIES
    • PAYMENT GUIDE
    • SHIPPING POLICY
    • REFUND POLICY
    • TERMS & CONDITIONS
    • Contact Us

No products in the cart.

  • Microsoft Office
  • Microsoft Windows
  • Other Software
  • Anti Virus
  • Blog
    • Word
    • Excel
    • Powerpoint
    • Software tricks/tips
  • POLICIES
    • PAYMENT GUIDE
    • SHIPPING POLICY
    • REFUND POLICY
    • TERMS & CONDITIONS
    • Contact Us

No products in the cart.

  • Microsoft Office
  • Microsoft Windows
  • Other Software
  • Anti Virus
  • Blog
    • Word
    • Excel
    • Powerpoint
    • Software tricks/tips
  • POLICIES
    • PAYMENT GUIDE
    • SHIPPING POLICY
    • REFUND POLICY
    • TERMS & CONDITIONS
    • Contact Us
Software tricks/tips

How to add the Permanently Delete option to the Windows 11/Windows 10 context menu

0 Comments

When you delete something on a Windows computer, it is sent to the Recycle Bin so you can restore it if needed. However, many users do not like this feature and want what they delete to disappear permanently from their computer.
Of course, Microsoft also provides users with the ability to permanently delete anything they want using the Shift + Delete shortcut key. However, for convenience, in this article, Quan Tri Mang will guide you on how to add the Permanently Delete option to the context menu (right-click menu) on Windows 11/Windows 10.

How to add the Permanently Delete option to the Windows 11Windows 10 context menu 1

How to add the Permanently Delete option to the Windows 11/Windows 10 context menu

To do this, you need to use the Registry Editor. However, before editing the Registry, you need to back it up to minimize the risk if any issues occur.

After backing up the Registry, follow these steps to add the Permanently Delete option to the context menu:

  • Press the Win + R key combination to open Run, then enter regedit and press Enter to open the Registry Editor.
  • Press OK to confirm opening, then navigate to the following location:
    Computer\HKEY_CLASSES_ROOT\AllFilesystemObjects
  • Expand AllFilessystemObjects, right-click on shell and select New > Key. How to add the Permanently Delete option to the Windows 11Windows 10 context menu 2
  • Name the new key Windows.PermanentDelete.
  • Right-click on Windows.PermanentDelete and select New > String Value.
  • Name the new value CommandStateSync.
  • Now, create another String value by right-clicking on Windows.PermanentDelete and selecting New > String Value.
  • Name the new value ExplorerCommandHandler.
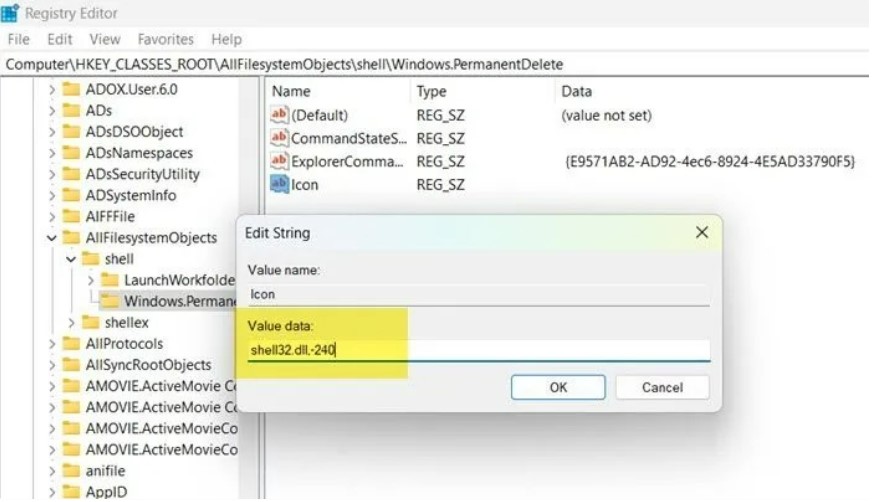
  • Double-click on ExplorerCommandHandler and enter {E9571AB2-AD92-4ec6-8924-4E5AD33790F5} in the Value data box, then click OK.
    Continue creating a new String value by right-clicking on Windows.PermanentDelete and selecting New > String Value. How to add the Permanently Delete option to the Windows 11Windows 10 context menu 3
  • Name the new value Icon and set its value to shell32.dll,-240. How to add the Permanently Delete option to the Windows 11Windows 10 context menu 4
  • The last value we need to create is named Position. Creating it is the same as instructed above. The value of the Position value is Bottom.

Note: If you want the Permanently Delete option to appear at the top of the context menu, select Top instead of Bottom in the Position value.

Now you just need to close the Registry Editor, and the Permanently Delete option will appear in the context menu, allowing you to permanently delete unnecessary files. However, use it carefully to avoid accidentally deleting files.

To remove the Permanently Delete option, simply delete the entire Windows.PermanentDelete key in the Registry Editor.

Above is our guide on how to add the permanent delete option to the context menu on Windows 11/Windows 10. This allows users to quickly and easily remove unnecessary files. However, always use this feature carefully to avoid accidentally deleting important files on your computer. If you want to remove the permanent delete option, you can delete the entire Windows.PermanentDelete key in the Registry Editor. We hope this guide from Buffcom.Net will be helpful for you in managing files on your computer.

12
89 Views
Running macOS on Windows 10 using VMware Workstation PlayerPrevRunning macOS on Windows 10 using VMware Workstation PlayerMarch 8, 2023
Change the color in Google Sheets with just 2 clicksMarch 8, 2023Change the color in Google Sheets with just 2 clicksNext

Leave a Reply Cancel reply

Your email address will not be published. Required fields are marked *

Recent Posts
  • Retrieve Data Based on Data Validation
    September 7, 2023
    Excel
  • How to Convert Multiple Rows to Columns and Rows in Excel?
    September 6, 2023
    Excel
  • VLOOKUP for Automatic Discount in Data Validation
    September 6, 2023
    Excel
  • How to Convert Text Dates to Dates in Excel?
    September 5, 2023
    Excel
Categories
  • Blog 80
  • Excel 754
  • Powerpoint 36
  • Software tricks/tips 128
  • Uncategorized 8
  • Word 109
Tags
the ISERROR
Top rated products
  • Kaspersky Total Security 2021 1 year 5 devices key Global Kaspersky Total Security 2021 1 year 5 devices key Global
    Rated 5.00 out of 5
    $46.00
  • Avast Premium Security 2021 Avast Premium Security 2021 1 Device 1 Year Global
    Rated 5.00 out of 5
    $11.00
  • Trend Micro Internet Security 3 Devices 1 Year Key GLOBAL Trend Micro Internet Security 3 Devices 1 Year Key GLOBAL
    Rated 5.00 out of 5
    $17.00
  • Windows 11 Pro Key Global
    Rated 5.00 out of 5
    $11.00
  • AVG Internet Security 2021 10 Devices 2 Years Global AVG Internet Security 2021 10 Devices 2 Years Global
    Rated 5.00 out of 5
    $42.20
Products
  • Buy Office 2021 Professional Plus Key Global For 5 PC
    Rated 5.00 out of 5
    $45.00
  • Buy Office 2021 Professional Plus Key Global Bind To Your Microsoft Account
    Rated 4.83 out of 5
    $49.00
  • Windows Server 2022 Datacenter Key Global
    Rated 5.00 out of 5
    $15.00
  • Windows Server 2022 Standard Key Global
    Rated 4.47 out of 5
    $15.00
  • Windows Server 2022 Remote Desktop Services Device Connections (50) Cal Key Global
    Rated 5.00 out of 5
    $45.00

Buffcom.net always brings the best digital products and services to you. Specializing in Office Software and online marketing services

BIG SALE 50% IN MAY

Microsoft Office
Microsoft Windows
Anti-Virus
Contact Us

Visit Us:

125 Division St, New York, NY 10002, USA

Mail Us:

buffcom.net@gmail.com

TERMS & CONDITIONS | PAYMENT GUIDE  | SHIPPING POLICY  | REFUND POLICY

Copyright © 2019 buffcom.net  All Rights Reserved.