How to Fix Microsoft Outlook Sync Issues
If Outlook is not synchronizing emails, make sure your internet connection is working, disable the offline mode of the application, manually sync your email folders, change the sorting order of your emails to have the newest ones on top, repair your email account or Outlook itself, unblock the email sender, clear your Outlook cache, or update Outlook. Thinking that Outlook is not showing you the most recent emails? The application may be experiencing a synchronization issue, unable to access new incoming emails and send outgoing emails. There are several ways to troubleshoot this problem, and we will guide you through the process.
Check your Internet Connection
When Outlook stops synchronizing emails, the first thing to do is to check your internet connection. Your connection may not be working, preventing Outlook from sending and receiving emails.
You can check your connection by launching a web browser on your computer and opening a webpage. If the webpage loads, your internet connection is working. In this case, follow the other troubleshooting methods below.
If your webpage doesn’t load, your connection has stopped working. In this case, try basic troubleshooting methods such as restarting your router, reconnecting to the Wi-Fi network, or updating your network adapter driver.
Disable Outlook’s Offline Mode
Outlook has an offline mode that allows you to work with your emails without being connected to the internet. This mode can be enabled, causing the application to not synchronize your emails. In this case, disable the mode to fix your issue.
To do this, in the ribbon of Outlook at the top, select the “Send/Receive” tab. Here, click on “Work Offline.”
Select “Work Offline.”
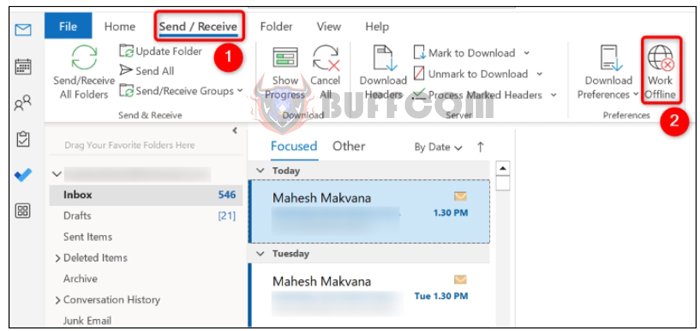 The option will no longer be highlighted, indicating that this option has been disabled. You’re done.
Manually Sync Your Email Folders
When Outlook’s automatic synchronization fails, force the application to manually sync your email folders. This only requires clicking on a single button within the application.
To do this, in the top ribbon of Outlook, select the “Send/Receive” tab. In this tab, click on the “Send/Receive All Folders” option.
Select “Send/Receive All Folders.”
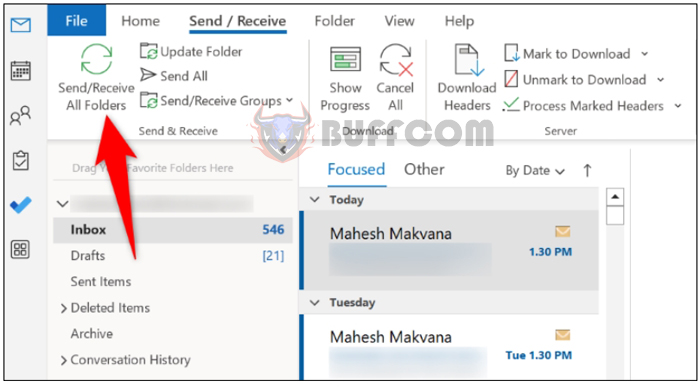 Outlook will start synchronizing emails in all of your folders.
Change the Sorting Order of Your Emails
You or someone else may have sorted Outlook emails in a way that the most recent emails are not displayed at the top. This can lead you to think that Outlook is not synchronizing your emails. In this case, change the sorting order, and your issue will be resolved.
To do this, open Outlook and access your email folder. At the top of your email list, click on “Date” (this option may have a different label depending on your current sorting order).
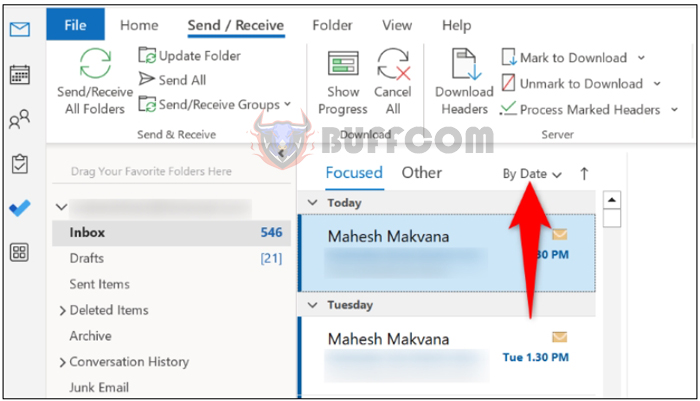
In the dropdown menu, from the “Sort by” section, choose “Date.” In the “Order” section, select “Newest on top.”
Choose “Date” and “Newest on top.”
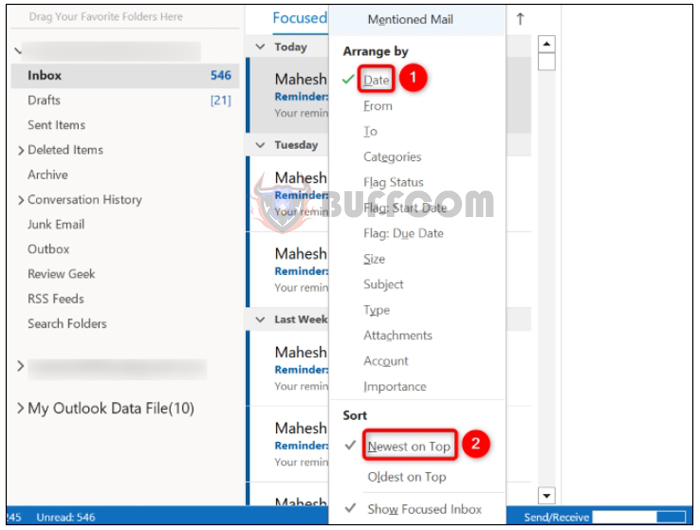 Your most recently synchronized emails will now be displayed at the top.
Repair Your Email Account in Outlook
Your email account in Outlook may be corrupted, causing synchronization issues. In this case, use Outlook’s built-in repair option to fix your account within the application.
To do this, at the top left corner of Outlook, click on “File.” Then, select “Info” > “Account Settings” > “Account Settings.”
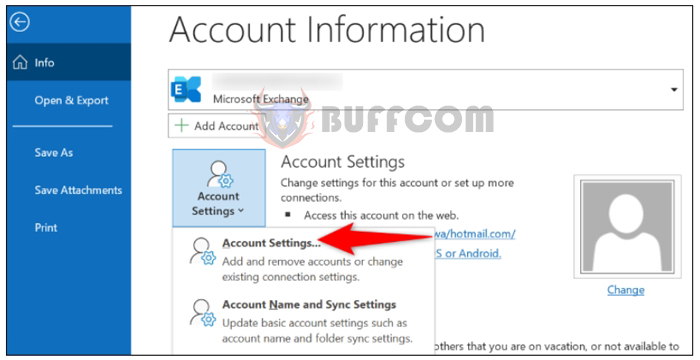 Choose your email account from the list and select “Repair.”
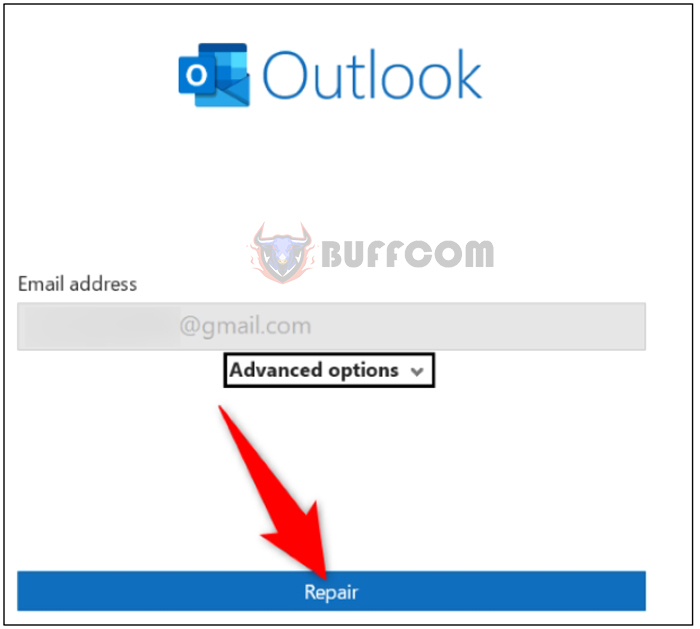
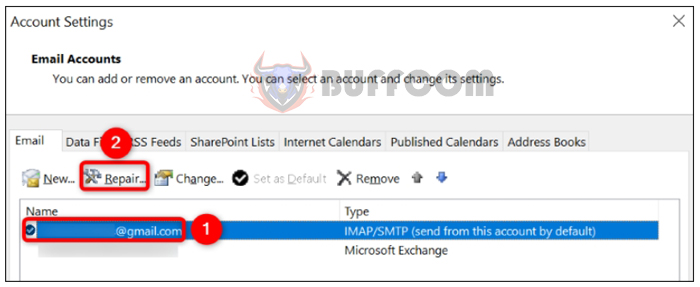 Select “Repair” and follow the on-screen instructions.
Unblocking an Email Sender in Outlook
If you are expecting an email from someone but cannot find it in your inbox, it is possible that you have blocked their email address in Outlook. To unblock that person and start receiving their emails, follow these steps:
To review your blocked list, select the “Home” tab from the Outlook ribbon at the top. Then choose “Junk” > “Junk Email Options.”
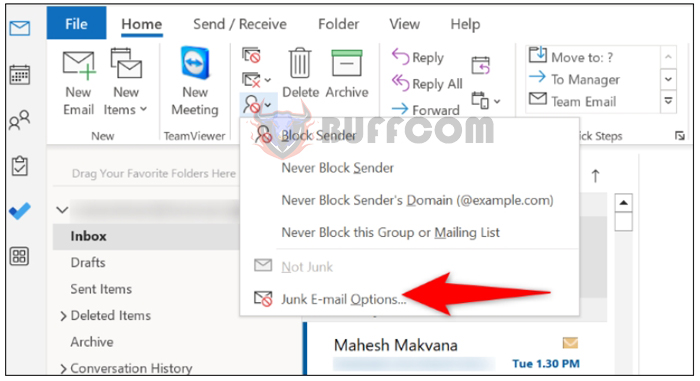 Click on “Junk Email Options.”
Open the “Blocked Senders” tab and make sure that the person you want to receive emails from is not listed. If they are, select their email address from the list and click “Remove.”
Then, at the bottom, click “Apply” and then “OK.”
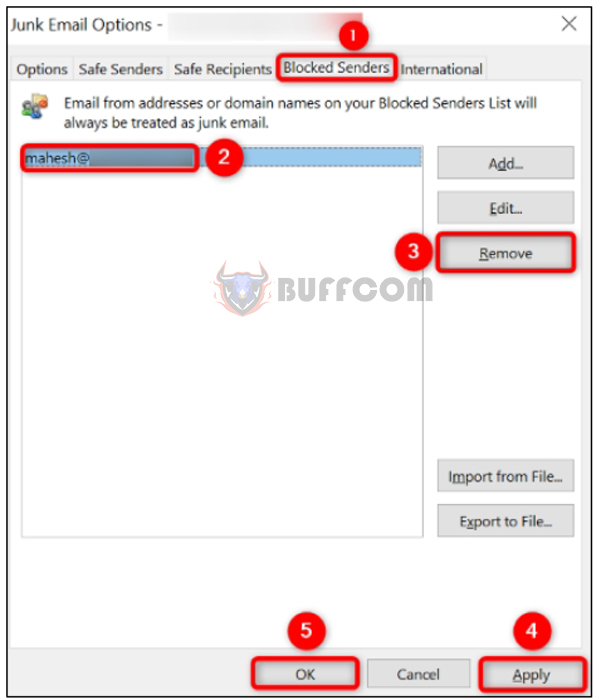 Unblocking the email sender is now complete.
Clearing the Outlook Application Cache
If Outlook is still not synchronizing your emails, the application’s cache files may be causing the issue. In this case, clearing those cache files will resolve the problem. Please note that you will not lose any emails or personal files when clearing your Outlook hidden cache.
To begin, open “Run” on your Windows PC by pressing Windows + R. Enter the following content into the box and press Enter:
%localappdata%\Microsoft\Outlook\RoamCache
Select all the files in the folder by pressing Ctrl + A. Then right-click on the selected files and choose “Delete.”
Warning: Copy these cache files to a safe location on your PC before deleting them, so you can restore the files in case of any issues with the application.
Click “Delete” in the menu.
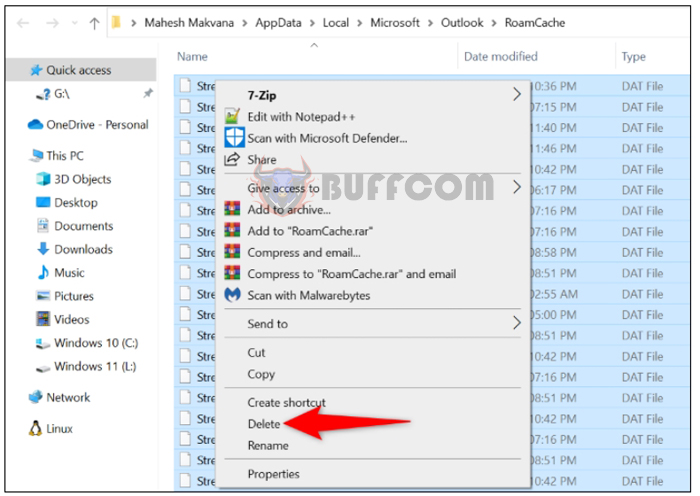
Once all the cache files have been deleted, launch Outlook.
Updating Your Outlook Application
You may be using an outdated version of the Outlook application, and such versions often have various issues. That could be why your emails are not synchronizing. You can resolve this by updating your Outlook application to the latest version.
To do this, open Outlook and select the “File” tab at the top left. From the left pane, choose “Office Account.” On the right pane, select “Update Options” > “Update Now.”
Click on “Update Now.”
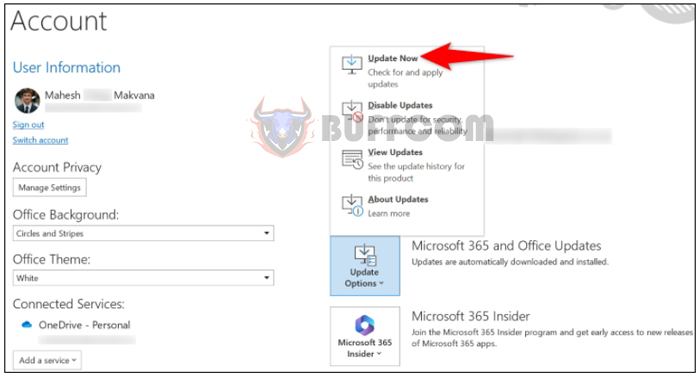 Follow the on-screen instructions to complete the update of your application.
Repairing Your Outlook Application
If none of the above methods fix your synchronization issue, the core files of your Outlook application may be corrupted. This often occurs when viruses or malicious applications modify your application files. In this case, use the built-in repair tool of Microsoft Office to repair your application.
To access it, launch the Control Panel on your PC. One way to do this is to open the Start menu, search for “Control Panel,” and select the utility.
In the Control Panel, choose “Uninstall a program.” On the subsequent window, select your Microsoft Office installation. Then, at the top, click “Change.”
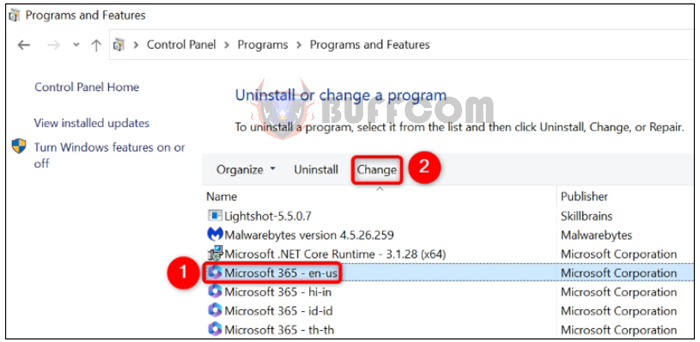 Select the Office installation and click “Change.”
In the “User Account Control” prompt, select “Yes.”
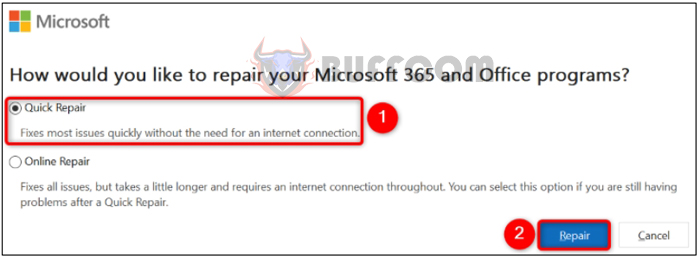
The Office repair tool will launch. Here, select “Quick Repair” and click “Repair” to begin repairing your application.
Repairing Microsoft Office.
How to Fix Microsoft Outlook Sync Issues
If your issue is still unresolved, on the same repair window, choose “Online Repair” and select “Repair.” You may also want to invest in a good antivirus software in case viruses are causing damage.
And those are the steps to resolve Outlook synchronization issues on your computer. Wishing you happy email sending!


