How to use Snipping Tool on Windows 10
There are many ways to take screenshots on a Windows 10 computer, such as capturing the entire screen by pressing PrtScn or Alt+PrtScn to capture a running window, or using the Faststone Capture tool. However, in this article, Buffcom will introduce readers to another sophisticated screen capture tool – Snipping Tool.
The article will guide you on how to take screenshots, edit, save, and email screenshots, as well as how to use the available markup tools and change the settings of Snipping Tool. Let’s get started.
What is Snipping Tool?
Snipping Tool is a screen capture utility in the Windows operating system that can capture screenshots in various ways. This application was developed by Microsoft and is the default tool available on all modern Windows operating systems, including Windows 7, Windows 8.1, and Windows 10.
This tool can capture screenshots in rectangular areas specified by the user, in free-form shapes determined by the user, and in typical full-screen images. The captured images are called “snips” and can be edited with the integrated editor, which provides basic editing capabilities, as well as annotation, and then saved in any popular image format.
Snipping Tool is a very flexible screen capture tool because it provides users with many different methods to capture different parts of the screen. System default screen captures taken with the PrintScreen key on the keyboard will capture the entire screen, and users can then edit and separate the actual areas they need using image editing software such as Paint or Photoshop. In contrast, Snipping Tool allows users to capture only certain specific parts or entire windows, helping users to better control everything. This tool saves snips (captured images) in JPG, GIF, or PNG format.
Types of snips include:
Full-screen capture – Captures the entire screen.
Window capture – Selects a window such as a browser window, application window, or dialog box.
Rectangular snip – Selects a portion of the screen by dragging the cursor to create a rectangular shape.
Free-form snip – Draws a free-form shape around an object to capture that part of the screen.
Opening Snipping Tool in Windows 10
First of all, for the question “Where is Snipping Tool located in Windows 10?”, you can access This PC > Local Disk (C:) > Windows > System32 and then find the executable (.exe) file of the Snipping Tool application. But it’s a waste of time to launch the tool in this way. Instead of creating a shortcut for the tool, you can find 5 other easy ways to open Snipping Tool here.
Method 1: Open in the Start menu In the Start menu, select All apps, choose Windows Accessories, and click on Snipping Tool. 
Method 2: Open Snipping Tool through search function Type “snip” into the search box on the taskbar and click on Snipping Tool in the results. 
Method 3: Open Snipping Tool via Run Display the Run command box with the Windows + R shortcut, enter “snippingtool” and click OK. 
Method 4: Open Snipping Tool via CMD Launch Command Prompt, enter “snippingtool.exe” and press Enter.
 Method 5: Launch it via Windows PowerShell Access Windows PowerShell, enter “snippingtool” and press Enter.
After opening Snipping Tool, you can click on the icon behind the New option and then a drop-down menu will appear, including options such as Free-form Snip, Rectangular Snip, Window Snip, Full-screen Snip. You can choose an option you like and then click on the New button. Then, you can use the mouse to select the area you want to capture. 
Next, you can edit the screenshot with the tools in Snipping Tool. In addition, you can save the screenshot as a PNG, GIF, JPEG, or HTML file. 
Learn about the user interface of Snipping Tool
The Snipping Tool interface in Win 10 has five important buttons: New, Mode, Delay, Cancel, Options.
The function of each button:
- The New button allows users to take screenshots.
- The Mode button is used to select the type of image you want to capture.
- The Delay button allows you to delay the screen capture time for 1, 2, 3, 4, or 5 seconds, depending on the user’s choice.

- The Cancel button allows users to cancel the current task.
- The Options button allows customization of the application settings.
Taking a screenshot with the Snipping Tool
There are 4 types of screenshots available in the Snipping Tool. You can choose one you want by clicking or clicking the Mode button.
Here are your options:
- Free-form Snip allows you to draw any line around the object or area you want to capture.
- Rectangular Snip helps you capture a rectangular-shaped screen by dragging the cursor around the object.
- Window Snip allows you to select a window (such as a web browser) or dialog box (such as an error message from an application) and take a screenshot.
- Full-screen Snip allows you to capture the entire screen, similar to the old Print Screen key.

Here, the Buffcom will give an example using the Free-form Snip option. Click or click Mode, then select Free-form Snip. Next, click New. 
Select the area to capture by clicking and dragging your mouse or finger (if your computer has a touch screen). 
If you use the default settings, when dragging, the selected area will be surrounded by a red border. 
When you release the mouse, the captured area will automatically be copied to a new window. Here, you can annotate, save or share the screenshot.
Edit the screenshot with the Snipping Tool
This editing window provides useful tools for editing the image you captured. For example, if you are not satisfied with the image quality, you can create a new capture image using the New Snip button.
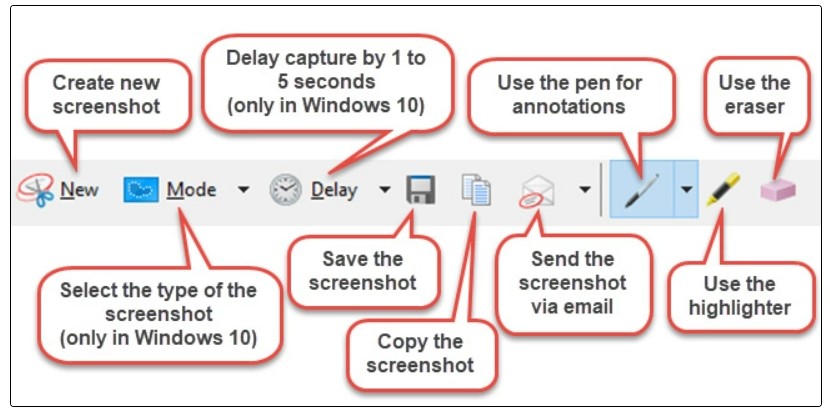
Before saving the screenshot, you can use the Pen and Highlighter tools to add marks to the screenshot. The Eraser tool removes marks made by Pen and Highlighter.
To save the screenshot, click the Save Snip button, select the location to save, type the file name and choose the file type: PNG, GIF, JPEG or HTML. 
Then click Save.
You can also send the screenshot via email using the Snip button on the toolbar.
This button provides 2 options: E-mail Recipient and E-mail Recipient (as attachment). 
To use this button, you need to install the email application on your computer.
Customizing Snipping Tool
When you launch the Snipping Tool, you can click or tap the Options button to set the options for how the application works. This Options button is also found in the Tools menu in the snip editing window. 
The available options are divided into two groups: Application and Selections. The Application section has a set of checkboxes that allow you to make the following changes:
Hide Instruction Text – hide the instructional text in the main window of the Snipping Tool. Always copy snips to the Clipboard – copy all snips to the Windows temporary clipboard so you can paste them into other applications (such as Word or an image editor). Include URL below snips (HTML only) – save snips as a Single File HTML or MHT document. If the snip is taken from the Internet Explorer window, it will also display the URLs of the web page in the screenshot. However, it does not work with any other browser, including Windows Edge. Prompt to save snips before exiting – display a pop-up reminder to save the snip before exiting the application. Show screen overlay when Snipping Tool – if disabled, when you capture a screenshot, the transparent Snipping Tool will no longer be displayed on the screen. 
The second section – Selections – allows you to make some color-related settings:
Ink Color – change the color of the border around the selected area when taking a screenshot. Show selection ink after snips are captured – when activated, the border around the selected area will be displayed around the screenshot using the color selected in the Ink Color list. 
This article provides all the detailed instructions on how to use Snipping Tool, the functions of each button, and the options of this application in Windows 10. Experience it and see how it works! If you have any questions or feedback, please leave a comment below!