Limiting input values in Excel using Data Validation

Limiting input values in Excel using Data Validation: When working with numbers in Excel, you may sometimes encounter cases where you enter incorrect data, which can affect the results and accuracy of the entire content. To limit the possibility of errors when entering data in Excel, users can use the Data Validation feature in Excel. This feature allows users to set limits on the input numbers in Excel, based on certain rules. When users enter values beyond these limits, they will receive a notification in Excel. In this article, Buffcom.net will guide you on how to use Data Validation to limit input values.
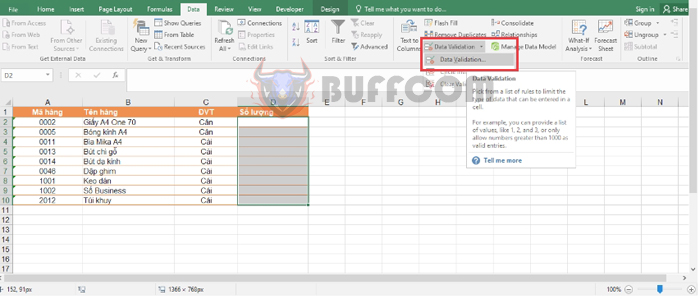
Step 1: Highlight the data range that you want to limit the input values for.
Then select the Data tab => Data Validation => Data Validation.

Limiting input values in Excel using Data Validation
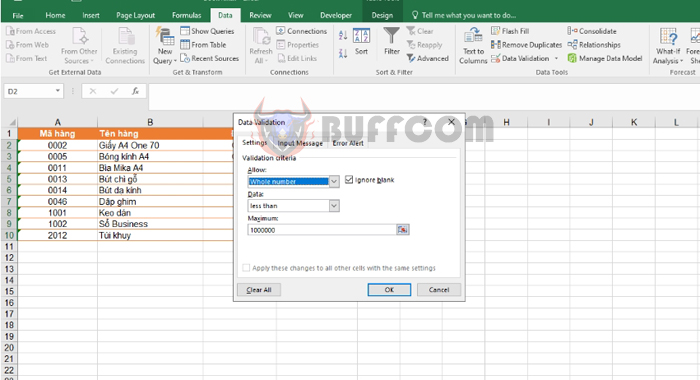
Step 2: The Data Validation dialog box appears, select the Settings tab and then choose as follows:
Under the Allow section, there are various options available:
- Whole number: only allows input of integers.
- Decimal: allows input of decimal numbers.
- List: allows input of values in a predefined list.
- Date: limits the data type to dates.
- Text Length: limits the length of input.
- Custom: allows for customized options.
Under the Data section, there are several options available regarding the range of data:
- Between: limits the range of values to a certain range.
- Not between: limits the input value to not be within a certain range.
- Equal to: limits the input value to a specific value.
- Not equal to: limits the input value to not be a specific value.
- Greater than: limits the input value to be greater than a specific value.
- Less than: limits the input value to be less than a specific value.
- Greater than or equal to: limits the input value to be greater than or equal to a specific value.
- Less than or equal to: limits the input value to be less than or equal to a specific value.
After that, enter the limit values in the boxes that appear below. For example, in this case, the input value is limited to integers that are less than 1,000,000.
 Step 3
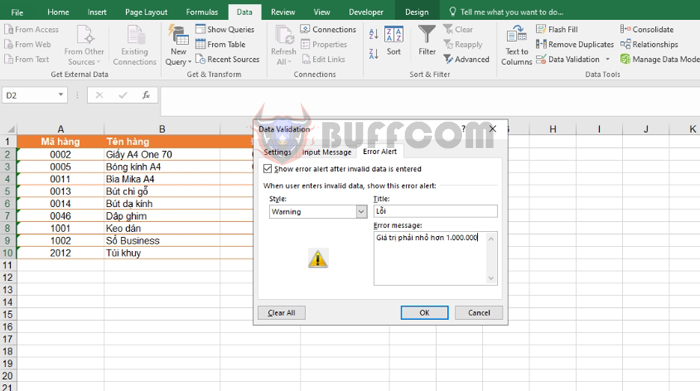
After setting the input value limits, you can customize the error message displayed to users for better understanding and re-entry of values by selecting the Error Alert tab. Then click OK to complete the process.

Limiting input values in Excel using Data Validation
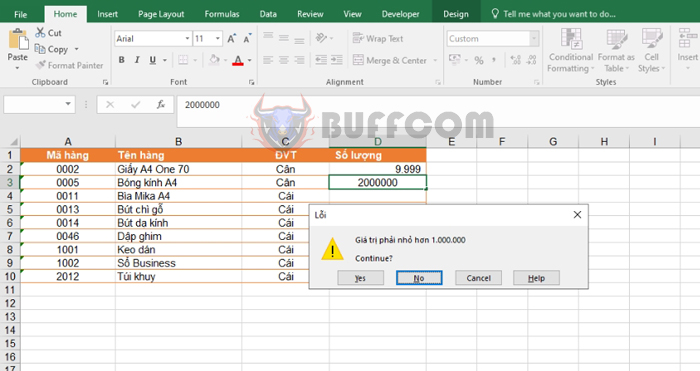
At this point, your Quantity column has been limited to values less than 1,000,000. If you enter a value greater than 1,000,000 in this column, an error message will appear as shown in the figure below.

Limiting input values in Excel using Data Validation
In conclusion, this article has introduced you to how to limit input values in Excel using Data Validation. Good luck!


