Tips for sorting names in alphabetical order in Excel

Tips for sorting names in alphabetical order in Excel: Sorting names in alphabetical order is a necessary task when creating statistical tables. However, not everyone knows how to do it. Follow the steps below to learn how to sort names in alphabetical order.
For example, we have a list of names as shown in the figure below. The task is to sort everyone’s name in alphabetical order. Follow these steps:
Step 1
First, you need to create a new column called “First Name“. Then, copy the entire list of names in the “Last Name, First Name” format to this column.
 Step 2
Next, select the entire “First Name” column. Then, go to the “Home” tab on the ribbon. Click the “Find & Select” button under the “Editing” section. Alternatively, you can use the shortcut “Ctrl + H” to open the “Find and Replace” tool.

Tips for sorting names in alphabetical order in Excel
Step 3
After the “Find and Replace” dialog box appears, select the “Replace” tab. Then, enter “* ” (asterisk and a space) in the “Find what” box and click “Replace All“. This will delete the last name and middle name from the “First Name” column.

Tips for sorting names in alphabetical order in Excel
Step 4
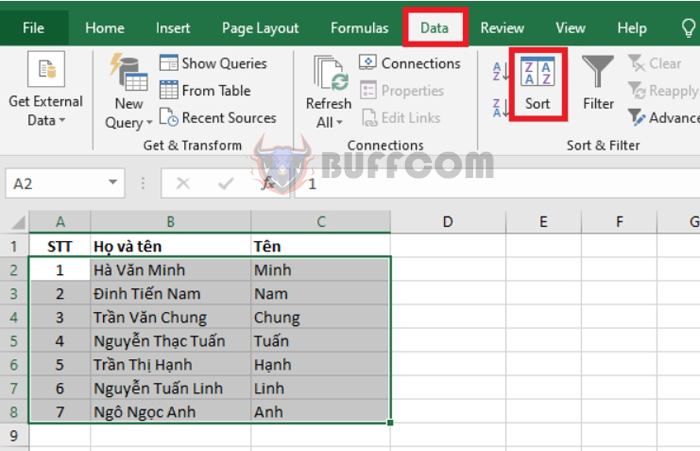
Select the entire range of data, and go to the “Data” tab on the ribbon. Click the “Sort” button under the “Sort & Filter” section.

Tips for sorting names in alphabetical order in Excel
Step 5
The “Sort” dialog box will appear. In the “Sort by” drop-down list, select “First Name” and click “OK” to complete the sorting process.

Tips for sorting names in alphabetical order in Excel
Step 6
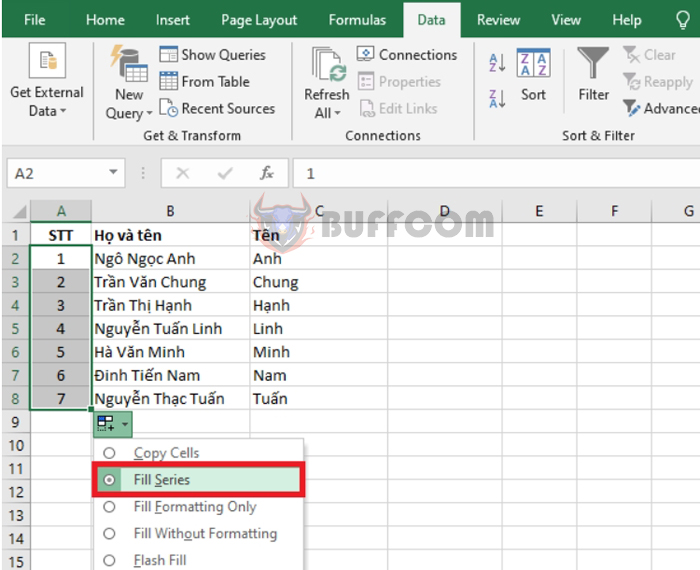
After the names are sorted in alphabetical order, you need to sort the index numbers. Type “1” in the first cell and double-click the bottom right corner of the cell to auto-fill the numbers. Then, click the “Auto Fill Options” button that appears and select “Fill Series” to complete the sorting process.

Tips for sorting names in alphabetical order in Excel
That’s it! The above steps have shown you how to sort names in alphabetical order in Excel. Hopefully, this article will be helpful to you in your work. Good luck!

