5 ways to delete blank rows in Excel

Blank rows can easily accumulate in Excel, whether they are imported from an external source or created during the data input process. Regardless of how they are generated, it is important to remove blank rows from a dataset. Excel relies on blanks to determine ranges, so if there are blank rows within your data, Excel’s selection-based features may not function as expected. In this article, I will demonstrate five simple methods to delete blank rows.
Before proceeding, I would like to issue a warning: exercise caution when deleting entire rows, as there may be hidden data off-screen that you are unaware of. Deleting an empty row from your dataset will also remove any out-of-sight data in the same row.
5 ways to delete blank rows in Excel
Get & Transform Data
Excel‘s Get & Transform Data feature offers a convenient way to retrieve data and provides various options for manipulating the data, including deleting blank rows. Although it is easy to use, this method requires a Table object. If your data is in a regular range, the feature will convert it into a Table object automatically, which may or may not be desired.
To begin, follow these steps:
- Click anywhere inside the data set and navigate to the Data tab.
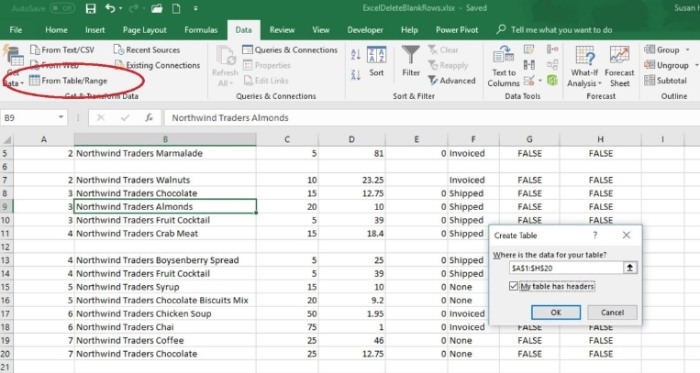
- In the Get & Transform Data group, click on From Table/Range. At this point, Excel may not identify the entire data set due to the presence of blank rows.
- Adjust the default range to A1:H20 (refer to Figure A), select the “My table has headers” option, and click OK.
- Excel will open the Power Query Editor to retrieve the data.
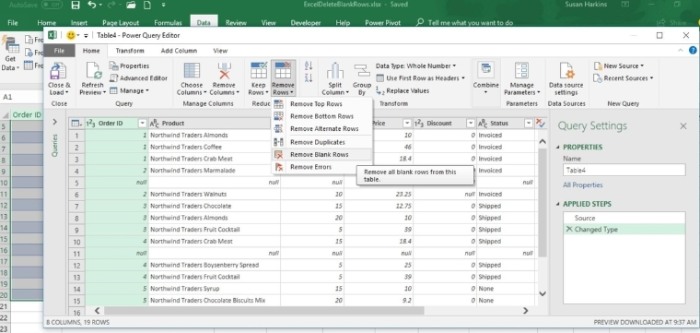
- In the Reduce Rows group (located in the Home tab for Power Query), click on the Remove Rows option and choose Remove Blank Rows (see Figure B). Power Query will eliminate the blank rows, but rows with blank cells will remain.
5 ways to delete blank rows in Excel
5 ways to delete blank rows in Excel
5 ways to delete blank rows in Excel
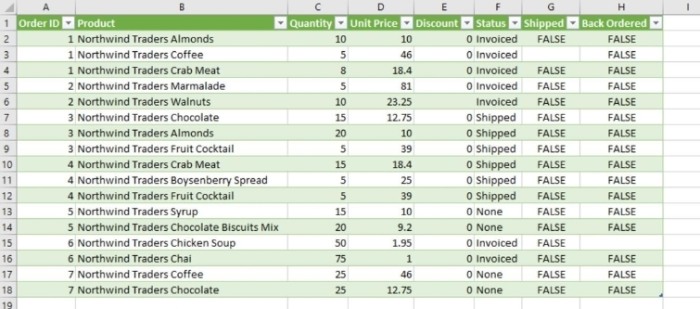
- Click on Close & Load in the Close group, and Power Query will copy the modified data set to a new sheet in Excel. At this stage, the data will be in the form of a Table object (see Figure C), which can be converted to a regular range if desired.
Although you can convert the Table object back into a regular range, please note that this method does not modify the original data set. Your decision to use this feature will depend on whether or not this behavior aligns with your requirements.
Filter
If you wish to remove the blank rows directly from the original data set, you can consider using the Filter feature. However, exercise caution and choose the filter column wisely. To illustrate this, let’s use a quick example with a regular range (not a Table object):
- Go to the Data tab and click on Filter in the Sort & Filter group.
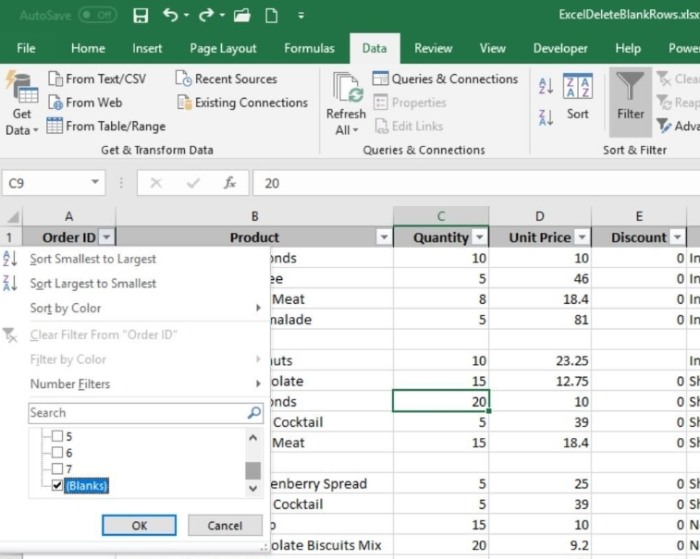
- Use the dropdown for the Order ID column to apply the filter. Uncheck the (Select All) option and then check (Blanks), as shown in Figure D. If the (Blanks) option is not available, start over by selecting the range first.
5 ways to delete blank rows in Excel
Here’s where the issue arises (Figure E). Because there is no Order ID value for the record in row 7, the filter includes that record. The row itself is not empty, but the Order ID value is. (I deliberately deleted the Order ID value in row 7 for a more effective example.)
The filter includes all records with blank Order ID values.

5 ways to delete blank rows in Excel
If the filter selects all the empty rows, you can simply choose the filtered set and press Ctrl+- (the minus key) to delete the entire rows when prompted by Excel. On the other hand, if you only want to delete the blank rows and keep the incomplete records, you can select a non-contiguous set of rows by holding down the Ctrl key and clicking the row headers (refer to Figure E). Then, press Ctrl+-. This method requires some extra steps, but it works with the original data.
Sort
This next suggestion is extremely straightforward, but it comes with a consequence – you will lose the original order of the data. Simply sort the data set alphabetically. Let’s try that now:
Select A2:H20.
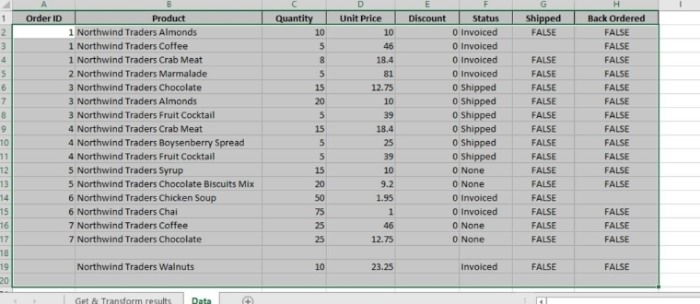
Click on Sort in the Sort & Filter group (on the Data tab) to sort the blank records to the bottom. As shown in Figure F, the results may not be exactly as expected.
5 ways to delete blank rows in Excel
Blanks in the Order ID column are sorted to the bottom, but the record with no Order ID value is also affected.
If you can accept the sorted results, this method is perhaps the simplest. However, if you need to restore the original order and you have a column that can be used to restore the data to its original order (while keeping the blank rows at the bottom out of the sort), sorting may be a viable option. It still requires some effort and is complicated by the incomplete row issue (now in row 19) shown in Figure F.
Go To
You can utilize Excel’s Go To feature to select all the blank cells within a selected range. If the results include empty rows, you can then press Ctrl+- to delete those rows. Let’s see what happens with our example:
Select A2:H40.
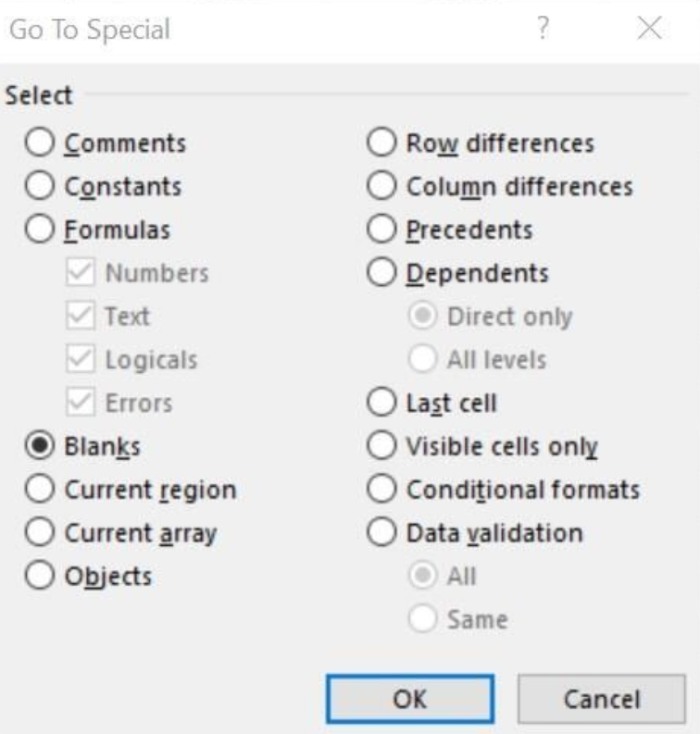
Press F5 and click on Special in the resulting dialog.
5 ways to delete blank rows in Excel
5 ways to delete blank rows in Excel
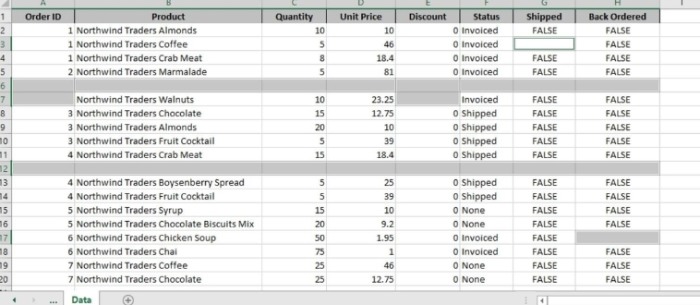
Choose Blanks (Figure G) and click OK. The results are displayed in Figure H – a non-contiguous selection that includes two blank records and three additional blank cells.
Selecting all the blank cells in the selected range.
The selection of blanks may include blank cells mixed with the empty rows.
While holding down the Ctrl key, you can click on the blank cells to remove them from the non-contiguous selection, and then press Ctrl+- to delete only the empty rows. Again, this method requires some effort, especially when working with a large data set. However, you are working directly with the original data set and maintaining its order.
Visual Inspection
By now, you might have realized that you could quickly create a non-contiguous selection and delete it, but this approach is most effective when dealing with a small data set. Hold down the Ctrl key and click on the header cells of each empty row. Once you have added all the empty rows to the selection, press Ctrl+- to delete them. You can use this selection technique with a large number of records, but it can become tiresome.
Stay tuned
I try to answer readers’ questions whenever possible, but there is no guarantee. Please do not send files unless requested; initial requests for help that come with attached files will be deleted without being read. You can send screenshots of your data to help clarify your question. When contacting me, please provide as much specific information as possible. For example, a request like “Please troubleshoot my workbook and fix what’s wrong” may not receive a response, but a question like “Can you explain why this formula is not returning the expected results?” might. Please mention the application and version you are using to ensure accurate assistance.


