Backup Windows Server 2016 with Windows Server Backup Feature

One of the best ways to back up Windows Server 2016 is through the Windows Server Backup feature. WSB is essential backup software for Servers. However, before we proceed, it’s important to learn more about this feature.
What is Windows Server Backup?
Windows Server Backup, or WSB, is a crucial feature of Windows that provides recovery and backup options for users utilizing Windows Server. To use this feature, you must first install it on Windows Server. With Windows Server Backup, you can back up files, folders, system state, specific drives, and the entire server.
Windows Server Backup also facilitates easy data recovery. You can restore files, folders, system state, specific applications, and drives without complications. In case of a hard disk failure, you can choose to perform a bare-metal restore.
This feature also allows you to manage backups for both remote and local computers. Microsoft introduced this feature to assist anyone in need of Windows Server backups.
Here, we will discuss in detail how to use Windows Server Backup to back up Windows Server 2016. Let’s see:
Installing Windows Server Backup
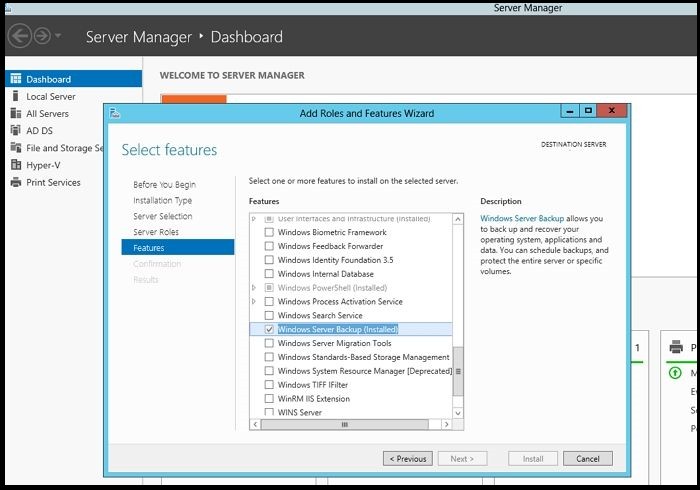
Step 1. Go to Server Manager. Click on “Manage” and select “Add Roles and Features.”
Step 2. Continue pressing “Next” until you reach the Features page. Scroll down to the Features section on the Select Features page. There, you will find the Windows Server Backup option.
 Step 3. Check the option and press “Next.” It will lead to the Confirm Installation Selection page.
Step 4. Click on the “Install” button. Wait for the installation process to complete.
Note: Remember that there is no need to restart or reboot Windows Server to install this feature. After installation, you need to develop a backup plan. There are various backup plans to choose from, including entire server, files and folders, critical drives, individual drives, and system state. It’s important to choose a specific backup plan and proceed.
Steps to Back Up Windows Server 2016
Below are the steps you need to take to back up (For this article, we choose the “Back up once” option).
Step 1. Launch Server Manager. Click on “Tools,” then select “Windows Server Backup” from the drop-down list. Wait for the Windows Server Backup window to open.
 Step 2. You will see the Action menu on the right side. There are three options – schedule backup, back up once, and recover. Choose the option you want.
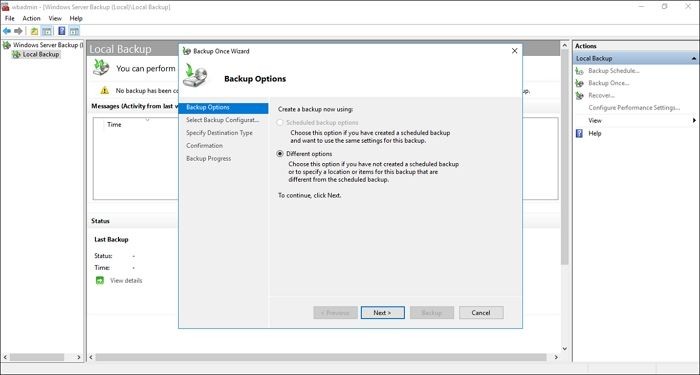
Step 3. It will lead to the Backup Options page. Here, you will encounter two options – Scheduled backup and Different options. Choose “Different options” and press “Next.”
Step 4. The next page is the Choose Backup Configuration page. You will have two choices – Full server and Custom.
Step 5. If you choose full server, the entire server will have a backup. On the other hand, custom allows users to select files or folders they want to back up.

Backup Windows Server 2016 with Windows Server Backup Feature
Step 6. Here, the Full Server option is selected. Press the “Next” button. The next page is the Specify Destination Type page. You need to choose between Local Drive and Remote Shared Folder.
Step 7. In this case, the Local Drive option is selected. Click on the “Next” button.
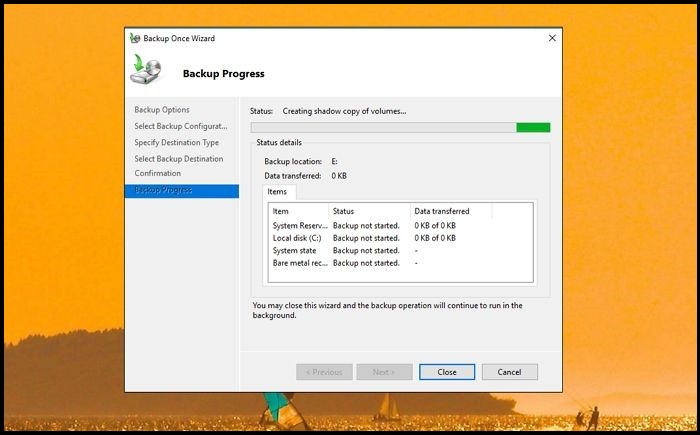
Step 8. On the next page – Choose Backup Destination, you need to select the drive you want to back up to. Press the “Next” button. On the Confirm page, select “Backup options.”
Now, you need to wait for the backup process to complete. It may take some time, depending on the backup’s size.


