How to draw a mind map in PowerPoint
How to draw a mind map in PowerPoint. Take advantage of the available tools in PowerPoint to optimize your presentation. Why not? Let’s learn how to draw a mind map in PowerPoint with Buffcom.net in this article.
A mind map, also known as a mind map diagram, is a versatile tool for the brain. Therefore, it is an intelligent and convenient method of presentation for presenters and easy to understand for the audience. Let’s learn how to draw a mind map in PowerPoint in this content with Buffcom.net.
What is a mind map?
A mind map is a visual-based note-taking method. According to Tony Buzan, the father of the mind map diagram, the human brain easily receives and remembers images. Proven by many experiments, the mind map is truly a breakthrough and has changed the note-taking habits of millions of people around the world.

Draw a mind map in PowerPoint
This method takes advantage of the human brain’s ability to connect images. By simplifying information, replacing it with images, and connecting them together with lines, data can be remembered and understood easily and quickly.
How to draw a mind map in PowerPoint
By using the drawing tools in Microsoft PowerPoint or available templates, you have different options to draw a mind map in your presentation.
How to draw a mind map by inserting a chart
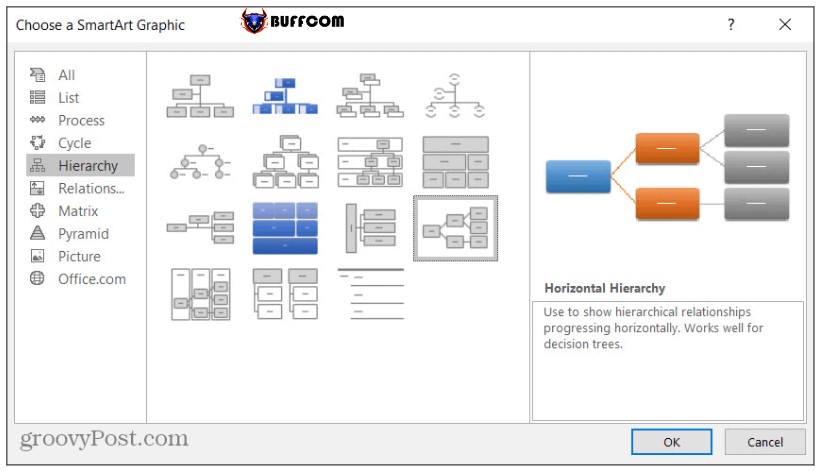
With the SmartArt tool, you can present the mind map diagram in many different ways. Among them, the horizontal hierarchy structure is chosen quite a lot because it allows for easier branching. Refer to the following guide to learn how to draw a mind map with PowerPoint.
Draw a mind map in PowerPoint
1. Open a new PowerPoint page Layout > Blank or delete all text boxes on the slide you are working on.
2. Select Insert > SmartArt> Hierarchy/Relationship. Choose the chart type that best fits your presentation. In this article, Buffcom.net will use the example of a horizontal hierarchy chart.
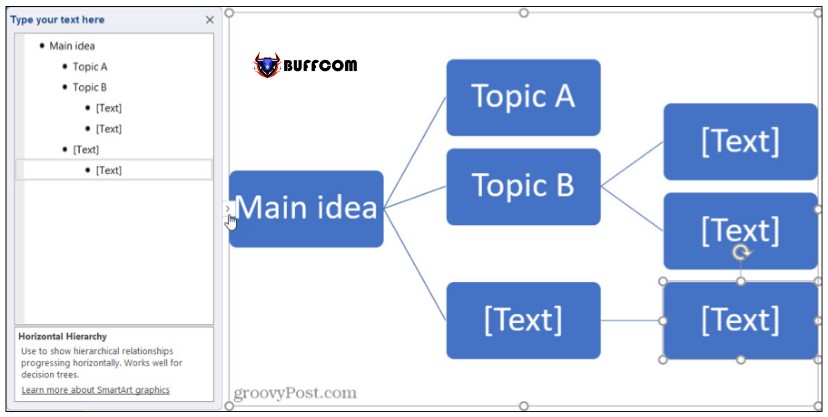
3. Enter text into the chart by clicking on each Text box to change the content. Or in the Design section, select Text Pane. You will see the content updated on your chart immediately.
Draw a mind map in PowerPoint
Implement your ideas and fill in the next branches of the map.
How to customize a mind map in PowerPoint
However, not every available template perfectly fits your ideas, right? Here’s how you can customize your mind map.
How to add elements to the mind map
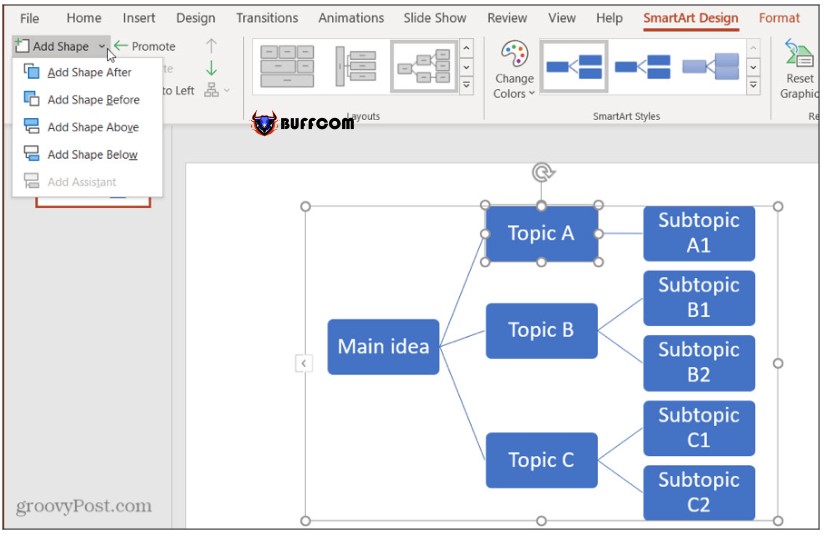
- Perform all operations such as adding a new shape or a new connector on the Design tab in SmartArt Tools.
- To add a new shape to the map: select the shape you want to add, in the SmartArt Tools tab select Design > Add Shape. Then choose the position you want to insert by clicking on the options available in Add Shape.
Draw a mind map in PowerPoint
- You can also add a new shape in the Text Pane. Click on the location where you want to insert, press Enter and see the changes on your chart.
How to arrange elements
There are 3 ways you can arrange the elements in your mind map.
Directly move the element boxes to the desired position. You just need to move the mouse to the element box and drag it to the position you want to change.
Use the commands in the Design tab in SmartArt Tools. Click on the shape you want to reposition and select Design > click on the corresponding command.
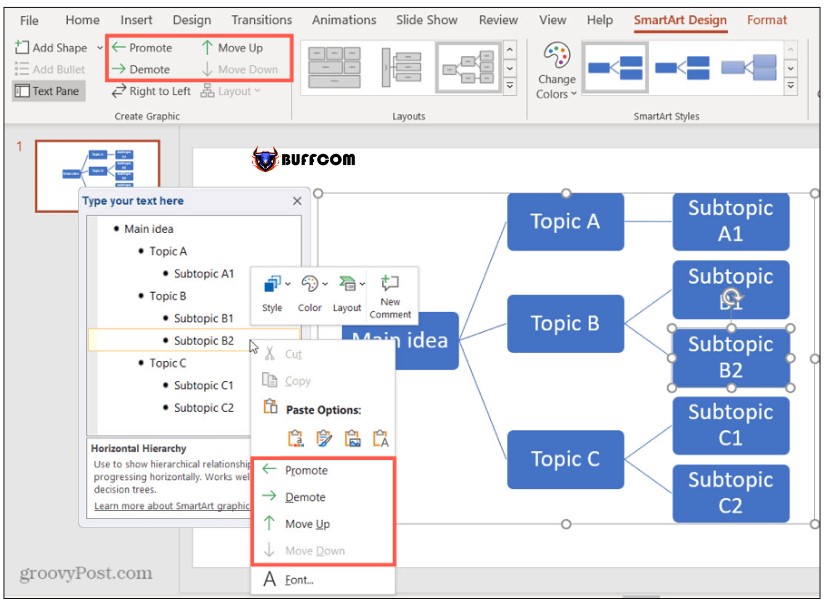
Draw a mind map in PowerPoint
In the Text Pane, right-click on the line corresponding to the element box you want to reposition. And choose the appropriate commands.
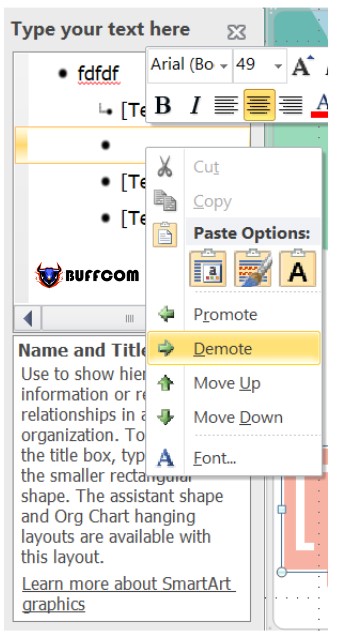
Draw a mind map in PowerPoint
How to delete elements
To delete an element box, you just need to follow the steps below:
To delete a shape, select that shape and press Delete. Make sure you only select the shape, not the entire map. Or you can select that shape and right-click and choose Cut.
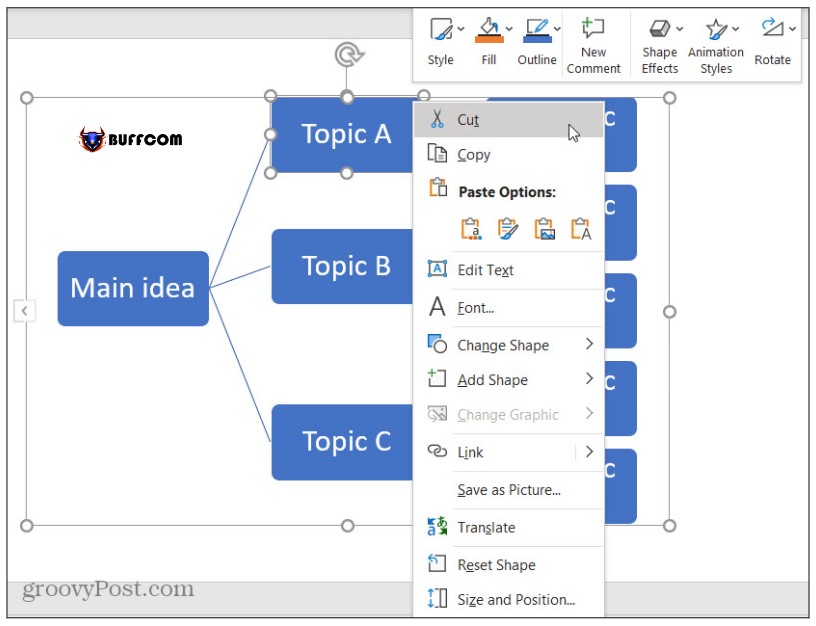
Draw a mind map in PowerPoint
To delete via Text Pane, click on the line corresponding to the element box, press Delete.
How to transform the mind map
If you feel that the format of the map is a bit dull, you can style your mind map in the following way.
Transform the entire chart
Select the entire chart to display the SmartArt Tools, select Design to change the style and pre-defined colors of the map.
Change the color: Click on Change Colors to change a different color for your map.
Change the chart style: In SmartArt Styles: Click on the arrow to display all different chart styles. These suggestions are all based on the original chart style you selected.
Transform individual elements
If you want to change the format of a specific element in the mind map, select the element to display SmartArt Tools > Format.

Draw a mind map in PowerPoint
Then you will see all the options to format the shape and text in your mind map. You can freely change the border, color, effects for both format and text. Change the size and position of the shape by dragging and dropping directly on that element.
In this article, Buffcom.net has guided you on how to draw a mind map in PowerPoint using the available tools. We hope this article has been helpful to you. Don’t forget to Like & Share to support Buffcom.net to continue sharing more useful information.


