How to Enforce a Consistent Phone Number Format in Microsoft Excel
How to Enforce a Consistent Phone Number Format in Microsoft Excel. Ensuring the accuracy of data entered in Microsoft Excel is crucial to avoid incorrect information. This is especially important for phone numbers, as entering an invalid phone number can render it useless. Mistakes can occur when users enter non-numeric characters or input an incorrect number of digits. While a custom number format can address the format aspect, it alone is not sufficient.
In this tutorial, I will demonstrate how to combine a custom number format with data validation to enforce the correct number of numeric digits. However, it’s important to note that users can still input incorrect numeric digits, as this cannot be prevented.
How to Enforce a Consistent Phone Number Format in Microsoft Excel
Determining Requirements in Excel
Phone numbers typically consist of 10 numeric digits and follow the format (xxx) xxx-xxxx. Let’s break down the requirements for a phone number in Excel:
- Must have 10 characters.
- Must be displayed in the (xxx) xxx-xxxx format.
- Must consist of numerical digits.
The (###) ###-#### custom format can address the format requirement, while data validation can be used for the other two requirements. It’s worth mentioning that there are two custom formats that can be helpful when formatting phone numbers:
- (###) ###-####: The “#” character acts as a numeric digit placeholder.
- (000) 000-0000: The “0” character is also a digit placeholder, but it displays a “0” when there aren’t enough input digits.
Figure A

How to Enforce a Consistent Phone Number Format in Microsoft Excel
demonstrates both custom formats applied to the same phone number. However, neither format resolves all potential issues. While both formats work correctly when the input value contains 10 numeric digits, they fail under the following circumstances:
- When the input value contains non-numeric characters.
- When the input value has less than 10 digits.
- When the input value exceeds 10 digits.
To address these issues, both a custom format and data validation are required.
Applying a Custom Format in Excel
The solution involves a combination of a custom format and data validation. Let’s use a Table object to enter the same input values and observe how the custom format and data validation handle each case.
First, let’s create the custom format for column C of the Table object, as shown in Figure B:
- Right-click on cell C3 and choose “Format Cells” from the submenu.
- In the Category list, select “Custom” at the bottom.
- In the Type control, choose “General” and enter “(###) ###-####” as the custom format. If the format is already in the list, select it. Note the space character between the “)” and “#” characters.
- Click “OK.”
Figure B
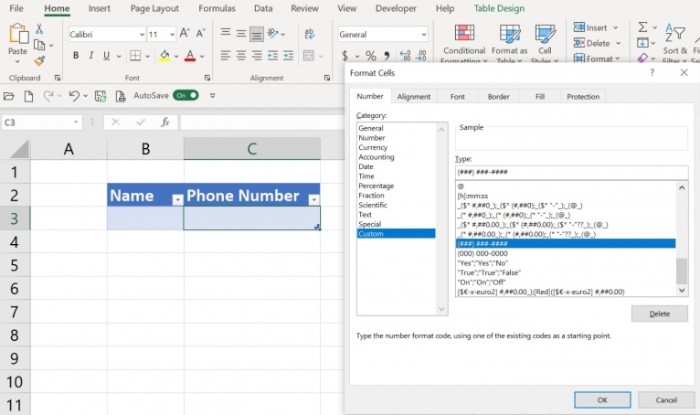
How to Enforce a Consistent Phone Number Format in Microsoft Excel
showcases the addition of a custom format.
Next, we need to apply data validation.
Applying Data Validation in Excel
Excel’s data validation feature enables the limitation of data input to ensure accuracy. While data validation controls can enforce basic business rules, they can also handle more complex requirements. In this case, we will use an expression.
To apply data validation, follow these steps:
- Select cell C3 if it’s not already selected.
- Click the “Data” tab.
- In the “Data Tools” group, click the “Data Validation” option.
- In the resulting dialog, choose “Custom” from the “Allow” dropdown.
- In the “Formula” control, enter the following expression: =AND(ISNUMBER(C3),LEN(C3)=10 (Figure C).
- Click “OK.”
Figure C
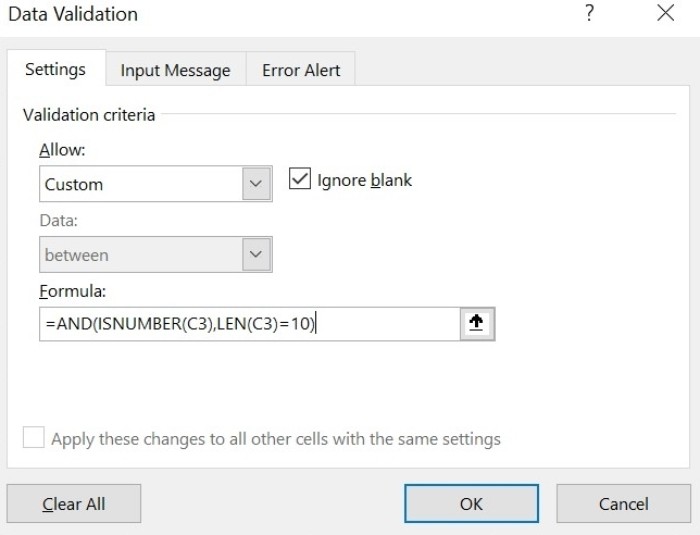
How to Enforce a Consistent Phone Number Format in Microsoft Excel
Demonstrates the entry of an expression to reject entries that are not exactly 10 non-numeric characters.
The expression =AND(ISNUMBER(A2),LEN(A2)=10
- Is the entry a number?
- Is the number exactly 10 characters long?
If either of these conditions is not met, data validation will reject the entry.
Now, let’s see how the custom format and data validation work together to enforce the proper formatting of phone numbers. Enter “1234567890” in cell C3 and press Tab. The custom format will display the value as expected, as shown in Figure D.
Figure D:
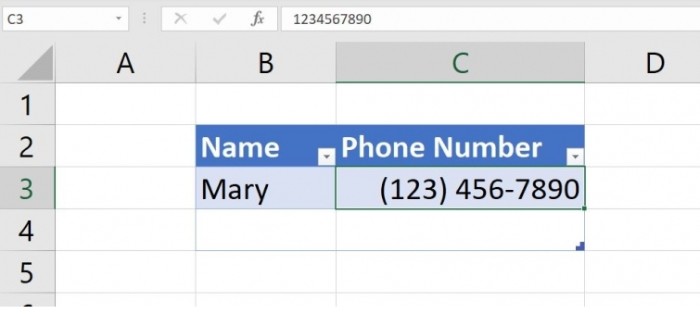
How to Enforce a Consistent Phone Number Format in Microsoft Excel
The input value contains 10 numeric digits, so the custom format works correctly.
Figure E illustrates the result of entering “a234567890”. Since the input value contains a non-numeric character (“a”), data validation displays an error. Clicking “Retry,” replacing “a” with “1,” and pressing Tab will result in data validation accepting the entry. It’s important to note that because we are using an Excel Table object, both the custom format and data validation will be automatically applied to new records.
Figure E:

How to Enforce a Consistent Phone Number Format in Microsoft Excel
Data validation rejects this input value because it contains a non-numeric character.
Entering “12345678” and “12345678901” will also fail data validation. The former has too few digits, while the latter has too many. Make the necessary corrections so that data validation accepts both, as shown in Figure F.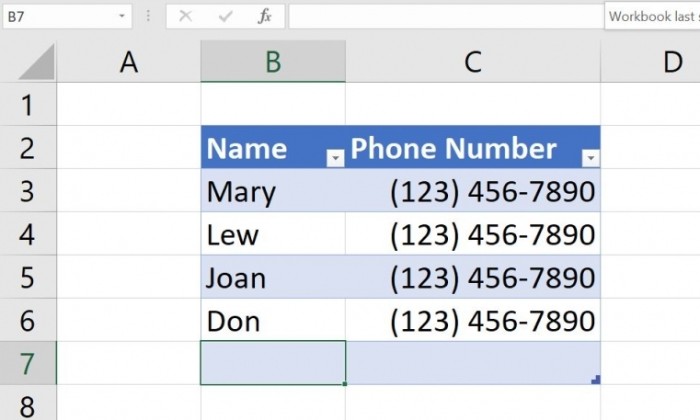
Figure F: Combining a custom format and data validation ensures accurate formatting.
While it is not possible to prevent users from entering incorrect numeric characters, the combination of these two features can help detect other input errors. Many users are unaware that these two features can be combined for better input control.


