• Microsoft Office
  • Microsoft Windows
  • Other Software
  • Anti Virus
  • Blog
    • Word
    • Excel
    • Powerpoint
    • Software tricks/tips
  • POLICIES
    • PAYMENT GUIDE
    • SHIPPING POLICY
    • REFUND POLICY
    • TERMS & CONDITIONS
    • Contact Us

No products in the cart.

  • Microsoft Office
  • Microsoft Windows
  • Other Software
  • Anti Virus
  • Blog
    • Word
    • Excel
    • Powerpoint
    • Software tricks/tips
  • POLICIES
    • PAYMENT GUIDE
    • SHIPPING POLICY
    • REFUND POLICY
    • TERMS & CONDITIONS
    • Contact Us

No products in the cart.

  • Microsoft Office
  • Microsoft Windows
  • Other Software
  • Anti Virus
  • Blog
    • Word
    • Excel
    • Powerpoint
    • Software tricks/tips
  • POLICIES
    • PAYMENT GUIDE
    • SHIPPING POLICY
    • REFUND POLICY
    • TERMS & CONDITIONS
    • Contact Us

No products in the cart.

  • Microsoft Office
  • Microsoft Windows
  • Other Software
  • Anti Virus
  • Blog
    • Word
    • Excel
    • Powerpoint
    • Software tricks/tips
  • POLICIES
    • PAYMENT GUIDE
    • SHIPPING POLICY
    • REFUND POLICY
    • TERMS & CONDITIONS
    • Contact Us
Excel

How to use the Print Selection feature to print selected areas in Excel

0 Comments

How to use the Print Selection feature to print selected areas in Excel: For example, you may have a large amount of data but only need to print small areas of that data. Follow the instructions below to learn how to use the Print Selection feature to quickly print selected areas in Excel.

Usually, if you don’t want to print the entire Excel sheet, you need to set the print area. But if you need to print multiple data areas, setting the print area can be time-consuming. At this point, the Print Selection feature will help you do this easily.

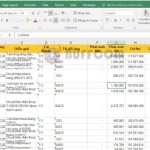
Step 1: Open the Excel file containing the data to be printed. Then, highlight the data area you want to print. For example, in this case, we need to print the A1:C10 area first.

How to use the Print Selection feature to print selected areas in Excel

How to use the Print Selection feature to print selected areas in Excel

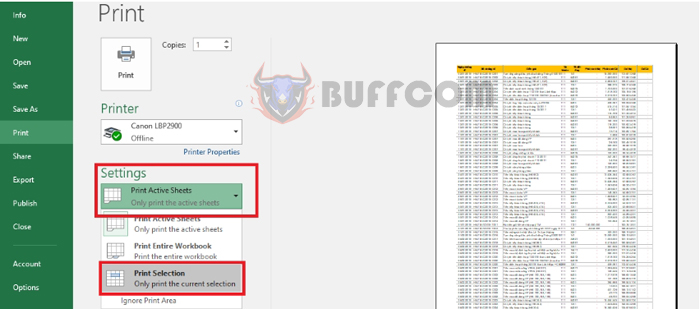
Step 2: Next, select the File tab on the Ribbon. Then, choose Print. Or you can use the shortcut Ctrl + P to open the print settings.

How to use the Print Selection feature to print selected areas in Excel

How to use the Print Selection feature to print selected areas in Excel

Step 3: Next, select the first item in the Settings section. The scroll bar appears, and you choose Print Selection.

How to use the Print Selection feature to print selected areas inStep 4: Next, select Page Setup to adjust the print page to fit. After adjusting, you just need to click Print to print the adjusted page.

How to use the Print Selection feature to print selected areas inStep 5: After printing the first data area, if you want to print another data area, simply highlight the area you want to print and follow the same steps as above.

How to use the Print Selection feature to print selected areas in Excel

How to use the Print Selection feature to print selected areas in Excel

So, the article above has shown you how to use the Print Selection feature to print selected areas in Excel. Hopefully, this article will be helpful to you in your work. Good luck!

2
48 Views
6 Points To Pay Attention to Eliminate Dashboard ClutterPrev6 Points To Pay Attention to Eliminate Dashboard ClutterApril 27, 2023
How to use AutoFit to automatically adjust row and column width to fit data in ExcelApril 27, 2023How to use AutoFit to automatically adjust row and column width to fit data in ExcelNext

Leave a Reply Cancel reply

Your email address will not be published. Required fields are marked *

Recent Posts
  • Retrieve Data Based on Data Validation
    September 7, 2023
    Excel
  • How to Convert Multiple Rows to Columns and Rows in Excel?
    September 6, 2023
    Excel
  • VLOOKUP for Automatic Discount in Data Validation
    September 6, 2023
    Excel
  • How to Convert Text Dates to Dates in Excel?
    September 5, 2023
    Excel
Categories
  • Blog 80
  • Excel 754
  • Powerpoint 36
  • Software tricks/tips 128
  • Uncategorized 8
  • Word 109
Tags
the ISERROR
Top rated products
  • Trend Micro Internet Security 3 Devices 1 Year Key GLOBAL Trend Micro Internet Security 3 Devices 1 Year Key GLOBAL
    Rated 5.00 out of 5
    $17.00
  • Windows 11 Pro Key Global
    Rated 5.00 out of 5
    $11.00
  • AVG Internet Security 2021 10 Devices 2 Years Global AVG Internet Security 2021 10 Devices 2 Years Global
    Rated 5.00 out of 5
    $42.20
  • Trend Micro Maximum Security 3 Devices 1 Year key Global Trend Micro Maximum Security 3 Devices 1 Year key Global
    Rated 5.00 out of 5
    $15.00
  • Windows 11 Home Key Global 2021
    Rated 5.00 out of 5
    $15.00
Products
  • Buy Office 2021 Professional Plus Key Global For 5 PC
    Rated 5.00 out of 5
    $45.00
  • Buy Office 2021 Professional Plus Key Global Bind To Your Microsoft Account
    Rated 4.83 out of 5
    $49.00
  • Windows Server 2022 Datacenter Key Global
    Rated 5.00 out of 5
    $15.00
  • Windows Server 2022 Standard Key Global
    Rated 4.47 out of 5
    $15.00
  • Windows Server 2022 Remote Desktop Services Device Connections (50) Cal Key Global
    Rated 5.00 out of 5
    $45.00

Buffcom.net always brings the best digital products and services to you. Specializing in Office Software and online marketing services

BIG SALE 50% IN MAY

Microsoft Office
Microsoft Windows
Anti-Virus
Contact Us

Visit Us:

125 Division St, New York, NY 10002, USA

Mail Us:

buffcom.net@gmail.com

TERMS & CONDITIONS | PAYMENT GUIDE  | SHIPPING POLICY  | REFUND POLICY

Copyright © 2019 buffcom.net  All Rights Reserved.