The IF function in Excel – Basic knowledge you need to master
The IF function is one of the most commonly used functions in Excel, with the ability to assign flexible logical options to handle many different situations in a spreadsheet. In this article, let’s learn about the IF function in Excel and its amazing features together with Buffcom.net.
Microsoft Excel is the most widely used spreadsheet software in the world, with many superior features that help improve work efficiency in number-related fields such as finance and accounting. In this article, Buffcom.net will briefly explain the IF function in Excel and provide two real-life examples for you to understand the concept and how the IF function works in Excel.
What is the IF function in Excel?
The IF function is one of the simplest and most useful functions in Excel. It can automatically fill in a value in a cell based on the evaluation of a specified condition. You can find this function in the Logical category.
When starting to use the IF function in the Logical category, a dialog box appears allowing you to enter the three arguments of the function or other data components. This is the easiest way if you are just getting familiar with Excel formulas. You can directly view the result returned after entering the arguments into the three fields: Logical_test, Value_if_true, and Value_if_false (displayed at the bottom of the dialog box in the Formula result = line).
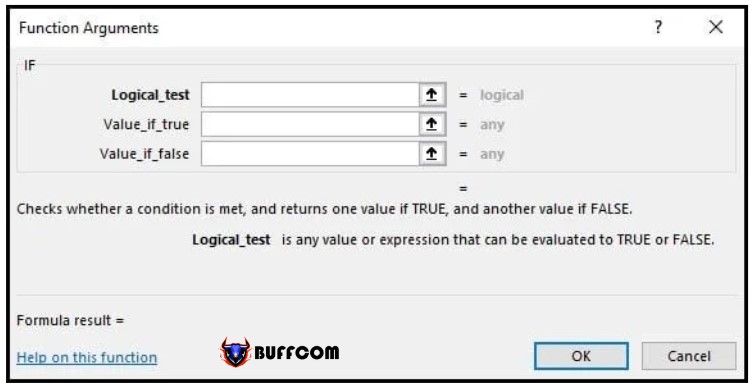
The arguments of the IF function in Excel are as follows:
 Here is an example illustrating how the IF function works. Suppose in a family, parents allocate pocket money to their children based on the amount of household chores they perform:
IF the child takes out the garbage AND cuts the grass AND washes the dishes AND walks the dog, the child will have enough pocket money.
Setting up the IF function in Excel
In the example above, Excel can calculate the pocket money using a logical test based on whether the values in the cell match the Excel formula or not.
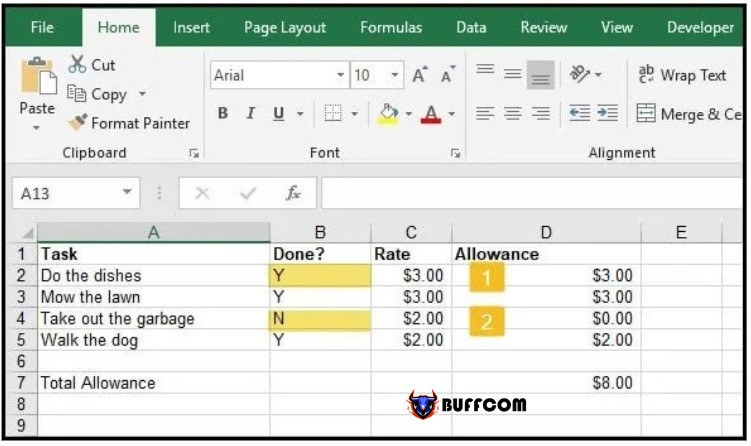
For example, in the table below, we can create a spreadsheet with tasks that need to be completed to receive a salary. If the job is completed (TRUE condition), the value (1) will be returned in column D (salary received). If the job is not completed (FALSE condition), no value (2) will be returned.
 Similarly, you can express the logical expression above as follows:
IF cell B2 contains the value “Y”, take the data from column Rate in cell C2 ($3.00) and put it in the Allowance column in cell D2.
IF cell B2 does not contain the value “Y”, output the value 0 in cell D2.
As shown in the illustration, the logical IF condition always returns TRUE or FALSE. In the highlighted parts (1) and (2), the spreadsheet pays for the “Do the dishes” task (1) and does not pay for the “Take out the garbage” task (2) as it is not completed.
How to enter arguments for the IF function in Excel
1. Click on the cell where you want to insert the Excel formula.
2. In the Formulas tab, click on Insert function…
3.In the Insert Function dialog box, type “if”.
4.Click on the Logical_test field to display the text cursor.
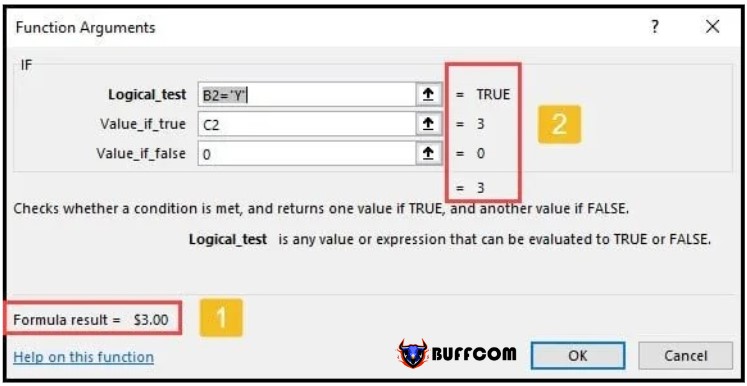
5.Click on the cell you want to reference for evaluation in the worksheet. Excel will automatically fill in the address of the selected cell, which is “B2″ in the illustration below.
6. Add an equals sign and a value in double quotation marks. For example, =”Y”.
7. In the Value_if_true field, enter the value to return if cell B2 equals “Y”. In the example below, cell C2 is selected.
8. In the Value_if_false field, enter the value to return if cell B2 does not contain “Y”. In this example, Buffcom will enter 0. You can also leave this field blank, but the value returned will be “FALSE”.
9. Look at the Formula result = value section (number 1 label below) for the result. You need to check that this section displays as shown in the illustration.
 10. Click OK.
11. Copy the formula to other cells in the column.
Advanced use of the IF function in Excel
The IF function in Excel is not only used to simply evaluate “Y” or “N” conditions, but it can also perform much more flexible and complex tasks than the example above.
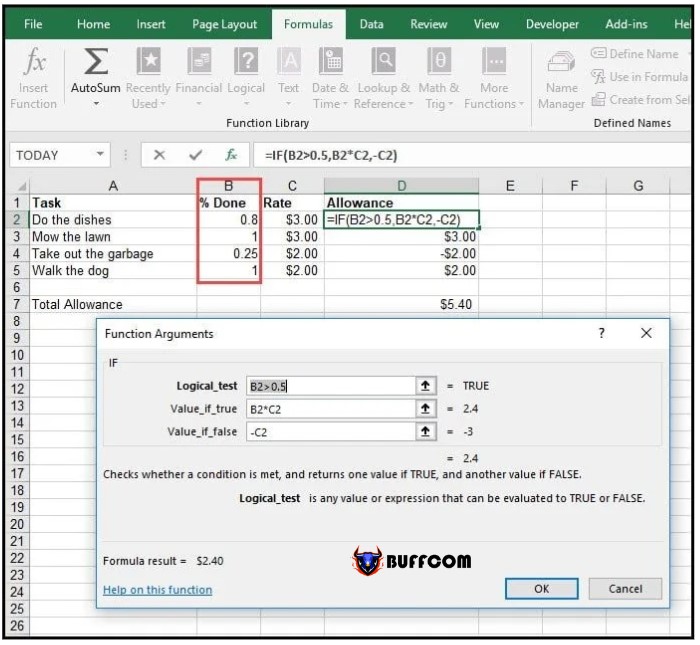
Example 2: You can convert the Done? column (column B) in the example above to %Done with a specific numeric result.
The new formula will return the actual amount received in the Allowance column (column D) based on the percentage of work done in the %Done column (column B). If the percentage of work done is greater than 0.5, the actual amount received based on the completion percentage will be returned in the Allowance column (the “amount” in the Rate column multiplied by the “completion percentage” in the % Done column). If the completion percentage is below 0.5, the Allowance column will return a negative value, which may imply a penalty for a child who does not meet the requirements.
 The IF function in Excel is a versatile and useful function. Once you understand it, you can use it in many different contexts. The two examples introduced above serve as a foundation to help you understand its essence and operation. Once you are proficient, you can use the IF function in Excel to handle transactions such as taxation for goods, shipping fees, or create a tracking table for rewards/penalties for children in the family.
If you find this article helpful, please Like & Share to support Buffcom.net Thank you for following along.


