Running macOS on Windows 10 using VMware Workstation Player
You can install macOS on Windows using VirtualBox. But if you prefer VMware over VirtualBox, you can create a macOS Monterey virtual machine using VMware that works just like VirtualBox. And, like VirtualBox, VMware requires patching before the macOS Monterey virtual machine can operate.
This guide applies to both Intel and AMD systems. AMD users need to use the second code snippet when editing the virtual machine’s VMX file.
Files needed to create a macOS virtual machine on Windows 10 using VMware Workstation Player
Before getting into the steps, you need to download and install the necessary tools.
You also need a copy of macOS. Monterey is the latest stable version of macOS at the time of writing, although macOS Ventura is coming soon. You can find download links for macOS Monterey in the link below.
Logging into your iCloud account on a VMware Player virtual machine is much easier than on a VirtualBox virtual machine. Although this is macOS running on Windows, not all features of macOS will work.
When the download process completes, right-click on the file and select “Extract to macOS Monterey” using a decompression tool like WinZip or 7-Zip.
Steps to run macOS on Windows 10 using VMware Workstation Player
1. VMware Workstation Player patch
 Before getting started, download the latest patch tool.
Step 1: Navigate to the location where you downloaded the patch tool. Extract the contents of the archive. This works best when both the VMware root folder and the extracted archive are located on the same drive (for example, both the VMware folder and the extracted archive are located on the C:\ drive).
Step 2: Make sure VMware is fully closed. In the Unlocker folder, right-click on the win-install command file and select Run as Administrator. The Command Prompt window will open and the patching commands will run.
Note: When running the commands, you need to pay attention to any “File not Found” messages.
The most common reason for the “file not found” or “system cannot find the file specified” message is that VMware Workstation Player is installed in a different location than the default folder and the patch is being executed from a different folder.
Once the patch is complete, you can open VMware.
2. Creating a macOS Monterey virtual machine with VMware
Step 1: Select “Create a New Virtual Machine” and choose “I will install the operating system later.”
Step 2: Now, select “Apple Mac OS X” and change the version to “macOS 12“. If you don’t see the macOS options, it’s because the patch was not installed correctly.
Step 3: Next, you need to choose a name for your macOS Monterey virtual machine. Choose something memorable, then copy the file path to a convenient location – you will need it to make some edits in a moment.
Step 4: On the next screen, set the disk size to at least 50GB and select “Store virtual disk as a single file”. Complete the virtual disk creation wizard, but do not power on the virtual machine yet.
3. Editing macOS Monterey virtual machine settings
 Before you can power on the virtual machine, you need to adjust the hardware settings.
Step 1: From the VMware main screen, select your macOS Monterey virtual machine, then right-click and select “Settings”.
Step 2: Increase the virtual machine memory to at least 4GB. You can allocate more if you have spare RAM.
Step 3: In “Processors”, edit the number of available cores to 2 (or more if available).
Step 4: Now, select “New CD/DVD (SATA) > Use ISO image file”. Browse to the macOS Monterey ISO file and select it.
Step 5: Close the “Hardware” window and select “Finish”.
However, do not power on the VMware Workstation Player macOS Monterey virtual machine yet. There are still some configuration file edits to make.
4. Edit macOS Monterey VMX file for Intel hardware
This section is for Intel users. It involves the final set of edits that you need to make before starting your VMware macOS Monterey virtual machine!
Close VMware. Go to the location where you have saved your macOS virtual machine. The default location is:
C:\Users\YOURNAME\Documents\Virtual Machines\YOUR MAC OS X FOLDER
Navigate to macOS Monterey.vmx, right-click and select Open with > Notepad (or your preferred text editor). Scroll down to the end of the configuration file and add the following line:
smbios.reflectHost = “TRUE”
hw.model = “MacBookPro14,3”
board-id = “Mac-551B86E5744E2388”
smc.version = “0”
Select Save > Exit.
Now, you can open VMware, select your macOS Monterey virtual machine, and power it on!
5. Edit macOS Monterey VMX file for AMD hardware
This section is for AMD users. Similar to the previous section, AMD users also need to edit the VMX file before proceeding. The AMD version has more lines than the Intel version, but you can simply copy and paste the data into the file.
Close VMware. Go to the location where you have saved your macOS virtual machine. The default location is:
C:\Users\YOURNAME\Documents\Virtual Machines\YOUR MAC OS X FOLDER
Navigate to macOS Monterey.vmx, right-click and select Open with > Notepad (or your preferred text editor). Scroll down to the end of the configuration file and add the following lines:
cpuid.0.eax = “0000:0000:0000:0000:0000:0000:0000:1011”
cpuid.0.ebx = “0111:0101:0110:1110:0110:0101:0100:0111”
cpuid.0.ecx = “0110:1100:0110:0101:0111:0100:0110:1110”
cpuid.0.edx = “0100:1001:0110:0101:0110:1110:0110:1001”
cpuid.1.eax = “0000:0000:0000:0001:0000:0110:0111:0001”
cpuid.1.ebx = “0000:0010:0000:0001:0000:1000:0000:0000”
cpuid.1.ecx = “1000:0010:1001:1000:0010:0010:0000:0011”
cpuid.1.edx = “0000:0111:1000:1011:1111:1011:1111:1111”
Select Save > Exit.
Now, you can open VMware, select your macOS Monterey virtual machine, and power it on!
6. Configuring and Installing macOS Monterey Virtual Machine
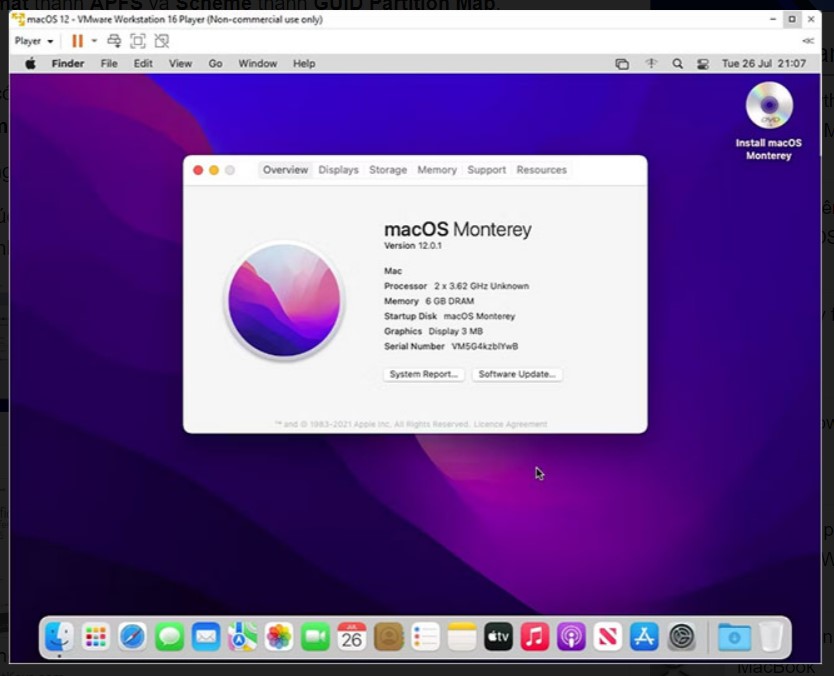
After launching the macOS Monterey virtual machine, you need to configure the storage drive before installation.Step 1: Next, select Disk Utility. Create a clean drive for macOS Monterey installation.
Step 2: In Disk Utility, select VMware Virtual SATA Hard Drive Media from the Internal drive column.
Step 3: After selecting the drive, go to the Erase option found at the top of the utility.
Step 4: Name the drive, set the Format to APFS, and Scheme to GUID Partition Map.
Step 5: Select Erase.
Step 6: After completion, you can exit Disk Utility to return to the Monterey recovery screen. From here, select Install macOS Monterey.
Step 7: Select the drive you created in Disk Utility > Continue.The installation process takes a while but is faster than VirtualBox. After macOS Monterey loads, you can configure the operating system as appropriate.
7. Installing VMware Tools in macOS Monterey Virtual Machine
Now, you need to install VMware Tools, a collection of utilities and extensions that improve mouse processing, video performance, and other useful things.
While the macOS virtual machine is running, go to Player > Manage > Install VMware Tools.
The installation disc will appear on the macOS desktop. When prompted, select Install VMware Tools, then allow it to access the removable volume. Follow the prompted installation process, which will require a restart upon completion.
Troubleshooting
A few things may go wrong during the macOS virtual machine installation in VMware Player Workstation.
- If you cannot see “Apple Mac OS X” in the virtual machine creation wizard, you need to review the troubleshooting process. Ensure that all processes related to VMware Player are closed.
- If you receive the message “Mac OS X is not supported with binary translation” when starting the virtual machine, you may need to enable virtualization in your BIOS/UEFI configuration.
- If you receive the message “VMware Player unrecoverable error: (vcpu-0)” when starting the virtual machine, you need to go back to the macOS Monterey.vmx configuration file to ensure that you added the additional line and saved the edit.
- If you are running AMD hardware and stuck at the Apple logo, first power off the virtual machine. Now, go to Settings > Options > General. Change Guest operating system to Microsoft Windows and Version to Windows 10 x64. Press OK, then try to power on the virtual machine again. When the Apple logo passes, power off the virtual machine, then set Guest operating system back to Apple Mac OS X, selecting the correct version.