8 Default Word Settings to Configure Before Composing
8 Default Word Settings to Configure Before Composing. Before composing a document, configuring certain operations within the text is necessary and important. Setting defaults before text composition helps ensure that the document adheres to the proper regulations and layout standards for each content type. Each section of the text has its own attributes and formatting styles to bring a professional and artistic quality to the text. This article will guide you on how to configure Word defaults that need to be done before composing a document.
Default Word Settings to Change the Unit in the File
The commonly used unit is cm.
Steps to perform:
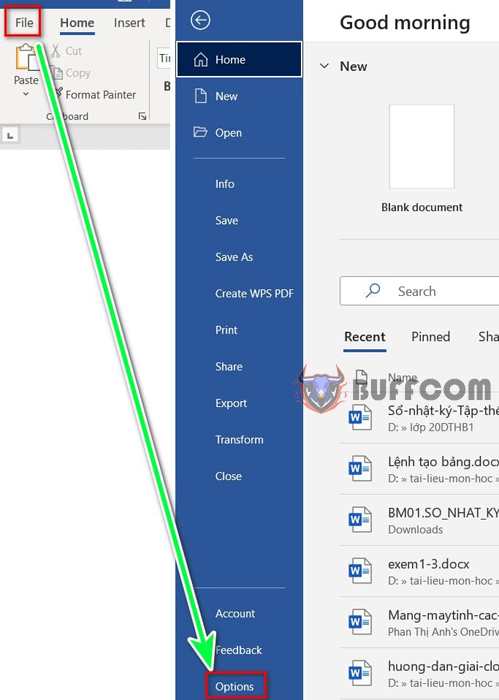
Step 1: In the Word interface, go to the File tab => Options.
8 Default Word Settings to Configure Before Composing
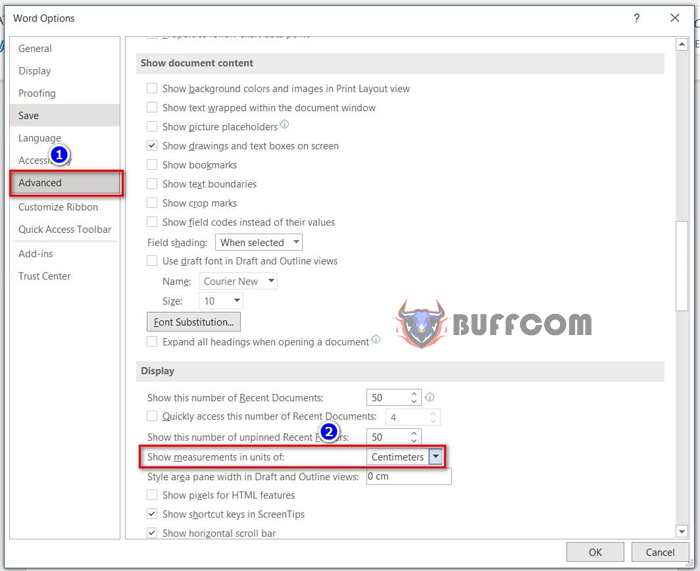
Step 2: The Word Options dialog box appears. Select the Advanced => Display section and change the unit in the Show measurements in units of field.
8 Default Word Settings to Configure Before Composing
Step 3: Press OK to complete.
A4 Portrait Paper Size
You will perform the following steps:
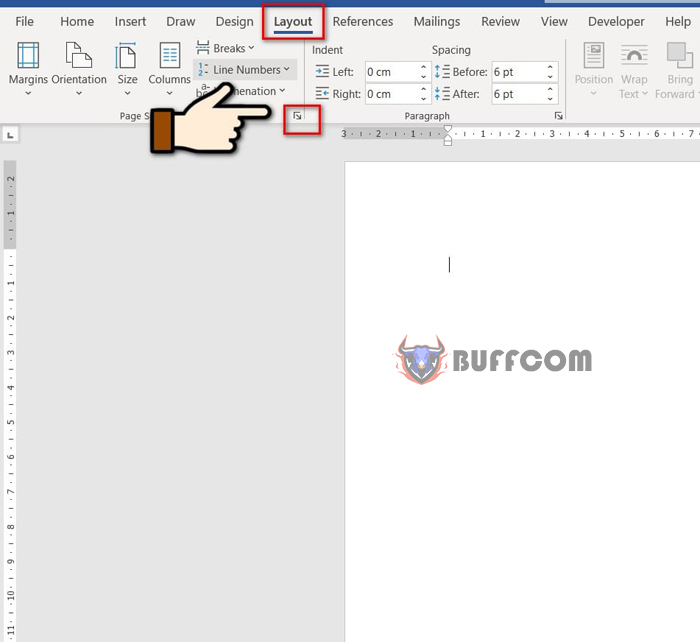
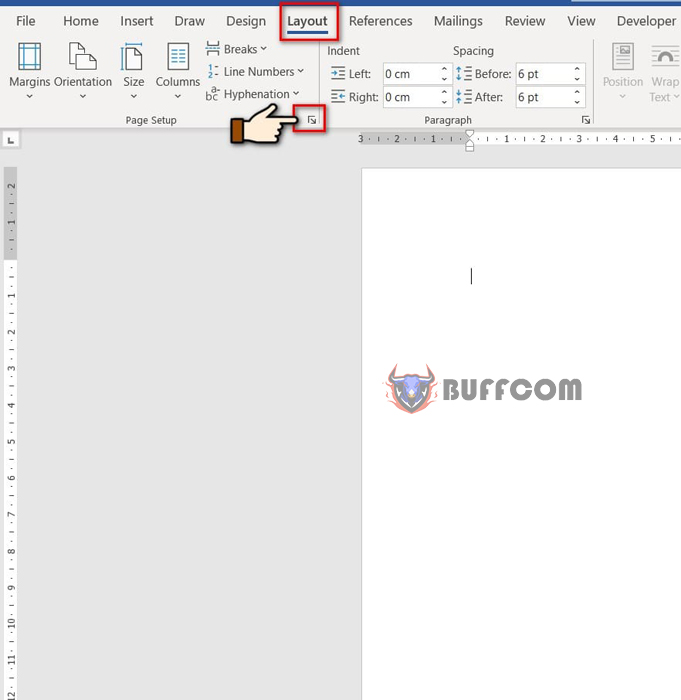
Step 1: Go to Layout => check the arrow next to the Page Setup group.
8 Default Word Settings to Configure Before Composing
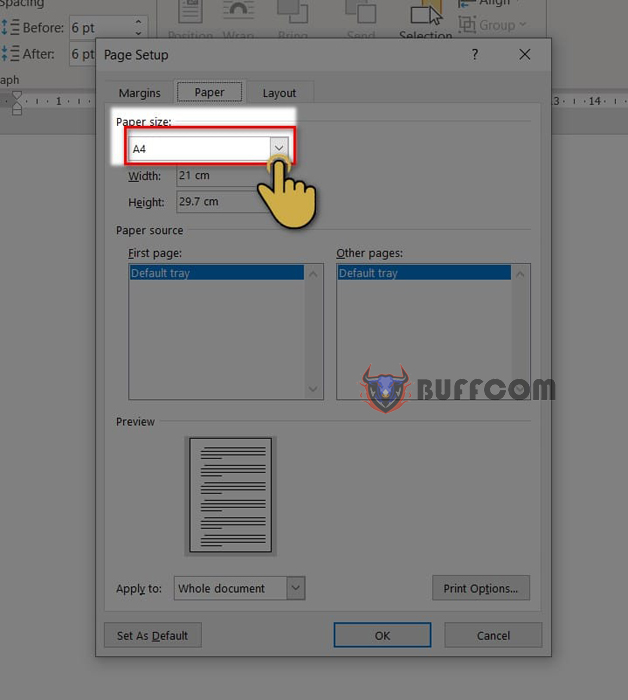
Step 2: The Page Setup box appears. Here, select Paper and change the A4 paper size in the Paper size field.
8 Default Word Settings to Configure Before Composing
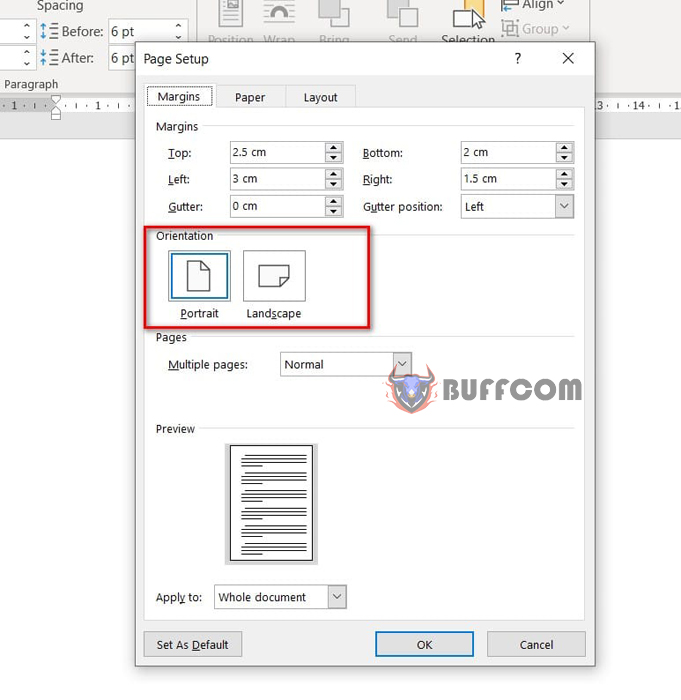
Step 3: Then, select the Margins section and change the paper orientation to Portrait in the Orientation field.
8 Default Word Settings to Configure Before Composing
Margin Alignment
8 Default Word Settings to Configure Before Composing
To align margins in Word, go to the Layout tab => click the small arrow next to the Page Setup group.
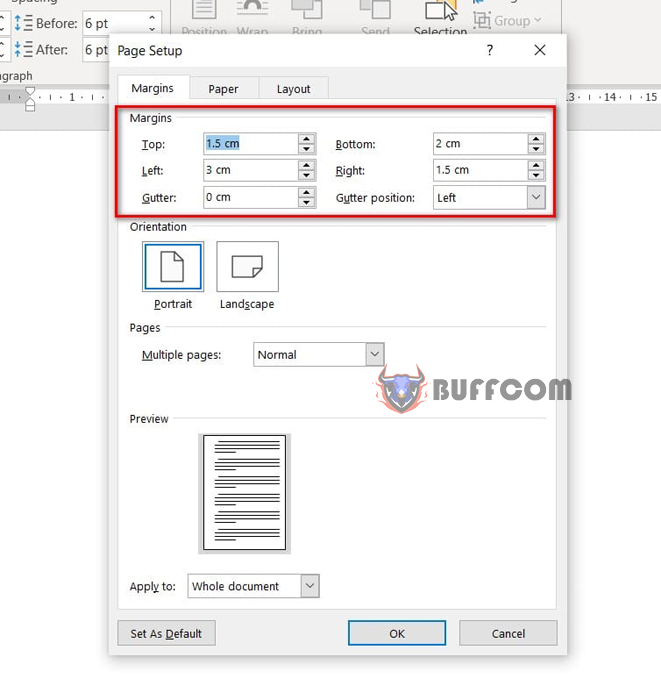
The Page Setup dialog box appears, where you will change the margin size in the Margin section.
8 Default Word Settings to Configure Before Composing
In the text, two types of margin alignment are commonly used as below:
Left 3cm, top 2cm, bottom 1.5 cm, right 1.5cm
Left 3.5cm, top 2.5 cm, bottom 2.5 right 2cm
Depending on the amount of content, choose the appropriate margin alignment!
Set Default “Normal Style” Information
“Normal Style” is a default formatting template assigned to a Word object when composing a new document.
“Normal Style” contains various formatting information: font, font size, paragraph formatting, tab, numbering, etc.
Steps to set up:
Step 1: Go to the Home tab => Select Normal Style in the Styles group.
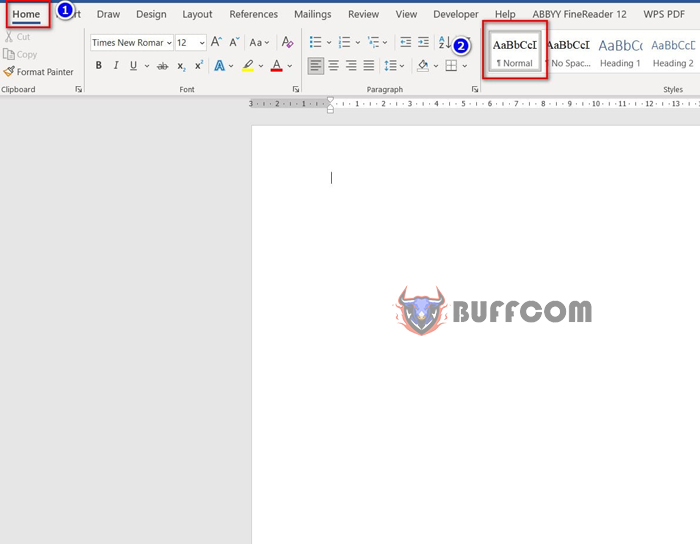
8 Default Word Settings to Configure Before Composing
Step 2: At Normal Style, right-click and select Modify….
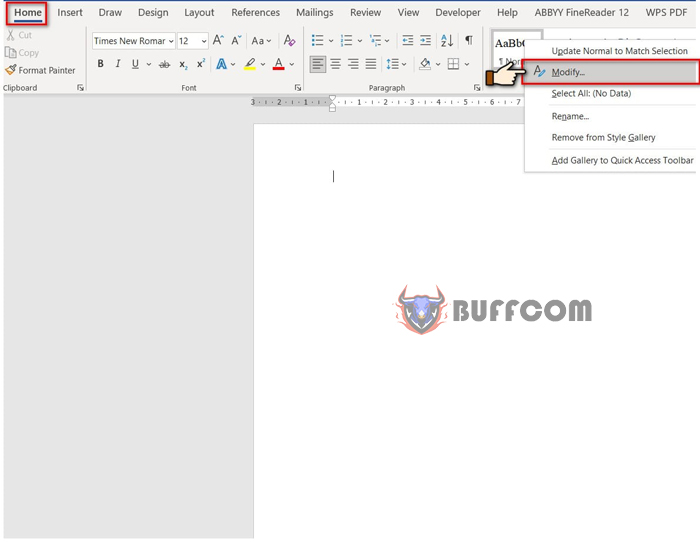
8 Default Word Settings to Configure Before Composing
Step 3: In the Modify Style dialog box, you will change the attributes:
Font: Time New Roman
Font size: 13
Paragraph line spacing:
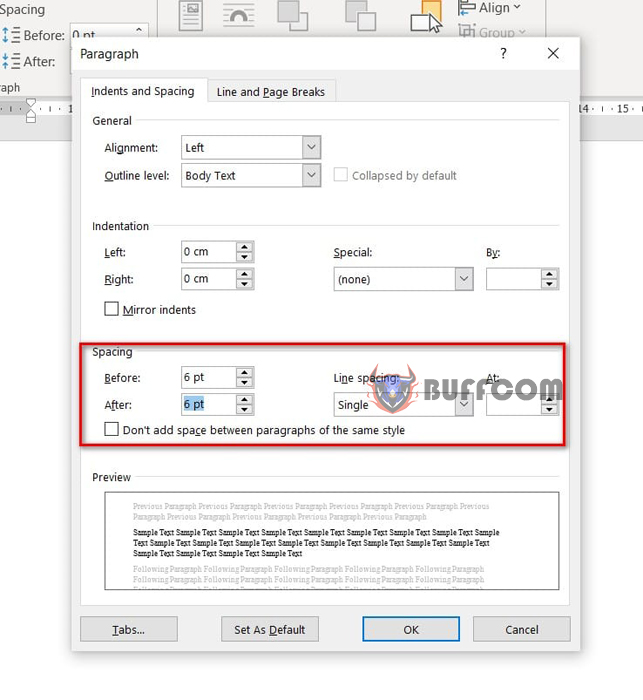
Go to Format => select Paragraph. The Paragraph dialog box will appear:
Under Spacing, adjust the settings as follows:
After: 6pt
Before: 6pt
Line spacing: Single
Note:
If there is a “Don’t add space…” option, uncheck it.
Set As Default -> All documents… to make it the default for future use.
Before adjusting the paragraph line spacing, make sure to determine the cursor position.
8 Default Word Settings to Configure Before Composing
Delete existing tabs:
Go to Format => Tab. The Tabs dialog box will appear, click on Clear All.
Turn off automatic bullet, numbering, and dashes:
Steps to follow:
Step 1: Go to File => Options. The Word Options dialog box will appear.
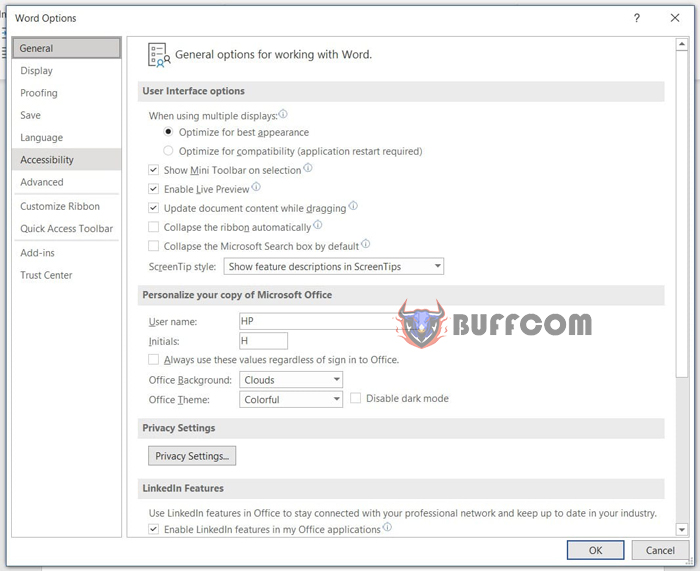
8 Default Word Settings to Configure Before Composing
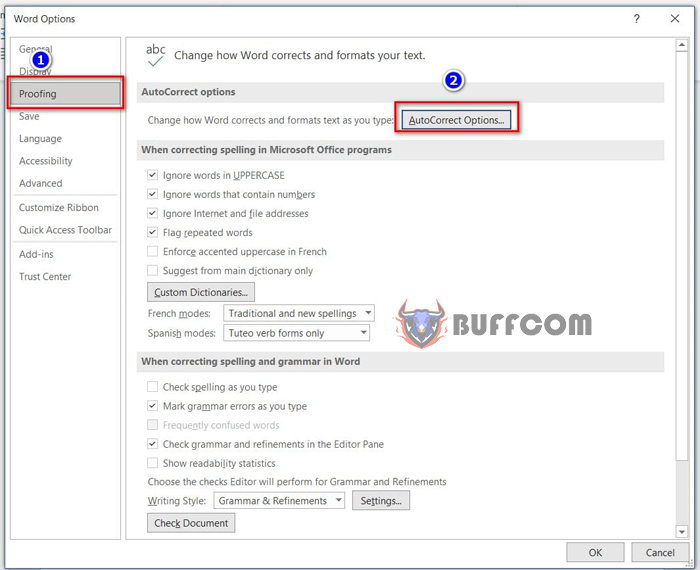
Step 2: Select Proofing => AutoCorrect Options…
8 Default Word Settings to Configure Before Composing
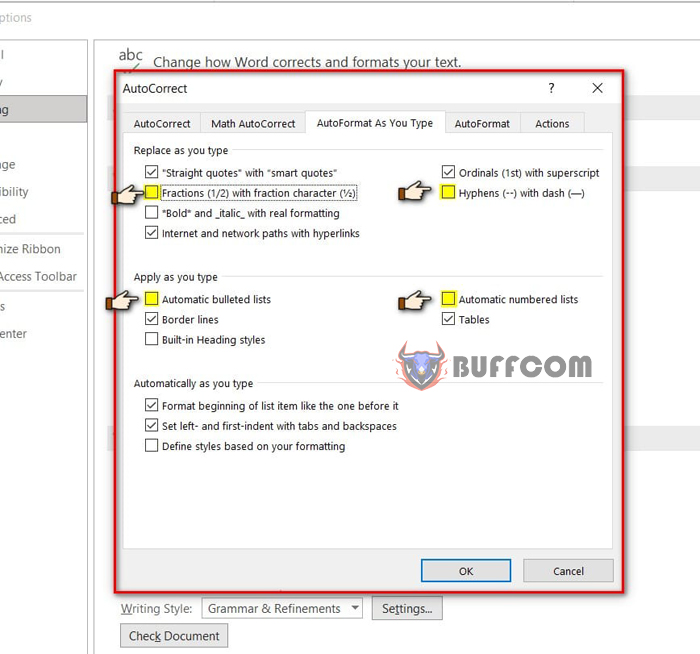
Step 3: Under AutoFormat As You Type, uncheck the boxes for Automatic bulleted lists, Automatic numbered lists, Hyphens (–) with dash (-), and Fractions (1/2) with fraction character (1/2).
8 Default Word Settings to Configure Before Composing
Turn off automatic spell checking. Red underlines for misspelled words:
Steps to follow:
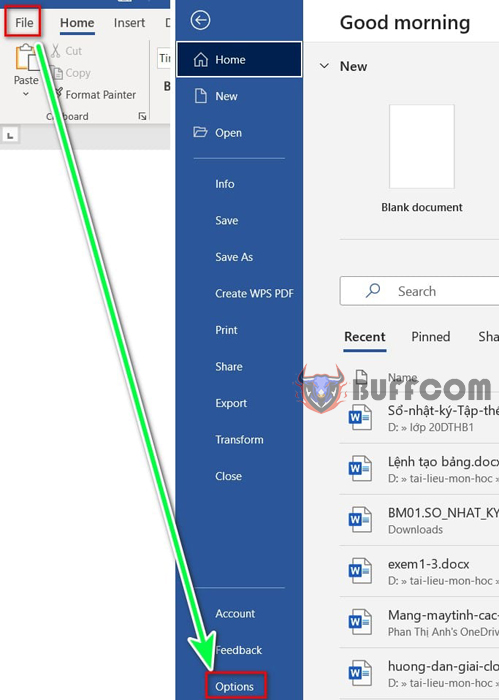
Step 1: Go to File => Options.
8 Default Word Settings to Configure Before Composing
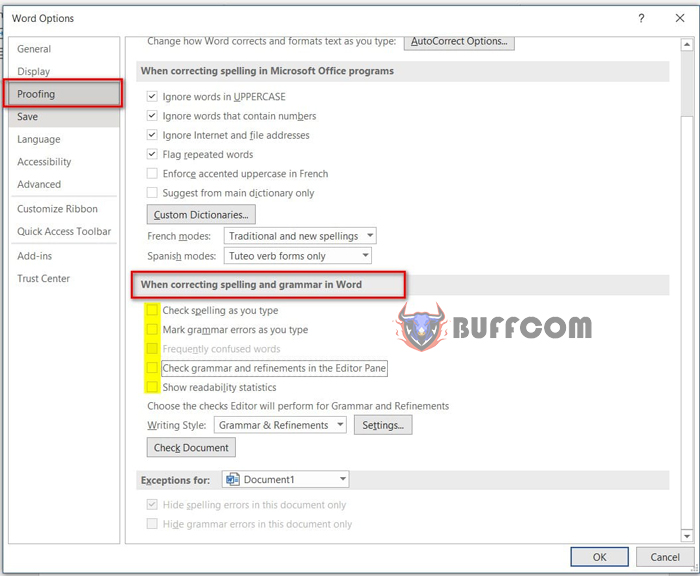
Step 2: Click on Proofing. Scroll down to When correcting spelling and grammar in Word and uncheck all boxes.
8 Default Word Settings to Configure Before Composing
Step 3: Click Ok to finish.
Display the ruler:
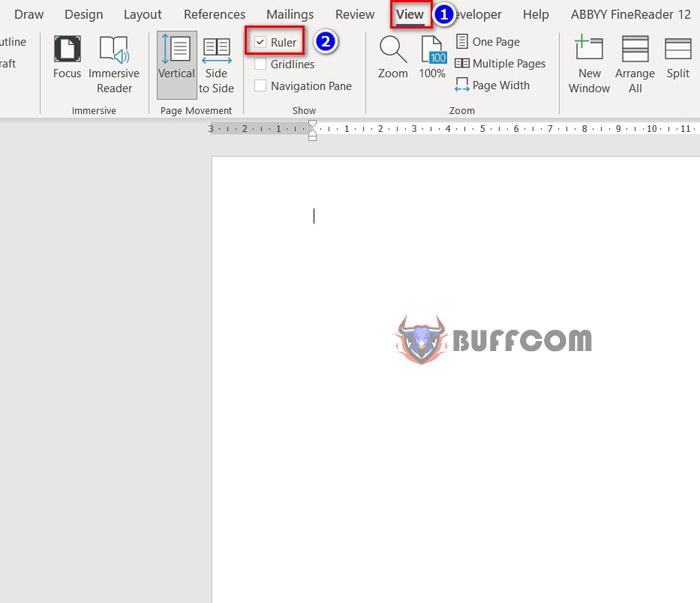
To display the ruler, select View => check the Ruler box.
8 Default Word Settings to Configure Before Composing
Set up 3 most commonly used shortcuts:
Example: Print preview edit mode: Alt + 1
Page setup: Alt + 2
Paragraph: Alt + 3
To set up these shortcuts, follow these steps:
Step 1: Go to File => Options. The Word Options dialog box will appear.
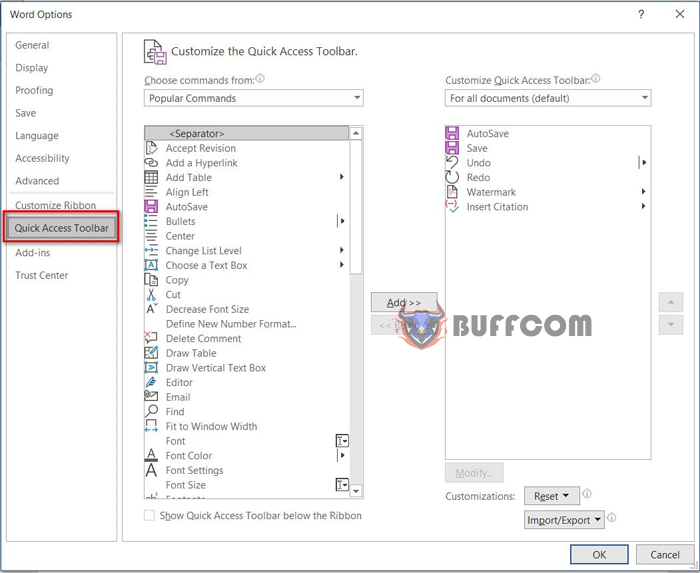
Step 2: Select Quick Access Toolbar.
8 Default Word Settings to Configure Before Composing
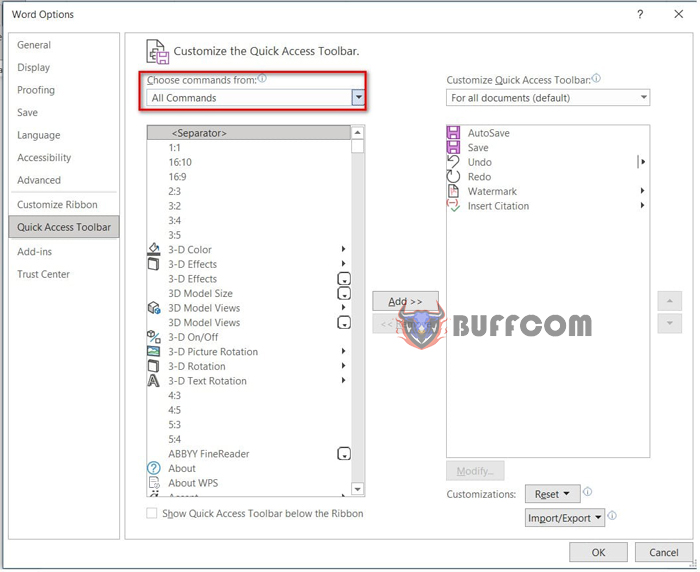
Step 3: Under Choose commands from:, select All commands.
8 Default Word Settings to Configure Before Composing
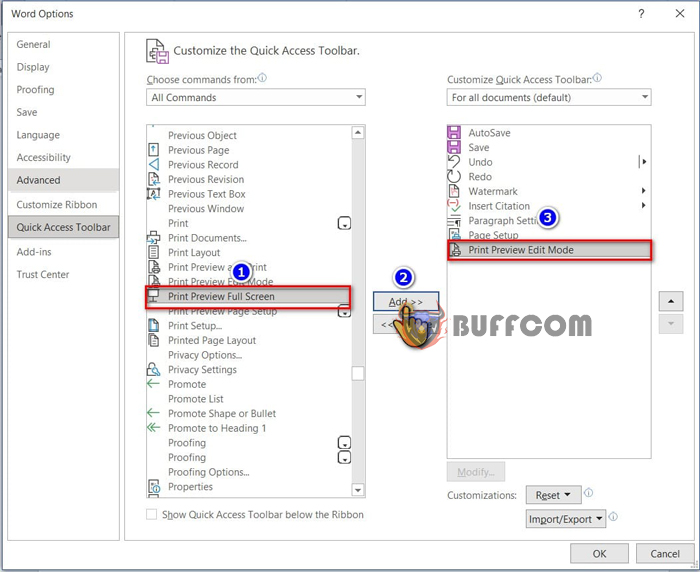
Step 4: Find Page setup, Paragraph setting, and Print preview edit mode under Choose commands from: and click Add to move them to the Customize Quick Access Toolbar column.
8 Default Word Settings to Configure Before Composing
Step 5: Click Ok to finish.
Note: You must move all three commands to the top and arrange them in the following order: Print Preview Edit Mode, Page Setup, Paragraph setting corresponding to the Alt + 1, Alt + 2, Alt + 3 shortcuts.
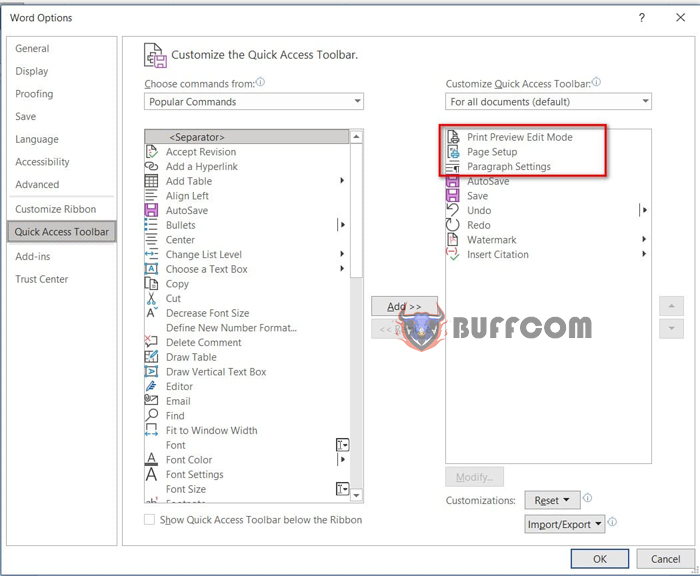 Once you have set up the shortcuts, you can use them quickly and easily.
That’s it! We’ve just gone over 8 default settings you should perform before starting to write your document. Buffcom hope this guide helps you succeed, and please don’t forget to rate this article below.


