A convenient method to delete or remove blank rows in Excel

Blank rows in Excel can be problematic in most spreadsheets. Microsoft Excel relies on blank rows in Excel to determine data ranges, and having blank rows in inappropriate locations can impede various built-in features. Thankfully, there’s a simple way to remove blank rows in Excel from a data range in Excel. However, this technique must be used with caution as it has the potential to delete data unintentionally.
In this Excel tutorial, I’ll demonstrate a quick and easy method to delete blank rows in Excel within a data set without accidentally deleting adjacent data. Throughout this tutorial, I’ll refer to rows that consist solely of blank cells within the data set.
How to prevent data loss when deleting rows in Excel
Deleting rows, whether they are blank or not, can be risky. If you have data located off-screen and out of sight, you may inadvertently delete it while deleting empty cells or rows in your immediate view. Let’s consider a simple example using the data set depicted in Figure A.
Figure A: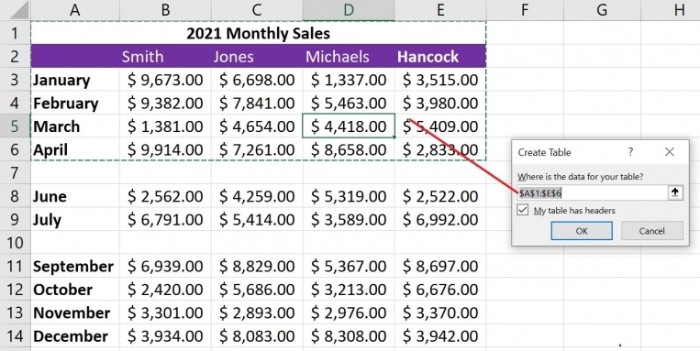
[Image: Sample data set with blank cells in rows 7 and 10.]
Suppose you intend to convert the data set into a Table object by selecting it and pressing Ctrl + T. If you’re fortunate, you’ll notice that Excel doesn’t encompass the entire data range. However, if you fail to notice, you won’t obtain the desired results. Deleting blank rows in Excel is necessary to utilize many of Excel’s built-in features.
How to efficiently select and delete blank cells and rows in Excel
When you come across blank rows in Excel your data set, it becomes necessary to delete them. Manually selecting each blank row can be a time-consuming task. However, there’s a simpler way to achieve this in Excel. Follow the steps below to select all the blank rows in Excel within a data set:
- Select the data range containing your data, such as A3:E14.
- Press the F5 key on your keyboard.
- In the resulting Go To dialog box, click on “Special.”
- Choose the “Blanks” option and click OK. This action selects all the blank cells within the selected range, such as A7:E7 and A10:E10 (refer to Figure B).
[Figure B: Visual representation of the selected blank cells.] 
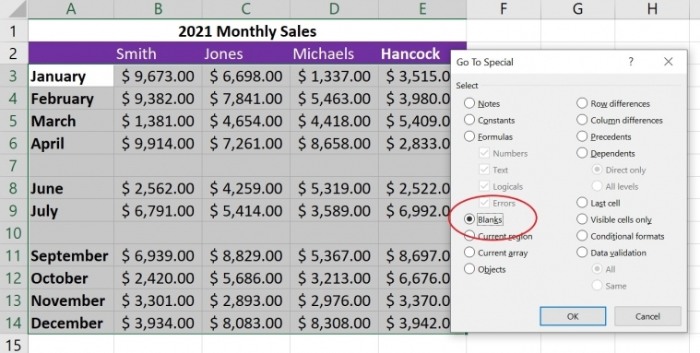
- Click OK to close the dialog box.
By utilizing Excel’s Go To feature, you can quickly select all the blank rows within your selection. Now that the blank rows are selected, you can proceed to delete them. Do not deselect the selection at this point.
Here’s how you can delete the selected blank cells:
- Click on the “Delete” button (not the dropdown) in the Cells group on the Home tab. This action should delete only the selected cells. If the desired outcome is not achieved, you can use the following alternative steps:
- With the blank rows (e.g., rows 7 and 10) still selected, click on the “Delete” dropdown in the Cells group on the Home tab, and then choose “Delete Cells.”
- In the subsequent dialog box, select “Delete Cells Up” (see Figure C).
[Figure C: Choose “Delete Cells” and then “Delete Cells Up” option.]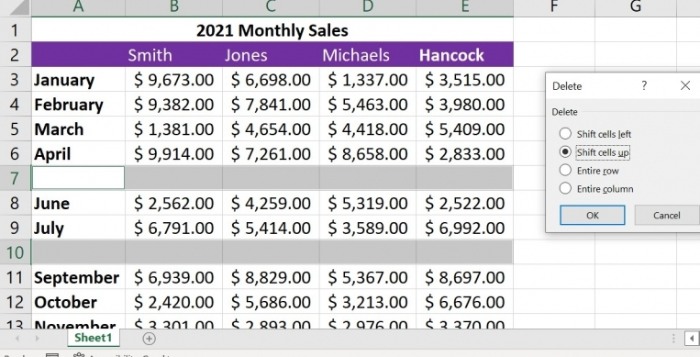
- Click OK.
Excel will remove the blank cells from the selected data range (as shown in Figure D).
[Figure D: Visual representation of the data range after the blank cells are deleted.]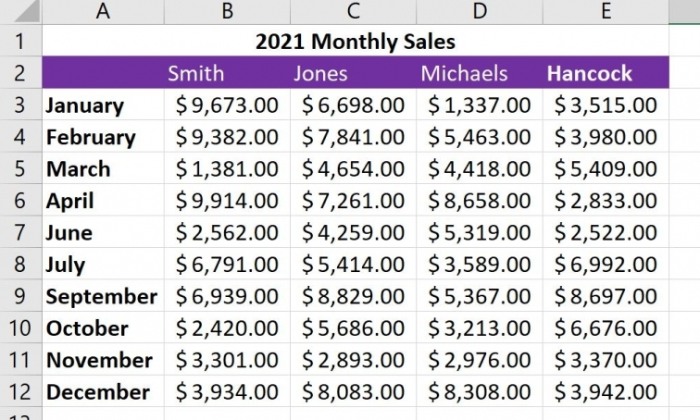
When choosing “Delete Cells,” only the blank cells within the selected range will be deleted. Exercise caution when selecting “Delete Sheet Rows” in step 2, as it may inadvertently remove data located to the right of the selection. Ensure you make the appropriate choice based on your objective of deleting only the blank cells or entire rows.
In scenarios where you have a large data set with dozens or even hundreds of records to review for blank cells, manually deleting rows one by one would be impractical. This method saves you time and effort while eliminating the risk of overlooking any blanks.


