How to use the Camera tool to crop images in Excel

How to use the Camera tool to crop images in Excel: The Camera tool in Excel is a very convenient way to crop images. However, not everyone knows about this tool. Follow the steps below to learn how to use the Camera tool in Excel.
Step 1
First, you need to open the Camera tool by selecting the File tab on the toolbar. Then select Options.

How to use the Camera tool to crop images in Excel
Step 2: The Excel Options window will appear.
Select the Quick Access Toolbar tab in the left-hand list. Then, under the Choose commands from section, select All Commands. Next, scroll down and select Camera from the list, and then click Add>>. Finally, click OK to finish.

How to use the Camera tool to crop images in Excel
Step 3
The camera icon for the Camera tool will now appear in the Quick Access Toolbar. Simply select the data area you want to capture, and then click the Camera icon.

How to use the Camera tool to crop images in Excel
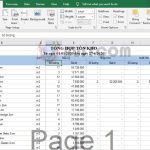
Step 4
After selecting the data area and clicking the Camera tool icon, left-click where you want to place the image of the selected area. That’s it, the image of the selected area will be cropped out.

How to use the Camera tool to crop images in Excel
Step 5
After the image has been cropped, you can edit it by clicking on the image and selecting the Format tab on the toolbar. Here are some editing options:
- Corrections: Adjust brightness of the image
- Color: Adjust color of the image
- Picture Styles: Adjust the style of the image
- Picture Border: Set the border of the image
- Picture Effects: Apply effects to the image
- Picture Layout: Adjust the layout of the image
- Rotate: Rotate the image
- Crop: Crop the image
- Height: Adjust the height of the image
- Width: Adjust the width of the image

How to use the Camera tool to crop images in Excel
That’s it! This article has shown you how to use the Camera tool to crop images in Excel. We hope this article is useful for you in your work. Good luck!