10 Excel Tips to Help Office Workers Increase Efficiency
10 Excel Tips to Help Office Workers Increase Efficiency. In today’s article, I will introduce 10 interesting Excel tips and tricks that I believe are very useful for office workers like us to work more efficiently, thereby significantly increasing work productivity. Let’s get started!
AutoCorrect
10 Excel Tips to Help Office Workers Increase Efficiency
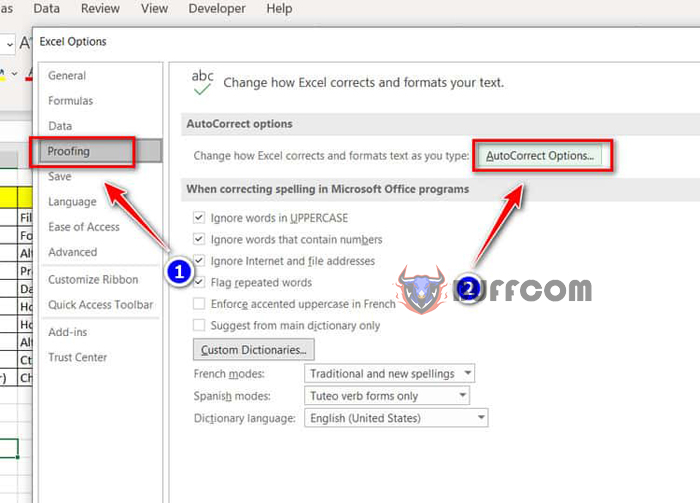
First is the AutoCorrect feature, which is particularly useful when you have to enter large amounts of data with many duplicate entries. This feature allows you to enter a shortcut for a certain string of characters, and after pressing Enter, it will automatically display the designated string of characters that you have set (for example, entering “pkt” will become “accounting department”). First, click on the File tab and select Options in the bottom left corner. At this point, the Excel Options dialog box will appear, and you can select the Proofing option and then click on AutoCorrect Options.
10 Excel Tips to Help Office Workers Increase Efficiency
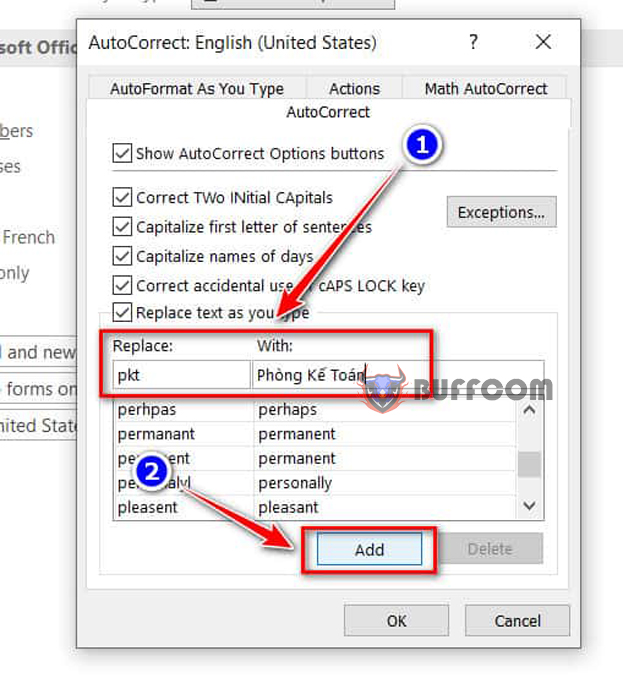
When the AutoCorrect dialog box appears, enter the shortcut string of characters to be replaced in the Replace field and enter the designated string of characters in the With field. After that, click on the Add button below to save. To delete a previously added string, select the string and click on the Delete button.
Shrink Text to Fit in Excel Cells
10 Excel Tips to Help Office Workers Increase Efficiency
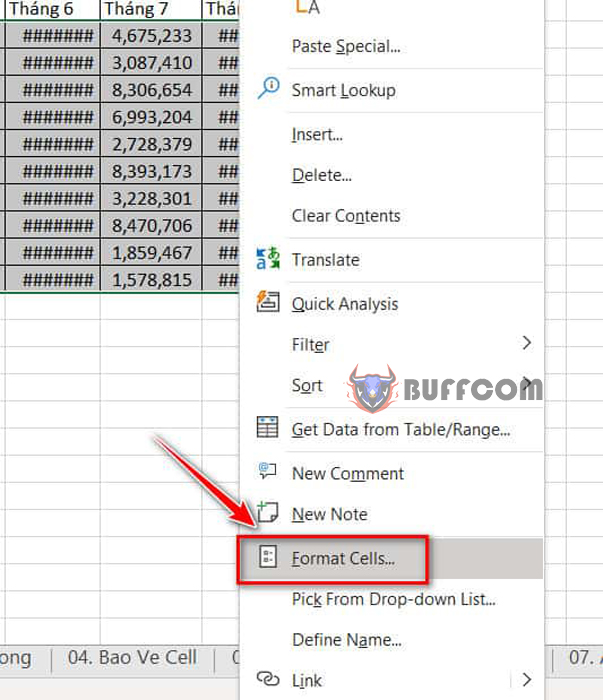
Next is how to shrink text to fit in Excel cells, meaning that the content in the cell will automatically change size to fit in the cell even if the width is not enough. First, select the data range, right-click, and then select Format Cells.
10 Excel Tips to Help Office Workers Increase Efficiency
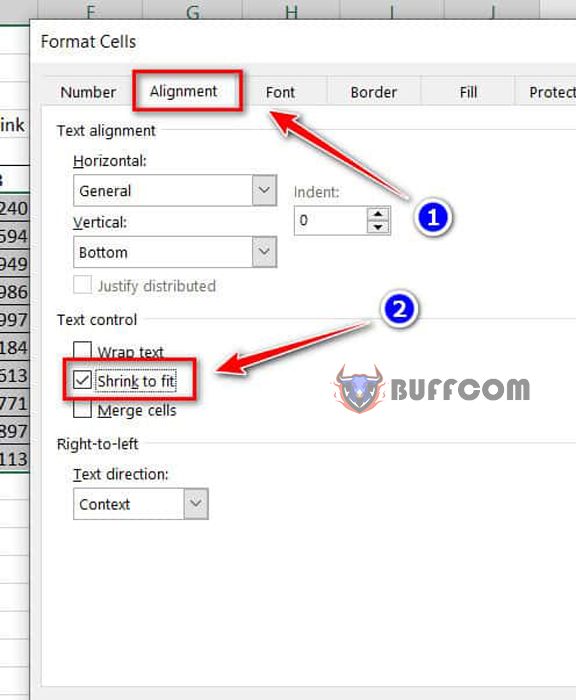
In the Format Cells dialog box, select the Alignment tab and then choose Shrink to fit in the Text control section. At this point, the content that previously could not be displayed will now be reduced in size and you can read it.
Automatically create a form:
10 Excel Tips to Help Office Workers Increase Efficiency
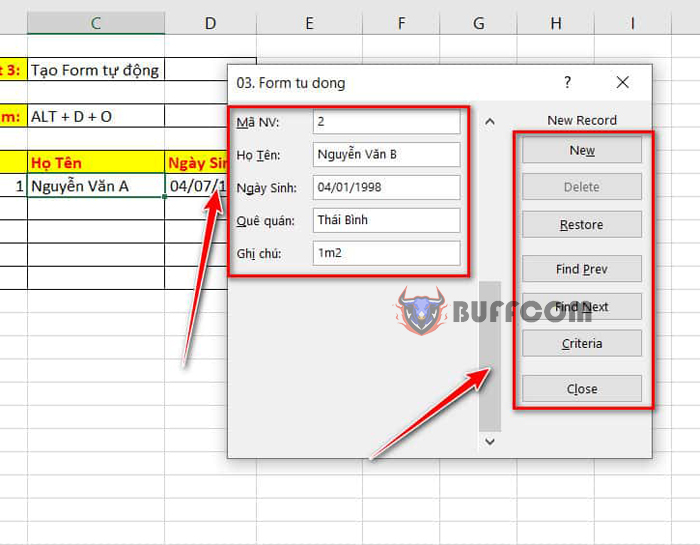
In case you need to enter a lot of data and don’t want to have to press arrow keys or tabs to switch between cells continuously, creating an automatic form is the best way to go. First, select a cell containing data in your table, then press the Alt + D + O key combination. Immediately, a dialog box named the current sheet’s name will appear. On the left column, you can enter the corresponding information with the headings in the data table, and the right column will be additional options such as add new, delete, restore, view data before and after.
Protect cells:
10 Excel Tips to Help Office Workers Increase Efficiency
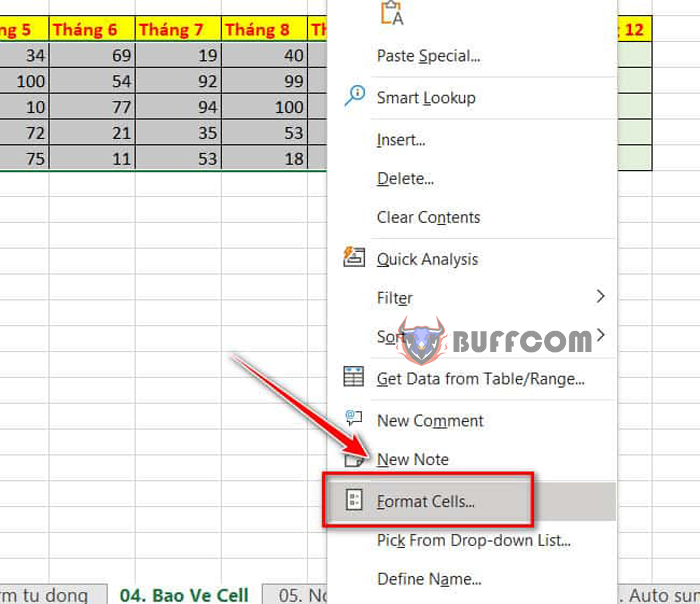
If you are a manager who wants to give an Excel file to your employees for data entry, but some cells should not be changed, use cell protection. Highlight the data range you want to protect, then right-click and select Format Cells.
10 Excel Tips to Help Office Workers Increase Efficiency
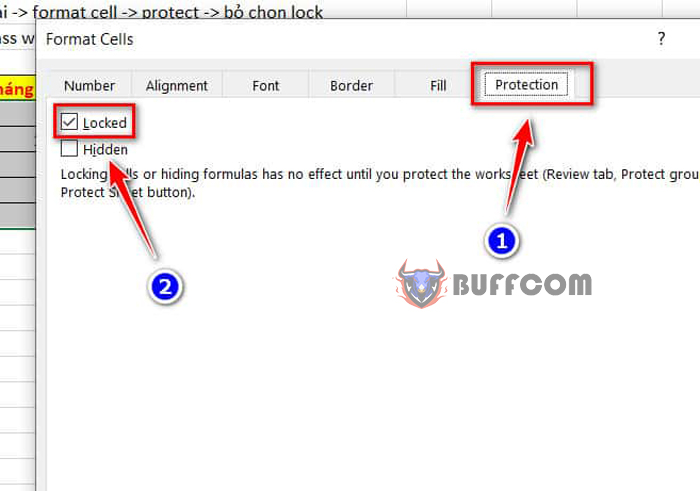
In the Format Cells dialog box, select the Protection option and click on Locked.
10 Excel Tips to Help Office Workers Increase Efficiency
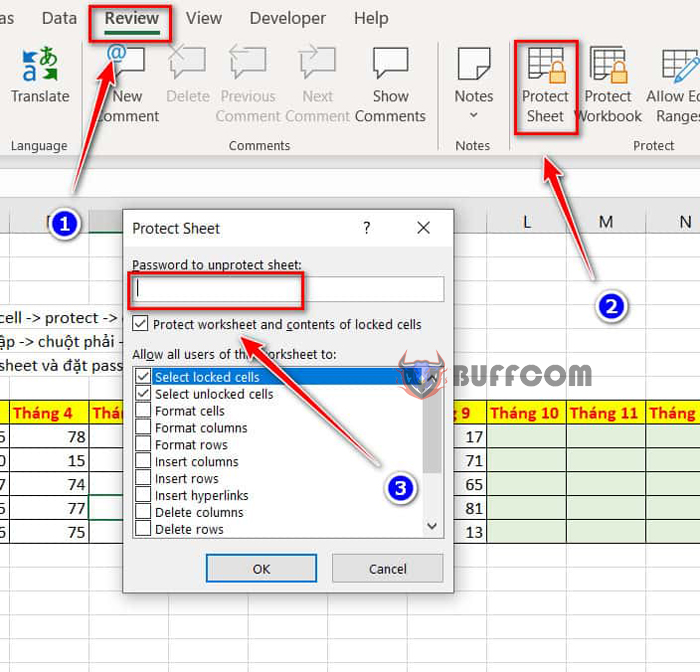
Finally, on the Review tab, select Protect Sheet. A new dialog box will appear, enter your password and click OK to execute the sheet protection. Note that the system will require you to enter the password again.
Prevent duplicate data entry:
10 Excel Tips to Help Office Workers Increase Efficiency
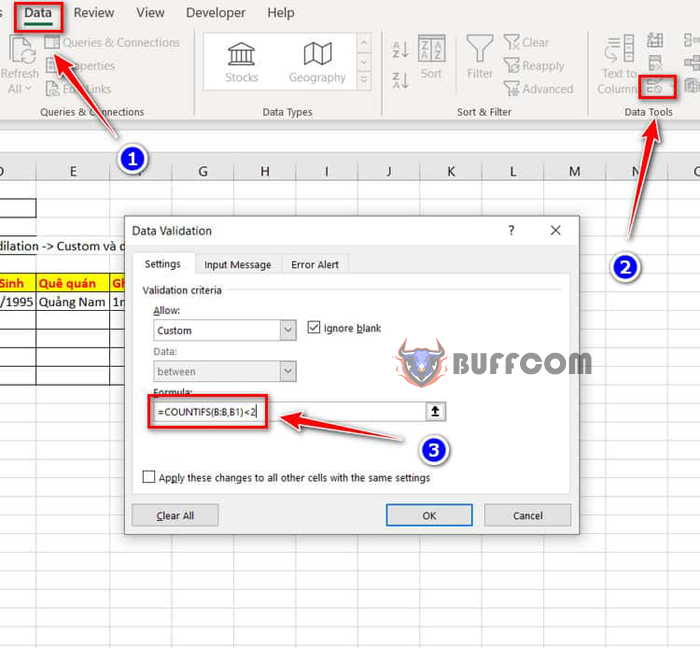
In data, there are some attributes that should not be duplicated, such as employee codes, identity cards, etc. To prevent duplicate data entry, first select the column containing that data, then on the Data tab, select Data Validation. In the dialog box that appears, in the Formula section, enter =COUNTIFS(B:B,B1)<2 (B is the name of the column you have selected) and click OK.
10 Excel Tips to Help Office Workers Increase Efficiency
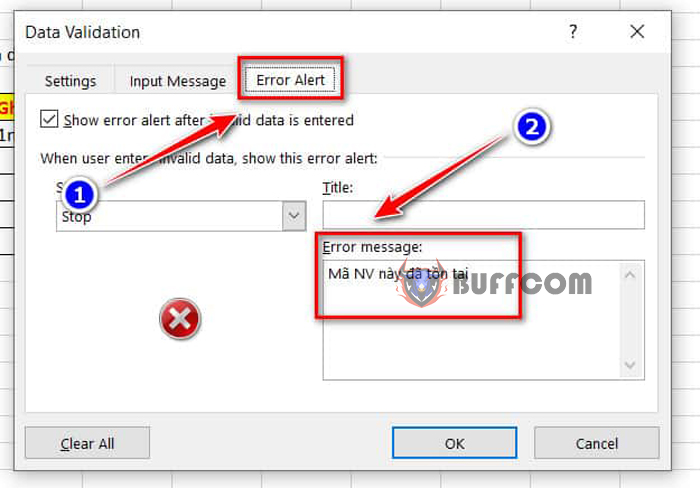
To change the error message when duplicate data is entered, switch to the Error Alert tab and enter the content you want to display when duplicate data is entered in the Error Message section.
Justify Feature
10 Excel Tips to Help Office Workers Increase Efficiency
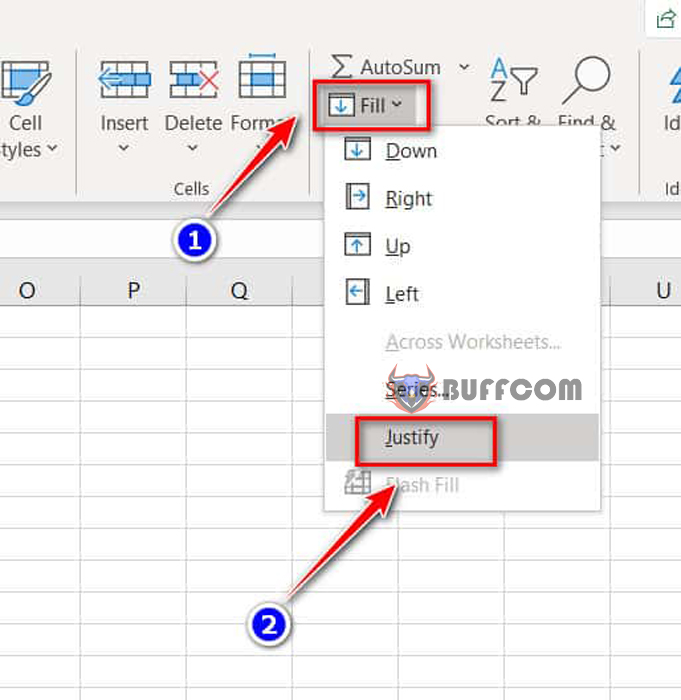
To wrap data onto the next line when it’s too long, select the data range you want to wrap (for example, if your data stretches from column A to F, but you only want to wrap to column C, select the data in columns A, B, and C), then go to the Home tab, select Fill, and then Justify.
AutoSum
10 Excel Tips to Help Office Workers Increase Efficiency
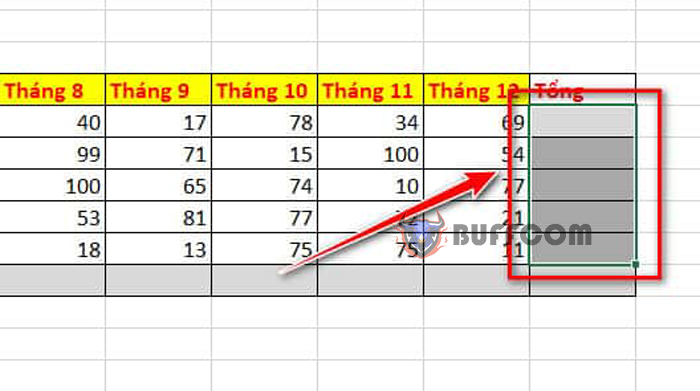
Another handy trick is to use AutoSum to automatically calculate totals from a table of data. To do this, simply select the data range you want to total and press Alt + =, and the system will automatically calculate the total for you.
Line Breaks in Cells
When entering data, you may sometimes want to insert a line break to continue typing, but pressing Enter will move you to the next cell. This is a common issue in Excel, but many people new to the program may not know how to do it. To insert a line break within a cell, simply press Alt + Enter, and then continue typing.
Quickly Switch Between Two Files
When working with two different Excel files, instead of scrolling down to the bottom of the screen and clicking to switch back and forth between the two files, you can use the Ctrl + Tab shortcut to quickly move between the two files.
Format Painter
10 Excel Tips to Help Office Workers Increase Efficiency
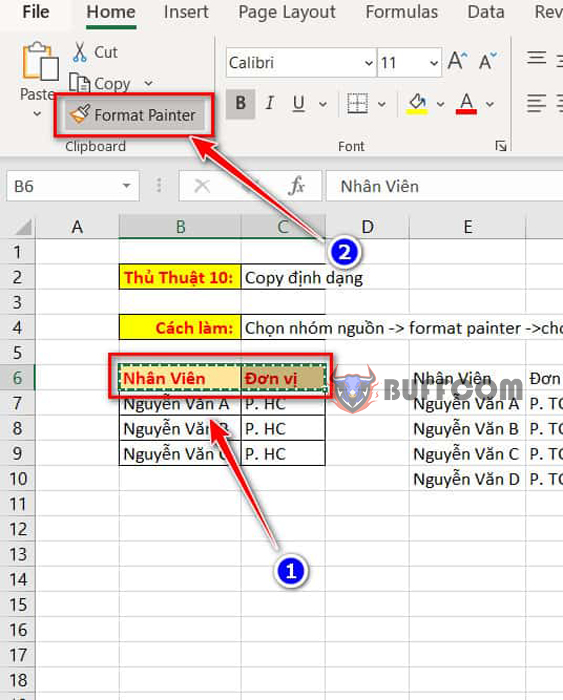
Finally, the Format Painter is a useful trick for copying formatting, and it is one of the most commonly used techniques. First, select the data range to copy the format, then go to the Home tab and select Format Painter. Next, apply the format of the selected data range to any cell by holding down the mouse button and dragging (like the highlighting action), and those cells will have the same format as the selected data range. Good luck with practicing!

![CreatinCreating A Diagram With SmartArt [Office 2013, 2016]](https://buffcom.net/wp-content/uploads/2023/03/Creating-A-Diagram-With-SmartArt-In-Word-150x150.jpg)
