3 Methods for Adding Months to a Date in Microsoft Excel

Are you looking to increase the number of months in a date using Excel? When dealing with time series data analysis, such as sales or stock trading, it becomes necessary to calculate time periods and utilize Excel’s Date and Time functions effectively. Fortunately, there are multiple techniques available in Excel for adding months to a date. This article will walk you through each method with detailed examples, enabling you to grasp the process easily. To facilitate your learning, you can obtain a copy of the sample workbook used in this post and follow along seamlessly!
Adding Months to a Date Using the EDATE Function
In Excel, dates are stored as serial numbers instead of the traditional day, month, and year format. These serial numbers begin at 1, representing January 1, 1900, and increase by one for each subsequent day. To add or subtract a specific number of months from a given date, you can utilize the EDATE function. This function returns the serial number that corresponds to the date which is a specified number of months before or after the provided date. The EDATE function is straightforward to use and enables you to perform complex date calculations effortlessly. It allows you to move forward or backward in time by any desired number of months. You can employ the EDATE function to determine maturity dates or due dates that align with the same day of the month as the issue date. The syntax for the EDATE function is as follows: =EDATE(start_date, months)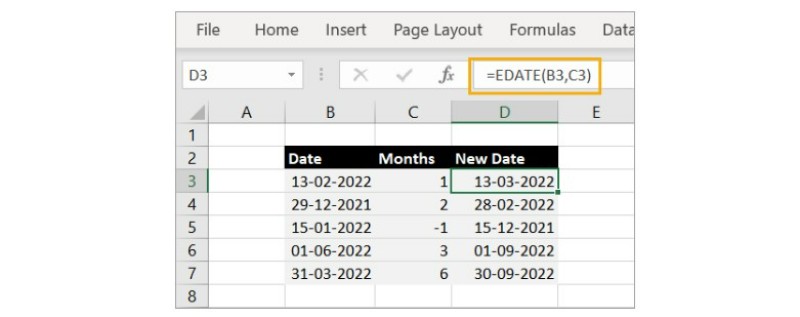
- start_date refers to the date from which you want to calculate the number of months before or after.
- months is an integer, positive or negative, representing the number of months to add or subtract from the start_date. If you provide a decimal number for months, the formula will ignore the decimal portion and consider only the integer value.
For example, you can use the formula =EDATE(B3, C3) if you have a date in column B and the number of months in column C that need to be added to the date. Apply this formula by clicking and dragging the fill handle to cover the entire column. By using the EDATE function, you can add the specified number of months in cell C3 to the date in cell B3. This method works effectively even when using negative numbers to subtract months from the date.
Adding Months to a Date Using the DATE Function
The DATE function in Excel is a powerful tool for calculating and generating dates. It offers various capabilities, including the ability to add, subtract, and compare dates, as well as create dynamic dates based on user input.
This function proves particularly useful when working with time-based data, such as determining the number of days between two dates or finding the day of the week for a specific date. Excel provides a range of formatting options to customize the output of the DATE function, enhancing readability and interpretation.
With its versatility and formatting capabilities, the DATE function is an invaluable resource for Excel users. It takes input in the form of year, month, and day components and returns the date as a serial number.
The syntax for the DATE function is as follows: =DATE(year, month, day)
- “year” represents an integer value for the year, which can consist of one to four digits.
- “month” is a positive or negative integer representing the month of the year, ranging from 1 to 12 for January to December.
- “day” is a positive or negative integer indicating the day of the month, ranging from 1 to 31.
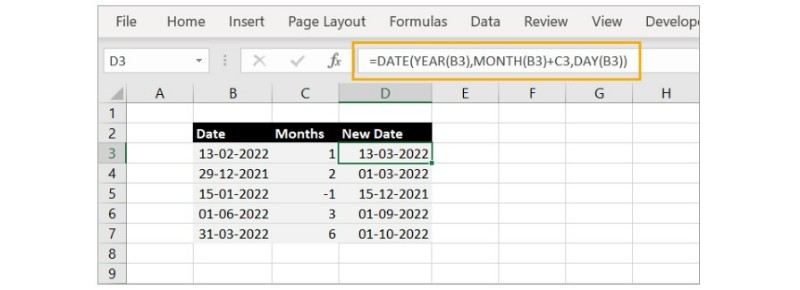
For example, you can use the formula =DATE(YEAR(B3), MONTH(B3) + C3, DAY(B3)) to add an offset number of months to the date in cell B3. Apply this formula by clicking and dragging the fill handle to extend it across the desired range of cells.
By utilizing the Excel functions YEAR, MONTH, and DAY, you can extract the respective components from cell B3. Then, add the offset number from column C to the value obtained from the MONTH function to obtain the new date.
Adding Months to a Date Using the Power Query Function
Power Query is a powerful data shaping tool that allows users to access, transform, and connect data in a flexible and efficient manner. It provides an intuitive interface for performing complex data mining and analysis tasks with ease. Power Query enables users to connect to multiple data sources, clean and transform data, and load it into Excel for further analysis. Additionally, Power Query offers the capability to add months to a date value.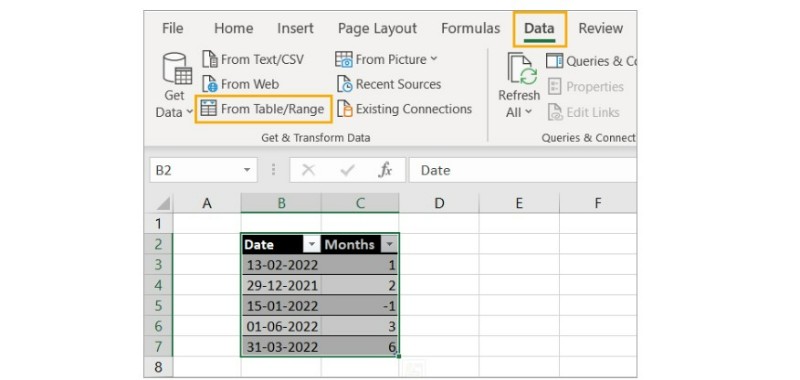
If you have your data in an Excel table, you can follow these steps to add months to a date using Power Query:
- Select your data.
- Go to the Data tab.
- In the Get & Transform Data group, choose “From Table/Range.” This will open the Power Query Editor window.

- In the Power Query Editor, go to the “Add Column” tab.
- Select the “Custom Column” option, which will open the Custom Column dialog box.
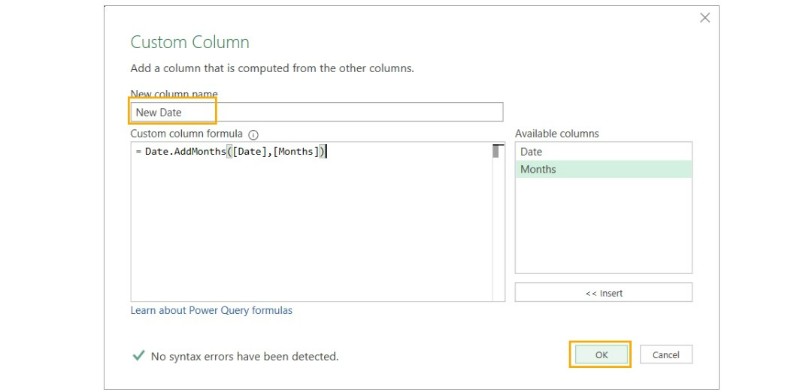
- In the “New Column name” input box, type “New Date.”
- In the “Custom column formula” box, enter the following formula: = Date.AddMonths([Date], [Months]) This formula utilizes the Power Query function Date.AddMonths to add the number of months from the “Months” field to the date in the “Date” field.
- Press the OK button to create the new column.

You will now see the new column, “New Date,” added to the Power Query table.
9. Select the “Home” tab.
10. Press the “Close and Load” button. Excel will close the Power Query Editor and display the Import Data dialog box.
11. Choose the desired option, such as “Existing worksheet,” and select an empty cell. If you want to import the data into a new worksheet, you can choose the “New Worksheet” option.
Press the OK button. This will load the new dates with the added months into Excel.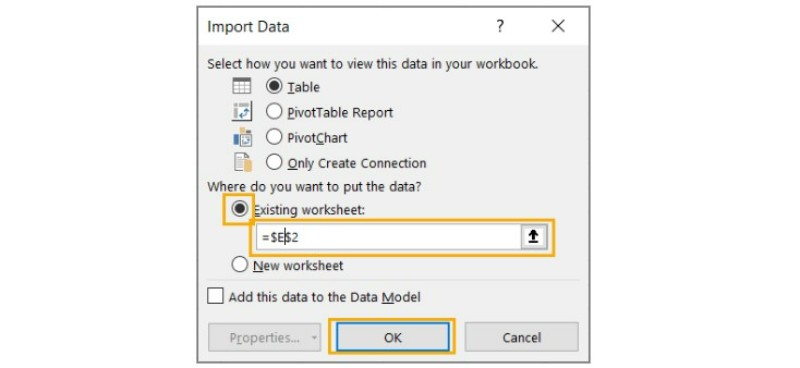
In conclusion, adding months to dates in Microsoft Excel can be done using the EDATE function or Power Query. The EDATE function provides a straightforward way to calculate dates by specifying the number of months to add or subtract. On the other hand, Power Query offers a comprehensive data shaping tool that allows users to manipulate and connect data from various sources, including adding months to date values. Mastering these techniques opens up new possibilities for analyzing time-based data. For more Excel tips and tutorials, visit Buffcom.net, your go-to resource for Excel and data analysis. Expand your skills and become a data powerhouse!


