The Latest Features In PowerPoint 2019 Compared To Previous Versions

Office 2019 brought many unique and innovative changes for users that had not been seen in previous versions. This is why PowerPoint 2019 also has many changes that make users amazed at the improvements and new features. So, what are the new features in PowerPoint 2019 compared to previous versions such as Office 2016? Let’s find out in this article on Buffcom.net!
Morph Transition
When talking about what’s new in PowerPoint 2019, the first feature that comes to mind is the Morph transition.
What is the Morph Transition Effect?
The Morph effect is one of the new slide transition effects in PowerPoint 2019. It allows users to smoothly and seamlessly transition from one slide to another, creating an attractive feeling for viewers. The Morph effect transforms the nature of shapes rather than simply fading or pushing them to another place like common transition effects.
The Morph effect is very flexible and can be applied to presentation slides to create motion effects for many objects such as text, images, SmartArt graphics, and WordArt.
However, Morph only looks good when the shape block in the two slides you apply the effect to have the same shape.
Steps to Set Up the Morph Effect
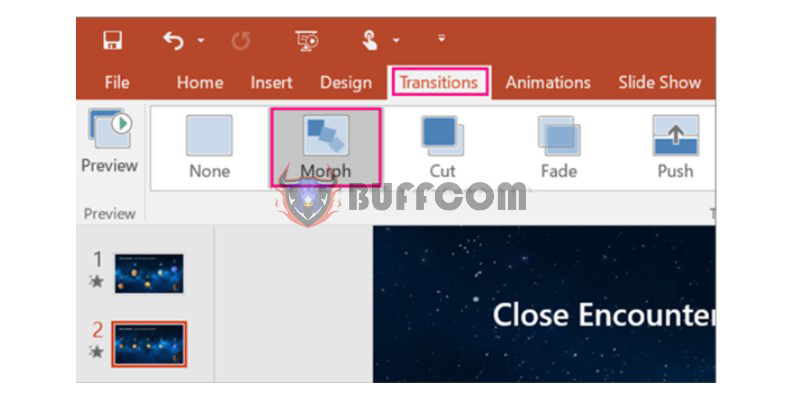
Step 1: In the Thumbnail pane on the left, click on the slide you want to apply, which is the second slide where you added the object, image or text you want to apply the Morph transition effect.
Step 2: On the Transitions tab, choose Morph.
 Note: In PowerPoint for Android, choose Transitions > Transition Effects > Morph.
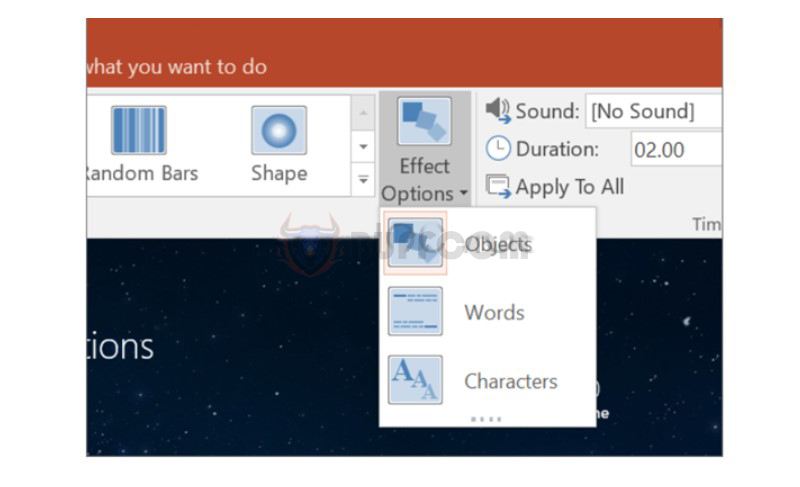
Step 3: Choose Transitions > Effect Options to choose how you want to apply the Transform transition.
 Step 4: Now click Preview to see the Morph transition effect on your slide.
Zoom For PowerPoint
The Zoom feature for PowerPoint allows users to move freely between slides to any page you want without interrupting your presentation, making your presentation more flexible. In PowerPoint 2019, there are three optional versions when Zooming:
Summary Zoom: You can use the zoom feature to go from one position to another in your presentation in any order you want.
Section Zoom: You can use them to return to the parts you really want to emphasize or to highlight how certain parts of your presentation are connected to each other.
Slide Zoom: helps you make your presentation more dynamic, allowing you to navigate freely between presentation slides in any order you choose without interrupting your presentation flow.
To use this feature, go to Insert > choose Zoom > choose one of the three Zoom options:
 Removing Backgrounds from Images Made Easier with Background Removal
This is a feature for removing image backgrounds that was already present in older Office versions, but in the updated Microsoft Office 2019 version, the Background Removal feature has been improved by Microsoft. For an image in an Office file, to highlight a theme or to remove distracting details, we can remove the background from it with freeform strokes instead of a rectangle like in previous versions.
Simple steps to remove background:
Step 1: Select the image you want to remove the background from.
Step 2: On the toolbar, select Format > Remove Background or Picture Format > Remove Background.
 Step 3: The default background area will be marked with bright red color to indicate it for removal, while the foreground will retain its natural color.
Step 4: If the default area is not accurate, go to Background Removal > Picture Tools and make adjustments using the Mark Areas to Keep tool to add the parts that need to be retained or the Mark Areas to Remove tool to remove unnecessary parts.
 Step 5: When finished, select Keep Changes to save the changes, or Discard All Changes to cancel all previous changes. The result you get will surprise you:
 To save the image in a separate file for later use, right-click on the image and select Save as Picture. Here are the images before and after performing the background removal function.
Exporting to 4K Video Quality (Export To 4K)
Once you have completed your presentation content, inserted all necessary audio and objects into your slides, you need to convert PowerPoint to video.
With the 2019 version, you can export to 4K video quality that was not supported in previous versions – a new feature in PowerPoint 2019 that cannot be overlooked. By converting directly on the software interface, you will ensure that the exported video is sharp, high-quality, secure and safe.
Removing Backgrounds for Images Made Easier with Background Removal
This is a feature that was already available in earlier versions of Office, but in the updated Microsoft Office 2019, the Background Removal function has been improved by Microsoft. For an image in an Office file, to highlight the subject or remove distracting details, we can remove the background from it using freehand strokes instead of a rectangular shape like in previous versions.
Steps to Export to 4K Video Format are Quite Simple:
Step 1: Go to File > Export > Create a Video > select Ultra HD (4K) > click Create video.
Step 2: The Save as dialog box appears, name your file and select the output format as *.mp4 or *.wmv, then click Save and wait for the program to finish exporting.
Drawing and Writing with Digital Ink
The Draw tab allows you to easily create freehand strokes and format them as desired. This is a new prominent feature in PowerPoint 2019.
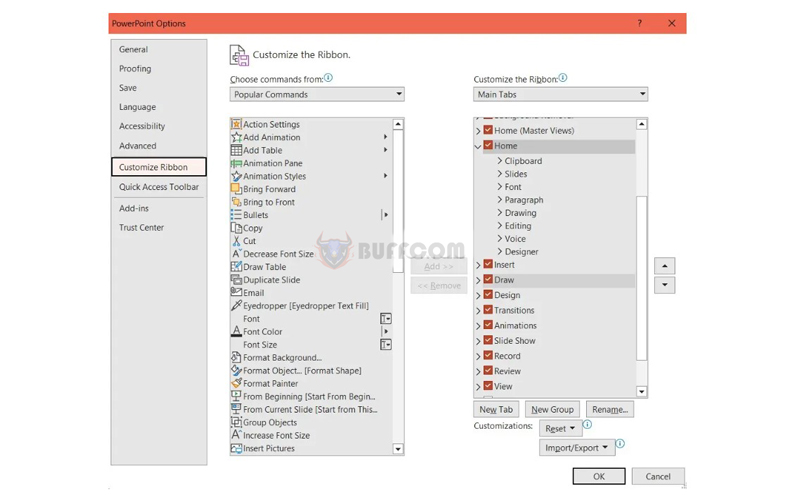
However, by default, this tab does not appear on the Ribbon, so you need to customize it in the Options section of the program to make it visible by selecting File > Options > Customize Ribbon > Draw.
 Some notable features in the Draw tab that have been improved in PowerPoint 2019 are:
Draw: drawing tool.
Eraser: eraser tool.
Lasso Select: selection tool.
Pens: a group of pen tools used when you have selected the drawing tool.
Add Pen: add additional pen tools.
Ruler: ruler tool.
Ink to Shape: convert freehand drawing objects to shapes.
Ink to Math: convert freehand drawing objects to math equations.
When you select the Draw tool, the program will automatically select one of the pen tools in the Pens group. Click on the icon to adjust the thickness, color, effects, etc.
When you select the Ruler tool, a ruler bar will appear in the middle of the page as shown in the image below. You can then use it to draw straight lines or align objects on the slide.
 Conclusion on New Features in PowerPoint 2019 Update
So in this article, Buffcom.net has updated you on some new features in PowerPoint 2019, including:
Morph transition effect
Zoom in PowerPoint 2019
Improved Background Removal for easier removal of image backgrounds
Exporting high-quality 4K videos (Export to 4K)
Writing and drawing with Digital Ink
Hopefully, the article has helped you stay updated on what’s new in PowerPoint 2019. In addition to the above features, there are many other features as well. If you want to get the full version with all the features, contact Buffcom.net for support!


