How to Uninstall Windows 10 Update from CMD or Settings

Windows 10 automatically downloads and installs any available updates. Although you can temporarily pause updates when necessary, there are still limitations. Your computer may encounter issues if the latest update has problems or if your PC’s software and hardware are incompatible. In such situations, the best approach is to log in to Windows and uninstall the problematic update.
For less technically inclined Windows 10 users, finding the system update uninstall option can be challenging as it is deeply hidden within the Control Panel. Additionally, in unfortunate cases, the computer may not boot into Windows and instead keep restarting. If you encounter this issue, you’ll need to boot your PC into Safe Mode to uninstall the update. However, you can rest assured that both of these scenarios have detailed instructions on how to troubleshoot in this article.
Uninstalling Windows 10 Update from the Settings App
The Settings app hasn’t completely replaced the previous Control Panel, but it includes most of the features we need. You can use it to find and uninstall the Windows 10 update.
Step 1: First, press the Windows shortcut key to open the Settings app.
Step 2: In the newly opened window, click on “Update & Security” and then select “Windows Update.” On the right-hand panel, click on the “View update history” button.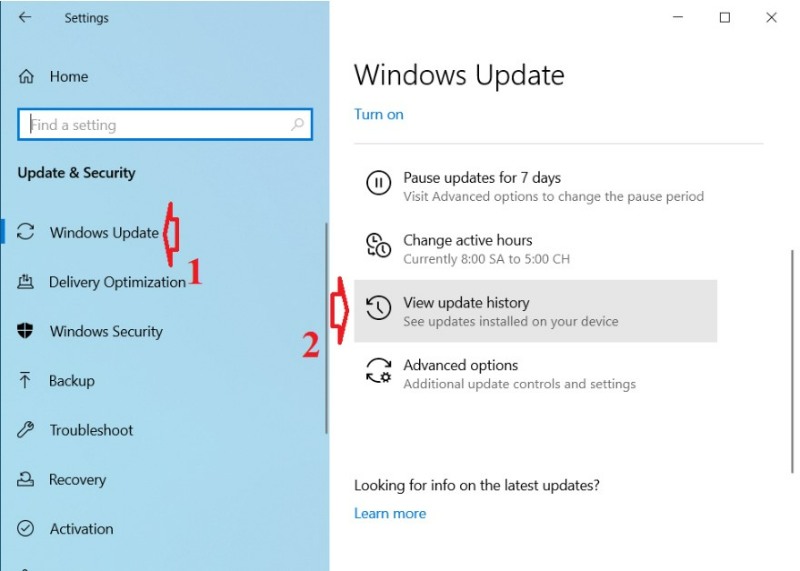
Step 3: In the next page, click on the “Uninstall updates” link that appears at the top.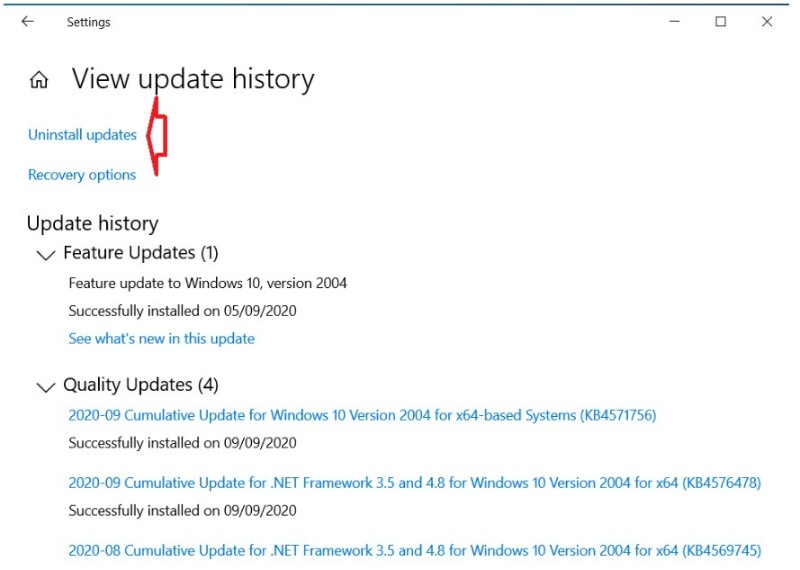
Step 4: A new window will now appear. Locate the update you want to uninstall, select it, and click on the “Uninstall” button that appears on the top options bar. You can sort the updates by installation date by clicking on the “Installed on” column.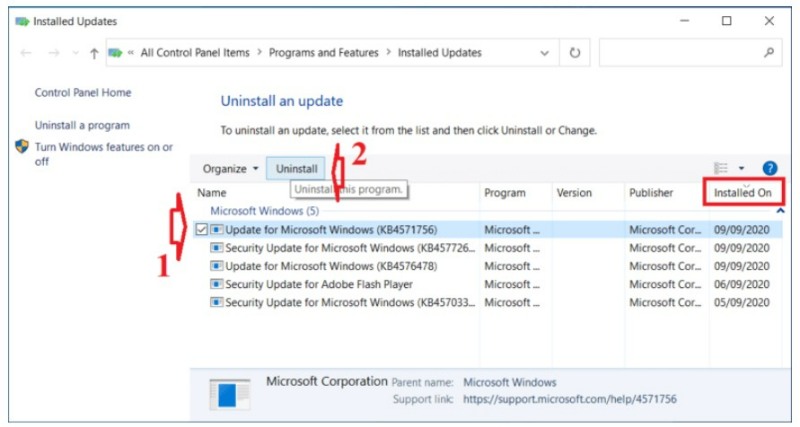
The uninstallation process will now begin. Depending on the update, you may have to follow on-screen instructions, but it is relatively straightforward.
Step 5: After the uninstallation is complete, click on the “Restart now” button to reboot Windows.
Note that you cannot uninstall feature or security updates. You can only uninstall the latest quality updates.
Using Command Prompt (CMD)
You can also use the Command Prompt to quickly uninstall Windows updates. There are two main steps in this method. First, you need to know the actual update’s KB number. Since each update has its own KB number, you can use this number to accurately uninstall the update.
Step 1: First, open the Start menu => type “Command Prompt” => then click on the “Run as administrator” option.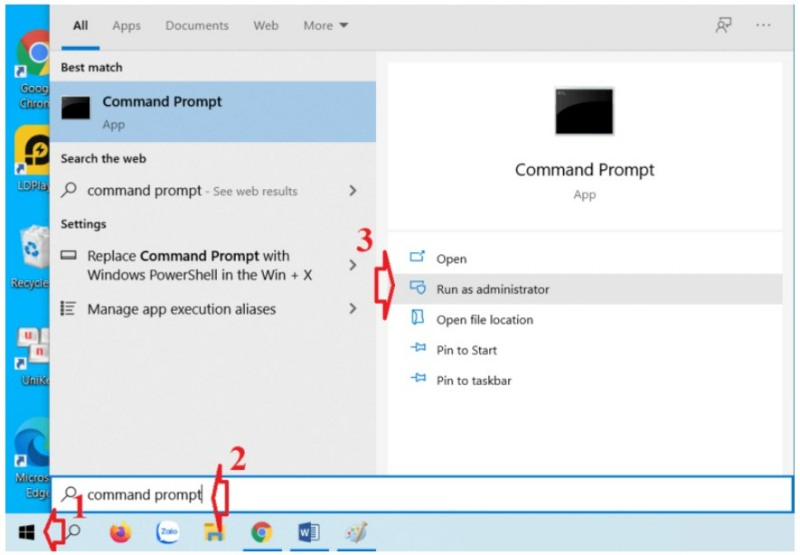
Step 2: After opening the Command Prompt, execute the following command (press Enter after entering the command) to list all installed Windows updates: wmic qfe list brief /format:table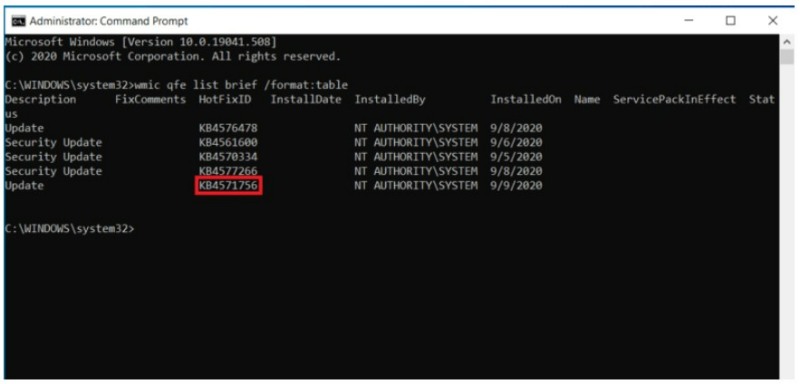
Step 3: From the list of updates, note down the KB number of the update you want to uninstall (usually the most recent one). You can find the KB number in the “HotFixID” column. For example, if I want to uninstall the latest update, I copied the KB number “4571756.”
Step 4: Once you have the KB number, use one of the following commands to uninstall the target update. Note: Replace <UpdateIDNumber> in the command with the KB number.
Without automatic restart (you should manually restart): wusa /uninstall /kb:<UpdateIDNumber> /quiet /norestart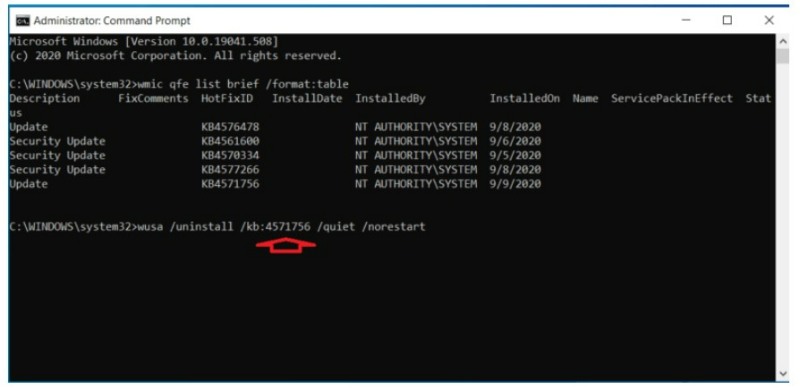
With automatic restart: wusa /uninstall /kb:<UpdateIDNumber> /quiet /forcerestart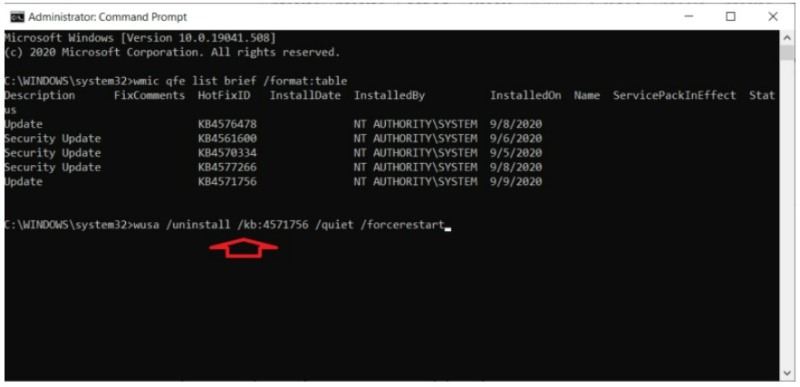
Depending on the update, you may see a warning prompt. Click the “Yes” button to proceed with the uninstallation process.
Uninstalling Windows Updates in Safe Mode (Unable to boot into normal mode)
If you are unable to boot into Windows, the above methods will not work. In that case, you can boot into Safe Mode and uninstall the problematic Windows update from there.
Step 1: First, boot your computer into Safe Mode. While your PC is booting, simply turn it off, then try restarting and turning it off again. Do this three times, and Windows will display the recovery screen. Here, select Safe Mode, and the system will boot into it.
Step 2: Once you’re in Safe Mode, open the PC Settings app using the Win + I shortcut and navigate to the Update & Security page, then select Windows Update.
Step 3: On the right-hand side panel, click the View Update History button.
Step 4: On this page, click the Uninstall Updates link at the top of the window.
Step 5: In the Control Panel, select the update you want to uninstall and click the Uninstall button (or right-click on the update and select Uninstall).
Step 6: Follow the instructions to uninstall the update. Once done, restart Windows, and your computer will operate normally.
Conclusion
As you can see, although the steps may be a bit lengthy, uninstalling Windows 10 updates is relatively straightforward. We hope this guide helps you. If you encounter difficulties or need assistance, please leave your comment below. Wishing you success with the process!


